Saturday, November 29, 2014
It's Saturday!
As a thank you to all our awesome readers we're really excited to make you an awesome deal! For Small Business Saturday we're offering ALL our PDF patterns at HALF PRICE! That is wholesale friends!!! Use the code SMALLBIZ at checkout. Take a look around our shop and find a pattern or two!!


Friday, November 28, 2014
Black Friday DEALS for YOU!
Southern Fabric is 25% off or more on the entire store. 25% off all full priced items discount given at checkout and hundreds of markdowns for up to 50% off.
Fat Quarter Shop will have 25% OFF the entire store for 2 days only!
Starting on FRIDAY, November 28th at 12:01 am CST until SATURDAY, November 29th at Midnight CST.
*Terms: Coupon code not required, product prices will show at marked down price. Offer excludes clubs, programs, pre-orders and purchase of gift certificates.
Mad About Patchwork is having a Handmade for the Holidays sale November 28 – December 7. We’ve been busy making samples and kits for simple gift ideas that can still be made in plenty of time for the holidays. Along with the kits, all notions (rulers, thread, interfacing), pre-cut charms and rolls, flannel and fleece are on sale. Everything you need to get sewing for Christmas! All 15% off with the coupon HANDMADE until December 7.
All purchases over $60 will receive a bonus gift, a one-of-a kind handmade pincushion with the Mad About Patchwork label.
And in the holiday spirit of giving, Mad About Patchwork is donating a portion of all sales from November 28 – 30 to The Snowsuit Fund. The Snowsuit Fund is an Ottawa-based charity that raises funds for the purchase and distribution of snowsuits to needy children in the community. Have fun shopping and help keep a child warm this winter!

Tuesday, November 25, 2014
Christmas Mini and Fabric Tuesday #212
Welcome to Fabric Tuesday! Today I have a mini quilt I've been working on for the last few weeks or so:
These stars are from Celestial Pattern by Alison Glass. Using the stars in the pattern I came up with a festive mini! I plan to hang it next to my tree. Originally I was thinking of a pillow but I changed the design halfway through :)
The fabrics are Alison Glass' from her Christmas Bundle.
There are a few different stars to use in the pattern. They're paper-pieced (don't be scared! Fun and easy!). You can either make the pattern or use the stars in lots of other fun ways!
There will be a link-up and giveaway on the Alison Glass blog. You will have until December 10 to share a completed project using Celestial for a chance to win a signed copy of Alison Glass' book and a $25 gift certificate to her shop. And, during the gift along, the Celestial pattern is $1 off and includes free shipping.
In addition, we'll have folks share their progress on Instagram using #celestialgiftalong where we'll be picking one winner each week for a pattern of their choice. Wahoo! So grab the pattern, I'd love to see what you make with it!
Fabric Tuesday!
Your turn to share!! Link up a recent project using FABRIC!

Tuesday, November 18, 2014
Fabric Tuesday, come on and link up!
As always, I am so inspired from all the projects from last week. I have finished some projects myself, hopefully I can get a few posted this week. I also attended an awesome quilt retreat in Hobble Creek this last weekend. I had so much fun!!! A few projects that caught my eye....


This awesome quilt "royalty" from My Quilt Infatuation. So neat!

Porch Swing quilts with her second quilt pattern, cuteness!

Paula from the Sassy Quilter never disappoints. Love!

This quilt really caught my eye in the thumbnail. Just cute and pretty! From Farm Road Quilts.

Sweet pillow, sweet colors. Love this! From Modern Parti Quilts.

Friday, November 14, 2014
Whimsy Houses 2
Hello Friends! I thought I'd share some of my latest creations that I'm selling on our @inkandbobbin account (on Instagram).
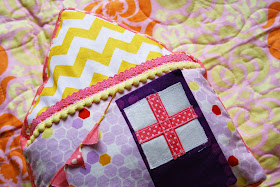
I made my first house pillow for Lucy's first birthday. She was so in love with it I decided to make a couple different versions for sale.
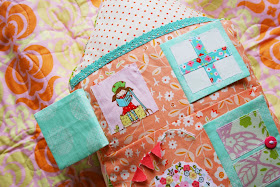
I have mini pillows that feature a door that opens and closes with cute little fussy cut scenes.
Each house had different fabrics and details. No two are the same!
Then I offer a larger size. These pillows have a door and two windows, also with little fussy cut scenes behind each opening.
Lots of little details make these super sweet and fun to make! I love trying new ideas!
If you or someone you know may like one of my pillows follow our @inkandbobbin account on Instagram for the next sale!
Thanks for stopping by, have a great weekend!!

Wednesday, November 12, 2014
Gigi's Thimble, Vintage Vibe blog tour...
Our friend Amber from Gigi's Thimble wrote a book!!! It's called Vintage Vibe. We are lucky enough to be part of the blog tour. I took this from Amber's site, but make sure to follow along. Schedule at the bottom of the post. Lots of fun people creating lots of cute items from her book. Congrats Amber!!
Well, it's about that time folks.
My new book, VINTAGE VIBE is shipping to stores any day now!
So, let's have some fun, shall we?
It's time for a VINTAGE VIBE Blog Tour!!!
Amber's first project in the book is called Skipper.

Here she did some cute girl version blocks. Love!
I've been dying to see what this pattern would look like made up in some girly fabrics from my stash. And well, I think it works. Don't you?
I started making these the other day and I didn't want to stop! My little pile of Skipper Blocks kept growing and growing! Now, I'm just trying to decide if I need to make a whole other quilt...or just a table runner? Hmmm. Decisions, decisions...
Here's the schedule:
11/6/14 - Amber @ http://www.alittlebitbiased.blogspot.com/
11/11/14 - April @ http://www.aprilrosenthal.com/
11/13/14 - Jessie @ http://messyjessecrafts.blogspot.com/
11/18/14 - The Fat Quarter Shop @ http://fatquartershop.blogspot.com/
11/20/14 - Corey @ http://www.littlemissshabby.com/
11/25/14 - Sherri @ http://www.aquiltinglife.com/
12/2/14 - Jodi @ http://www.pleasant-home.com/
12/4/14 - Melissa @ http://www.happyquiltingmelissa.com/
12/9/14 - Pam @ http://pamkittymorning.blogspot.com/
12/11/14 - Heather @ http://quiltstory.blogspot.com/
12/16/14 - Andy @ http://www.abrightcorner.com/
12/18/14 - Amy @ http://www.diaryofaquilter.com/
12/23/14 - Melissa @ http://www.polkadotchair.com/
12/30/14 - Lori @ http://beeinmybonnetco.blogspot.com/
P.S. For those interested,
you can get your autographed copy of VINTAGE VIBE HERE :)

Tuesday, November 11, 2014
Fabric Tuesday is ON!
Hi friends!! I'm SUPER late!
I wanted to quickly share a bag I made for Heather and then we'll jump into fabric Tuesday!
We make eachother handmade gifts every year. This was her Christmas gift 6 months late (or early?!). I found the pattern on Craftsy. It's really big, which is what I wanted! I used Jennifer Paganelli fabrics since they're some of her favorites!
Fabric Tuesday #210
Let's see what you're working on!

Friday, November 7, 2014
Lucy's Fancy Cape!
I made Miss Lucy a cape. She didn't have a "formal" coat (for all her fancy engagements of course) and I just knew I had to use Michael Miller Glitz to make her a cape!
There will be LOTS of pictures and little how-to.
Like a boss!
How to make a cape (this is not a tutorial as I didn't take photos as I went but I will be happy to answer any questions!)
This will fit a little girl up to about size 7 or maybe more! You'll adjust the length and neck as needed for your princess.
MATERIALS
1.5 yards of cotton fabric (I used Michael Miller's Glitz)
1.5 yards of minky
1 button
The bottom of the cape is a circle. Keep this in mind when choosing fabrics as directional prints will end up sideways and upside down.
THE CAPE
The bottom of the cape is a circle skirt. Get your measurements HERE on MADE. She has the numbers and a diagram to get the numbers you need. To establish the radius I measured a collar of Lucy's. Do not add any additional numbers (remember her measurements are for a skirt) as we do not need a gather or anything. The cape opens and closes with a button so it does not need to fit over their heads. For the length I did as long as I could, around 19".
Cut the circle from both fabrics. Going back I would probably NOT make it a full circle. I would do anywhere from 1/2-3/4 skirt. It is so full she gets annoyed that she can't easily pull out her hands. When it's actually cold outside (as it isn't too cold yet) I don't think she'll mind as it's like a blanket!
Lay the pieces together, choose a spot and cut a straight line from the neck (radius) to the outside. If you didn't make a full circle you already have an opening. With the right sides together sew together, from the neck of the opening to the outside, all the way around the bottom of the circle (IMPORTANT leave a 4"-5" opening somewhere along the bottom of the circle, we will close this later), and back up the other side to the neck opening. LEAVE THE SEAM AROUND THE NECK OPEN. Set aside to make the hood.
THE HOOD
For the hood I used my 5 year old sons coat hood as a pattern. I used his because I wanted the hood to be more full and loose. You could use any hood you have on hand and adjust a little larger or smaller as needed.
I laid the hood flat and simply traced around it onto pattern paper. Around the neck I extended it down a little further so I had excess to sew it into the cape.
Fold your fabric in half (they need to be opposite directions so just fold it!) and use the pattern to cut 2 of the outside print and two of the minky. It took a little brain power (and a seam ripper) when I was sewing it together but I figured it out! Take the outside pieces, right sides together and sew down what will be the center or middle of the hood. Repeat for the inside pieces.
Place the outside hood piece into the inside hood piece, right sides together. Then sew together the front (the seam around the face). Turn it right side out and press. The bottom of the hood should be open.
It is VERY twirl-able!
And super cozy.
FINISHING UP
With the cape still inside out and the hood right side out, place the hood inside the cape at the neck and pin. Have the outside cape fabric facing the outside hood fabric (and thus the inside fabrics facing each other). Sew around the neck seam to close it. Turn the cape right side out from the 4"-5" gap left when stitching the cape together.
Press the whole cape nice and crisp. Top stitch around the whole cape (closing the gap as you go). I stitched around the entire cape again about 2" in. You can see this on the button picture above. Minky is so slick I wanted to stitch again to stabilize it all better.
Attach the button!
How many questions do you have? Lol! Leave them in the comments and I will answer in the comments as well as add it to the post (if necessary).
Read the instructions first. But I do find that when I read the directions for anything I'm confused. Once I start creating whatever it is, it is so much easier to follow when I actually have it in front of me, makes a lot more sense.
I adore this girl. Look at her sweet face!!
Our backyard in Virginia sure made a great backdrop for a cape.
Can you spy her?!
Thanks for indulging me with all my photos!
Thanks for stopping by!!


