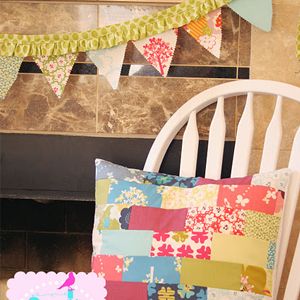
Amber is our cute little friend we met at market a couple years ago. We have become friends since. I am in love with this pillow she created for us this year, just sweet and fun! Amber has a great blog, A little bit biased, where she shares all her darling projects. She is also a pattern designer, her business is Gigi's Thimbles, and she sure whips up some cute quilts. I really love her latest one, Twisted. Anyhow, we are really happy she did another tutorial for our series this year, her Christmas runner from last year, is still quite a popular post. Thanks Amber!
Hello! It's Amber here from the blog A Little Bit Biased (and Gigi's Thimble quilt patterns). I'm so glad Heather and Megan asked me to come back for their annual Holiday Tutorials series. I was here last year with my Holly Berry Table Topper and this year I've got a coordinating pillow cover to go along with it!
I'd like to introduce you to my Holly Berry Pillow Cover tutorial.
It's super easy and no fuss. Perfect for the holidays!
So here's what you'll need:
(1) 18" pillow form
1 yard of beige duck cloth
1/8 yd. of burlap
1 fat quarter of green wool (felted)
3 red bells (I got mine at Hobby Lobby)
fat eighth tan ticking fabric for tag
red Perle cotton
1 button
1 needle
water soluble marker
freezer paper
Shall we get started then???
First, from the 1 yard of beige duck cloth, follow the diagram below to cut the 3 main pieces of the pillow cover (one 19" square for the front of the cover and two 19" x 16.5" pieces for the back).
Now, before we get going on decorating the front of the pillow cover, I want to share with you a little trick I learned to help make a pillow cover fit just right:
Use a water soluble marker to make a mark (on the wrong side of your fabric) at 1/2" and 4-1/2" from each corner of the square piece of duck cloth. Draw a line, beginning at the edge of the fabric at the 4-1/2" mark on one side of your square and ending at the edge of the fabric at the 1/2" mark on the next side. Later, we will cut along these lines to give our covers a slightly sloped shape in the corners (we will do the actual cutting right before we sew the back pieces to the front because this fabric tends to fray). Cutting off these corners will help to eliminate the emptiness that can occur in a "fitted" pillow cover.
Follow this same process on just two of the corners of each of the two 19" x 16.5" pieces.
Then it will be time to hem the opposite sides of the 19" x 16.5" pieces to make the envelope enclosure on the back of the pillow. To do this, you will need to draw a line along the edge of the two sides that don't have the corner cutting marks on them - 2" in from the edge - with a water soluble marker.
Fold the edge of the fabric (with wrong sides together) onto that line. Press to get a nice, crisp edge.
Fold over one more time to hide those raw edges. Press again.
Top stitch this hem down, 1/8" and 7/8" in from the folded edge. Use matching thread. Set these two pieces aside.
Now, it's time for the fun part! Time to decorate the front of the pillow!
First, cut a 2" x width of fabric strip of burlap. Cut it in half so that you have two pieces that are 2" x 22".
Center one strip onto the front of the square piece of duck cloth. Pin in place and stitch along both of the long edges using a 1/4" seam allowance. Do not trim off the excess burlap yet - wait until the front of the pillow cover is completely finished.
Repeat with the second strip.
Next, trace the holly leaf template onto the paper side of freezer paper - 3 times. Roughly cut out the leaves and carefully iron onto the green wool (use a medium-low heat setting).
Cut the three leaves out and peel off the paper. Pin the leaves in place onto the center of your pillow cover.
Stitch around the leaves using coordinating thread (I just did a straight stitch about 1/8" in from the raw edge but you could do any kind of stitch you like!)
Attach the three red bells to the center of the holly leaves using red Perle cotton.
Then it's time to make the tag. To do this, trace "To: and From:" onto the tan ticking fabric. Embroider over the words with red Perle cotton.
When you're finished embroidering, take the fabric out of the hoop. Cut it into a tag shape that it 3" x 5".
Layer it on top of a piece of fusible fleece (or batting) and another piece of ticking fabric. The fusible fleece (or batting) should be between the two pieces of fabric and the right sides of the fabric should be facing out. If you're using fusible fleece then iron the three layers together. Sew around the raw edges using an 1/8" seam allowance. Then trim off the excess fleece and backing fabric.
Attach the tag underneath the bells using a button to secure it in place.
Now your pillow front is complete.
Trim the excess burlap...
You can trim off those corners now too :)
With right sides together, layer the two back pieces and the pillow front together. Make sure the hemmed back pieces over lap. Pin around the raw edges and then sew together using a 1/2" seam allowance.
I reinforced the corners by stitching around them one extra time.
Then trim off the excess leaving an 1/8" seam allowance.
Turn the pillow cover right side out. Your pillow cover may need a little pressing now ~ just be careful to go around the embellishments and keep the heat setting on medium-low. Stuff your pillow form in (you may want to use a lint roller now too, to get rid of any loose fibers from the burlap).
And voila! You are finished!
I hope you liked this tutorial.
I think this pillow will go quite nicely with my Holly Berry Table Topper from last year (so be sure to check that out!) Thank you Megan and Heather for having me here today! I had a great time :)
♥ Amber



























5 comments:
I love this pillow. I'm not one to do pillows, but I think I will have to do this one! Thanks
Such a cute pillow! I love the simple yet effective design =D
Super cute Christmas runner! Thanks!
Must make one immediately!
Lovely pillow. I would love to invite you to join me in my blog for christmas pillow linky party. Please come and join me. Thank you
Post a Comment