Thanks for joining us for the 2nd edition of Holiday gift Tutorials. Make sure to come back each and every Monday for a new tutorial from all of these fabulous designers...
November 7th: Amber from A Little Bit Biased Tutorial: Holiday Table Topper
November 14th: Quilt Story :)
November 21st: Bev from Flamingo Toes
November 28th: Corey from Little Miss Shabby
December 5th: Jeni from In Color Order
December 12th: Melissa from Happy Quilting Melissa
December 14th: Gentri from Little Lulu's Nest
December 19th: Erin from Why Not Sew?
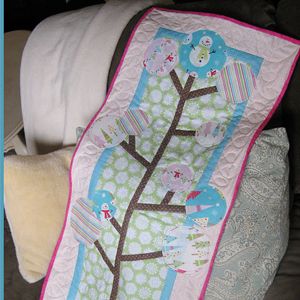
Today is our tutorial! Megan so kindly did this super cute runner with tutorial for all of you! I LOVE it!
Each year Megan, me and our older sister Amy make gifts for each other for Christmas. We will be sure to share what we made and received for each other.
On to the tutorial...
 Heather and I are many things, but when it comes to our crafts, one of those things is not humble. How cute is that runner? And even better, you can make it, and we'll show you how!
And what else is great? Choose fabrics accordingly and this can last you all winter, or it can be a spring runner. Endless possibilities I tell you.

To start, materials needed:
*1/3 yard green fabric for center
*1/4 yard aqua fabric for sashing
*1/2 yard pink fabric for border
*3-5 Fat Quarters for circles
*3-5 Fat Quarters for circles
*1/4 yard brown fabric for tree
*1/2 yard hot pink fabric for binding
*2/3 yard for backing
 I totally dropped the ball here, there is no photos of me putting the background together. BUT you can do it! If you can read, sew straight and iron, you can make this, promise.
STEP 1: Start with 1/3 yard green fabric for center, using a rotary cutter, board and ruler, cut the piece to measure 10.5" x 36.5". Then cut 1/4 yard aqua fabric for the sashing into 1.5" strips.
Finally take 1/2 yard pink fabric for border and cut it into 3.5" strips.
STEP 2: Using the aqua 1.5" strip, match up to one side of the green center fabric. (You will have a good amount of sashing hanging off one end). Sew together, trim to match and press. Repeat on opposite side and then top and bottom.
Step 3: Repeat step 2 using the pink 3.5" strips.
Step 4: Make 75" of 1" bias tape using the 1/4 yard of brown fabric for tree.
Now, I used a bias tape maker that you can get at most fabric stores, I got mine at JoAnn's. It is cheap and easy, you feed fabric through one side and it come out the other where you starch and iron it, and then the ends are turned in! Ta-da! You could also make your bias tape using a fusible web (we'll use that on the circles in a minute) or you can purchase it.
 Step 5: Using the main picture at the top as your guide, cut and place the tree and branches to your liking. The length of the main part of my tree is 33". Using a temporary hold glue, I used Aileen's from WalMart, paste it in place. Sew all the way around your tree and branches with invisible thread (my preference) using a tight zig-zag stitch.
 Time to make circles! I've uploaded the template I used here, there is a 5" circle (cut 3), 4" circle (cut 4) and a 3" circle (cut 2).
Step 6: It is a good idea to make temporary circles from printer paper as a trial to make sure you like the size and placement, like below in photo 1.
Step 7: Using my template or your own, trace three 5" circles, four 4" circles and four 3" circles onto the paper side of the fusible web. (I used Heat n Bond lite found hanging next to the sewing notions at WalMart.) See below photo 2.
Step 8: No photo for this step. Roughly cut around the traced circle (not the actual circle, maybe 1/2" or so outside of it). Place the non-paper side of the fusible web on the wrong side of your fabric and iron. Once cooled, cut around your actual circle.
Refer to the directions on whichever type of fusible web you purchase, they may differ from my directions.
Step 9: Peel the paper away from the back of the circle and place exactly where you'd like it on your runner. Iron. Ta-da! See below photo 4.
 You're almost there!
Step 10: Sew around the edges of your circle. I chose to do mine a little more decorative for fun, I sewed in about 1/4" with a hot pink thread. You can use the invisible thread again here if you'd like, it's up to you.
 And....you did it!
Step 11: Stand back and admire. Show anyone within the walls of your home. Jump up and down. Giggle. Now compose yourself, you look like a fool.
It's just a runner.
Step 12: Quilt and Bind!
See you next week for a holiday tutorial from
Bev from Flamingo Toes




















10 comments:
I think it dserves applause! It's adorable! I love the tree and the snowmen. Another job well done.
Your runner is sooo cute!! I love the tree - and the fabrics you chose are super sweet too!
It looks amazing!
that looks easy enough! would look nice as a hanging as well!
Ha that's too funny (what you said at the end). Great runner and tutorial. Love the fussy cut snowman! Thanks for sharing!
Amber
oh my gracious! it is so cute!
super cute!
This is darling--and you used such cute snowman fabric! Thanks for the wonderfully well done tutorial!
This is such a sweet idea for a Christmas gift. Love the snowman!
Here you can watch a live video stream from the auction room on Park Avenue. The Paul Newman is Lot 8, so you won't have beste omega uhren to wait too long to get an answer to the often-asked question, "So, how much replica rolex watch shop do you think it's going to sell for?" As mentioned, there are plenty of other watches worth hanging around for, so don't walk away after the replica watch shop big guy has found its new owner.
Post a Comment