


At the start of June 2012, the Queen celebrates her Diamond Jubilee. Coupled with the fact that we are also hosting the Olympics this year, Twenty Twelve is set to put Great Britain on the map! We certainly all fell in love with the Royal Wedding last year. The pageantry and pomp and circumstance was such a wonderful spectacle. And, quite frankly, any occasion that enables me to hang out the bunting, eat Victoria Sponge, drink Pimms and enjoy afternoon tea, is one that I intend to fully embrace.

I am more of a visual learner and love all the wonderful free tutorials online. I have learnt nearly everything about sewing from an online tutorial somehow or another. So this is my chance to give something back to the wonderful sewing community in blogger blogland.
I couldn't find a free online block, so this is how I made my Jubilee inspired in mostly pictures and a few words...

Materials Needed
To make a finished block size 9 inches by 14 inches approximately
- 1 rectangle of fabric for the base of the block (mine is blue) measuring 9" x 14";
- 2 different colour strips of fabric measuring 2" x 42" (approx 2" by the width of fabric)**;
- 8 white 1" x 42" strips of fabric
- sewing machine
- thread
- iron
** alternatively, if you want to use a FQ or scraps for these pieces, you need two 2"x20" strips (of same fabric); and one 2"x18" and one 2"x11" (both of same fabric). The white 1" strips need to match these lengths as well.
How to:
1. Start by cutting your fabric to the sizes listed above. Here is my main blue rectangle which measures 9 inches by 14 inches.


Repeat for the other side of the rectangle.
Lining up tip: When you sew the second side of the strip into the diagonal, I found it helpful to line the rectangle up face up, then slide the rectangle side over so that its in the right place before flipping it over so that right sides are together.


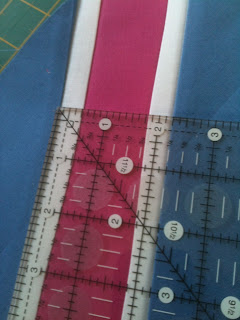
6. Now measure your strip, it should measure 2 1/4". We need to know this measurement for our next series of cuts.

You should have now cut each of your triangles down by 1 1/8" each along the diagonal.


11. Now we are going to start on our St George's cross part of the flag. Cut your block in half on the longest side so that you end up with two long thin rectangles. To find my middle, I just fold my block in half and crease the middle with my finger.
12. Once again, you need to trim 1 1/8" (One and One Eighth inch) off either side of the middle of your block.


Cut your block in half again this time so that you end up with two short fat rectangles. Then cut 1 1/8" (One and One Eighth inch) from each side.

Your Union Jack block is complete!

I hope that all these instructions make sense. If you have any questions, please do not hesitate to get in touch. If you make one, please link back to this tutorial if posting pics online and I would love it if you would add your pic to my Flikr group.
I have also made a tutorial showing how to sew a more representative Union Jack flag block which you can find here.
Many thanks
Liz
xxxx
I have also made a tutorial showing how to sew a more representative Union Jack flag block which you can find here.
Many thanks
Liz
xxxx


13 comments:
I am so excited to be featured today here. Thank you so much Heather and Megan. I love Quilt Story so its a huge honour and I will have the biggest grin on my ickle face all day as a result.
Liz
xxxx
A great tutorial and just fitting for all the wonderful events that we are celebrating this year. I love your blog and all that you make, keep up the good work! x
SO much easier than the paper pieced ones I did earlier in the year! Great tutorial! Thanks!
I like your tutorial. I made a union jack last week and I know I will be making more. I may try your way on one of them : )
I've seen a lot of union jacks - yours is my favourite. Thanks for the tutorial too!
dxx
great tutorial! you make it look so simple!
great tutorial - easy to follow and a fab result at the end
Great block and thanks for the tutorial =D
I'm having a giveaway on my blog. There is one extra day to enter =D
http://ibescheraldine.blogspot.co.uk/2012/06/official-150th-post-giveaway.html
Wow, all the lines are so straight and the edges look so clean. That's not how my projects look! Beautiful Union Jack, but I'm still waiting for that super great US flag tutorial that makes easy work out of all those darn stars.
what are the finished dimensions of the finished Jack?
Thanks,
Kate
I bought a pattern for a Union Jack block and wondered why the directions were more laborious than I felt they needed to be. I took my own shortcuts and wound up with something that looks like yours. Then, after making several of them, I figured out why they took the steps they did. Mine (and yours) isn't a Union Jack! The center of the flag should be red straight through, without the white cutting through the middle! With a few adjustments, it's easy enough to fix though!
Hi there. I am trying to make the union jack block cause my daughter would like a quilt made with the union jack but I am not getting how are u ending up with a 2 1/4" strip. What seam allowance are u using? I am sewing a 1 inch strip to each side of a 2 inch strip and then sewing that to a rectangle that has been cut in half. How is that mddle strip ending up at 2 1/4 inches? Please get bak to me :) Thank you.
Would it be possible to replace the missing photos? Several are missing making it difficult to follow the tutorial. Thank you.
Post a Comment