For my last tour stop at the KVQG show, I am posting again about my 2010 Selvage Sampler. Forgive me, but I did want to show close-up photos of the blocks in case anyone wants to try making some that are similar. (If you do, email me, I would love to see them! I am also considering posting some tutorials for a couple of these blocks sometime in the future.) As well, I wanted to share my Quilter's Statement and my judging results.
-
So first the statement: "I am new to quilting but I think I'm already addicted. This quilt was inspired by both the traditional idea that a beginner quilter make a sampler, and the modern trend to use fabric selvages in sewing projects.
I also wanted to make a unique and personalised memory quilt to celebrate the start of my quilting adventure. The selvages are all from fabrics which I used (or plan to use) in other quilts this year. The fussy cuts in the quilt represent my family members and some of our interests.
This quilt is my own design and is free-pieced without a pattern. It was a lot of fun to make and I can't wait to gather more selvages to try another quilt. Thank you so much to Tina Hanson of Town and Country Quilts for the wonderful job she did machine quilting it."
-
-
 Now, for some of the details. In the 2010 section I used only the pieces of selvage that had the numbered colour windows on them. The little blocks making up the numbers are 3 inches square. Some of these little blocks only have 2 selvages on them, but some have as many as 4. I like the look of all the little numbers making up the big numbers.
 This is the square representing my husband. The head is cut from a Mer-Man I found on a fabric called Mermania by Blank Quilting. I used blue and green selvages primarily here to keep his block masculine.
 A crow is featured in this block because we enjoy feeding the crows at our house. Crows are so smart. In the mornings I throw them the toast crusts that the kids don't eat. I yell "Breakfast Crows!" and even if they are down the street they fly over to our yard as soon as they hear me.
-
I really like the look of the triangle log cabin block. And it was very easy to make!
 A butterfly block represents the love of nature that we share with my parents. Some of the selvages on this block say "Butterflies" and "Nest." There are also the "seedlings" from the Flea Market Fancy line in there, spiderwebs, bird tracks, leaves, as well as Woodgrain by Joel Dewberry.
 This is my son's block. He plays T-ball so he picked out the little ball player to represent himself. The outside of this square has robots on it for him too.
 A heart.
 The central scissors here are from the MoMo Wonderland line. The selvage right above the scissors says "Patchwork Fever." Guess who has Patchwork Fever? Hee, hee.
 Our provincial flag. The flag of New Brunswick. The selvage above it says "In Love With" as we are proud New Brunswickers. Maybe I should have saved that selvage for my husband's square, but I didn't think of it until too late. Believe me, the selvages were flying around here as I was making this quilt, and they were hard to all keep track of.
 My daughter's square. She is peeking out the window of the house. I think this was the trickiest square to make as it has seams that are both sewn together regular as well as those that are overlapped and top-stitched.
 I am represented in the triangle here.
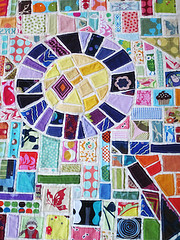
 An owl fussy cut. Probably the biggest fabric trend of 2010 was owls, I would say. Plus we like birds. The star was really easy to make. If I made a selvage star block again I would make it bigger to use lots of selvages on each point rather than just one.
 A simple zig-zag square.
 An all-Halloween string block. I made two Halloween quilts this year and had lots of Halloween fabric.
-
Then the butterfly. Not the hardest block, but I did tweak it over and over to get a decent shape.
 A simple selvage rail fence block done by colour.
 My name is here. (Read down from the top in two columns). This is placed at the end of the 2010 section.
 The background fabric is "Rock Star Hero" by Henry Glass. Wow it is bright and awesome "in person!" The quilt is 67 by 92 inches, so twin-sized.
-
It took me about a month and a half or maybe two months to make, just working on it here and there.
-
It was quilted by long-arm with invisible thread (polyester). Tina Hanson, the owner of my local quilt shop, quilted it for me. She hadn't tried invisible thread before. I really wanted invisible though, because the quilt already had so much going on, I didn't want thread lines making everything busier.
Tina was more than willing to try the invisible thread and did some practice sewing on scrap fabric first to be sure it was okay. It seemed all good, but then on the actual quilt it was only about 95% good. As I was sewing on the binding I noticed the thread had caused her machine to skip in several places. And not just little skips, but a few were about 3/4 inch of missed stitches. Anyway, she was great at fixing it up no charge and you can't tell any difference now. We were laughing that she certainly will not be suggesting the invisible thread to her customers in the future.
-
And, finally, my judges results from the show. My design, colour, general presentation, top assembly, and quilting all received "Good." My finishing received "Excellent." My comments "Design is fascinating. Colour is vibrant. Amazing. Quilter should be proud."
-
So anyway, this was such a fun quilt to make and I was happy to have the goal of the show to motivate me to get it done! It was really nice to see it hanging in public and my kids were excited to see it at the show. I'm definitely going to enter something next year and I'm likely joining the local quilters' guild too.
-
The KVQG show had about 300 entries and was attended by over 2500 people.
-
Happy Quilting!