Photobucket Photobucket Photobucket Photobucket Photobucket Photobucket Photobucket Photobucket Photobucket Photobucket Photobucket Photobucket Photobucket

Showing posts with label Christmas. Show all posts

Tuesday, November 25, 2014

Christmas Mini and Fabric Tuesday #212

Welcome to Fabric Tuesday! Today I have a mini quilt I've been working on for the last few weeks or so:


These stars are from Celestial Pattern by Alison Glass.  Using the stars in the pattern I came up with a festive mini!  I plan to hang it next to my tree.  Originally I was thinking of a pillow but I changed the design halfway through :)

The fabrics are Alison Glass' from her Christmas Bundle.


There are a few different stars to use in the pattern.  They're paper-pieced (don't be scared! Fun and easy!).  You can either make the pattern or use the stars in lots of other fun ways!


There will be a link-up and giveaway on the Alison Glass blog.  You will have until December 10 to share a completed project using Celestial for a chance to win a signed copy of Alison Glass' book and a $25 gift certificate to her shop. And, during the gift along, the Celestial pattern is $1 off and includes free shipping. 

In addition, we'll have folks share their progress on Instagram using #celestialgiftalong where we'll be picking one winner each week for a pattern of their choice. Wahoo!  So grab the pattern, I'd love to see what you make with it!


Fabric Tuesday!

Your turn to share!! Link up a recent project using FABRIC!


Photobucket

Wednesday, July 23, 2014

Snowflake Dresden Plate Tutorial

Thank you for stopping by for my Snowflake Dresden Plate Tutorial!! If you're visiting from another blog please take a look around! :)  

Quickly about us, we're two sisters, Heather and Megan, who write quilt patterns (found here).  We also blog here with lots of tutorials, finishes and we feature other quilters as well.  You can find out more about that on our tabs above.  You'll also find us on Instagram A LOT.  @quiltstorymeg and @quiltstory

Let's jump right in!


Materials
Use 1/4" seams throughout


Christmas in July - Folk Art Holiday

Pillow
-At least 4 FQ prints (or large scraps)
-17" pillow form

Embroidery
-Embroidery floss & needle
-Embroidery hoop
-Temporary Fabric Marker
-8" square or larger white felt


Cut out 10 Large wedges, 5 Medium wedges and 5 Small wedges.
I missed photographing an important step.  (If you search other Dresden Plate tutorials you could find this step there.)

Take each wedge and fold right sides together lengthwise (so it looks like a long skinny strip).  
Stitch each end (leaving the long edge open).
Press open and each end will come to a point like below.  Press well.  Repeat on every piece.


Lay out all your pieces, 20 total.  In this order, Large, Small, Large, Medium (repeat).

Stitch together in four sections of 5.

See above and below.  Stitch end to end of the shorter pieces.  If you stitch over a little don't worry, it will be ironed over and you won't see it.  Take care to backstitch your start and finish.

Take each section of 5 and press the seems open. You'll find that the taller pieces naturally and easily fold in 1/4".  See below.  Stitch all sections together so you have a complete and continuous Snowflake Dresden Plate.


Ultimately the pillow will be cut down to 18.5".  However keep your piece generous until after it is embroidered and your Dresden is attached.

Place the "Let it Snow" underneath the fabric.  Trace the letters using a temporary fabric marker.


Place the generous size of felt under the fabric.  You'll embroider through both pieces.  The felt make it not only sturdier but you are unable to see the stitching underneath and you move from letter to letter.

I used all 6 threads of floss and used a basic backstitch.  (A quick google search will show you lots of tutorials if you aren't familiar).  On the wider sections of the font there is a close up below so you can see how I did it.  Still using a backstitch.


Place the Snowflake Dresden over top and center it with "Let it Snow".

Carefully pin around the entire snowflake.

Use a tight zig-zag to attach the snowflake to the front of the pillow.  Zig-zag around all the inner and outer points.  You can see this above and below.


Trim the pillow front to 18.5" x 18.5".

I used an envelope closure in the back.  Easy to do and easily removable to clean.
Cut two pieces, 9" x 18.5" and 14.5" x 18.5".  Turn under, press and stitch one side on each piece for a nice finished edge (below).  


Right sides together place the front and back envelope pieces together, pin around and use a 3/4" seam and stitch around completely.  Turn pillow right side out, press and place in your pillow form!


This block would be so cute done as a table topper, I thought about shrinking the size a bit and doing the regular size in the middle and two smaller snowflakes on the side.  It would also make a really cute wall hanging!  And of course an entire quilt would be awesome!!


Here's the schedule for the blog hop and prizes...make sure to be checking Sew Lux as you go!!  

  • July 7th - Series Announcement & Bundle Sale 
  • July 14th - Solstice Wreath Mini Tutorial (See that cute wreath in our series button image? We'll show you how to make it here on the Sew Lux Blog!)
  • July 21st - Sewing with Winter Wonderland - Lee of May Chappell
  • July 22nd - Sewing with Be Jolly - Chrissy of Sew Lux
  • July 23rd - Sewing the Folk Art Holiday - Sarah of Stitching & Bacon AND Megan ofQuilt Story
  • July 24th - Sewing with 25th & Pine - Tessa of The Sewing Chick AND Tracey oftraceyjay quilts
  • July 25th - Sewing with Solstice - Christen of Love by Hand AND Stephanie of Quarter Incher
  • July 21-August 4th - Linky open to link up your projects
  • August 5th - Winner Announced
Photobucket

Friday, March 14, 2014

Merry Christmas Megan! (late)

Megan and I started a tradition a few years ago with our other sister to make each other Christmas gifts instead of store bought. I love this tradition. But more years than not, we are late, sometimes really late. 

This year of course, something way more important was on our mind than gifts, sewing or Christmas, being with our Dad


I started these in early December because I was going to be on time. I didn't finish, but it sure was nice to have them mostly done. As much as I want sewing and creating to be my therapy as I grieve, even that has seemed to hard most the time. 


I finally finished about a month ago and sent them to Meg. It brightened her day. It has been hard being so far from Megan during this time. 


Anyhow, these were the potholders from the amazing NanaCompany tutorial. I also learned the quilt as you go technique from a Craftsy class, I can't wait to do more. 


The red and aqua make me so happy!


Merry Christmas Megan!
Photobucket

Friday, December 13, 2013

Holiday Tutorial Series- Erin Why not sew...


Erin from Why Not Sew is an amazingly talented lady. We have featured her before, and keep asking because she is just that good! For reals. Just looking at her blog will make you happy, cute projects, pretty pictures, happy colors. Check out her tutorials, love. She has some great free patterns, this mixer, I must make it! I follow her on Instagram, bloglovin and pinterest, all her posts will make you smile! Thanks Erin.

Hi! Thank you to Heather and Megan of Quilt Story for inviting me to join the Holiday Tutorial Series! Today I have a tutorial for making a super cute ornament. There is some crochet involved with these cuties and If you do not know how to crochet, no problem! I will give you links to some resources for crocheting. You can just as easily skip the crocheting, if you wish, and they are still just as cute. You could use ribbon, pre-crocheted trim, pom-pom trim etc. in place of the crochet instructions I give to you. Whatever you decide I hope you give them a try. They make great little gifts and a really fun addition to your holiday decorating!


::Supplies::

~ 2 pieces of wool felt about 3 inches in diameter (regular craft felt can be used but you must exercise caution when ironing on your bird, place a towel between your iron and felt/applique piece if using poly. craft felt)

~ 1 piece of pretty fabric, a 2.5" square is big enough

~ 1 piece of heat'n bond or wonder under (fusible web)

~ A handful of poly-fil

~ Embroidery needle (something that 6 strands of floss will fit through)

~ 1 skein of embroidery floss (I used DMC color 321)

~ crochet hook size E

~ bird template HERE (this is from the Quiltstory tutorial I did in 2011. The bird can be used for this too.)

Let's get started!


Trace the bird template onto the paper side of your fusible web.Cut it out leaving a scant 1/8 of an inch away from the drawn line.

Iron the bird paper side up, fusible side down, onto the WRONG side your piece of  fabric.

Cut away from the fabric ON the drawn line.

Peel the paper off of the back of your fabric. A pin or needle inserted gently through the paper can help with out fraying your fabric.

 Iron your bird onto one of the wool felt pieces.

Applique the bird to the wool felt. I used the thread sketching technique. That's achieved by using your darning or open toe foot and dropping your feed dogs. Use your favorite method.

Wind your embroidery floss around a clothespin. This will save time trying to undo an inevitable knot while you are working!

It only takes a second and it's saves so much frustration.

Thread your embroidery needle with all 6 strands of embroidery floss. Just a little less than an arm span long. Knot end. Place your 2 pieces of felt together. Bird side up.

Hide your knot on the inside of the 2 felt pieces.

Blanket stitch about 2/3  to 3/4 around the outside of the 2 felt pieces.

Stuff with poly-fil.

Finish blanket stitching to the end catching your first stitch when making your last stitch. You want an even number of stitches for these ornament. For this one I used 20 stitches but for other ornaments I have used up to 26 stitches. It just depends on how close together you will want your scalloped edge. 

Now onto the crocheting! Let me preface this by saying I can crochet. I learned to crochet when I was a teenager BUT I am just learning to read patterns and I certainly have not written any patterns before. I've made washcloths, scarves and hats. That's it. So this is going to be very simple explanation. I use chain, slip stitch and double crochet for this ornament. How to's for these 3 stitches are below.

chain

slip stitch and another slip stitch

double crochet and another double crochet

Plus there are many crocheting videos on You Tube.


Size E hook (it's small)

Find the stitch that is at the very top of your ornament.

Slip stitch into it. You will have a loop on your hook.

Double crochet 7 times into next blanket sitch.*note* If you have more than 20 blanket stitches, say 24 or 26, you can double crochet a lesser amount into the blanket stitches. I used 6 double crochets on my ornaments with 24 blanket stitches. They are less squished looking that way. Again, this is all just your preference.

This will form your scallop.  Sorry about this picture it is not so easy taking pictures while crocheting :) Slip stitch into the next blanket stitch, Double crochet into the next, etc. alternating the two stitches. You should end up with a slip stitch in the very first blanket stitch you started crocheting into.


After you slip stitch into the last blanket stitch, chain double the amount of stitches that you would like your hanger to be. I chained 34. You may like yours longer or shorter. Then slip stitch back into that first blanket stitch where you started and ended crocheting. Cut your embroidery floss leaving a few inches. Pull through your last stitch / loop.


Weave your ends into the back of your crochet work (about 2 shells). Cut floss being very careful not to cut your work.


Hang and Enjoy!!!


Wednesday, December 11, 2013

Holiday tutorial series from Christa Quilts, Log Cabin Wreath mini...

Christa is an amazing Quilter! Christa Quilts has been a friend and advertiser on our blog for quite some time. She is a rockstar with quilt design, numbers, software, the works! She knows the process from start to finish, including some amazing machine quilting. Christa hosts some amazing quilt a longs, these are great! Check them out, and join in! This lady knows her stuff! She also has an awesome quilt fabric shop, she truly has a great selection. Thank you Christa!!

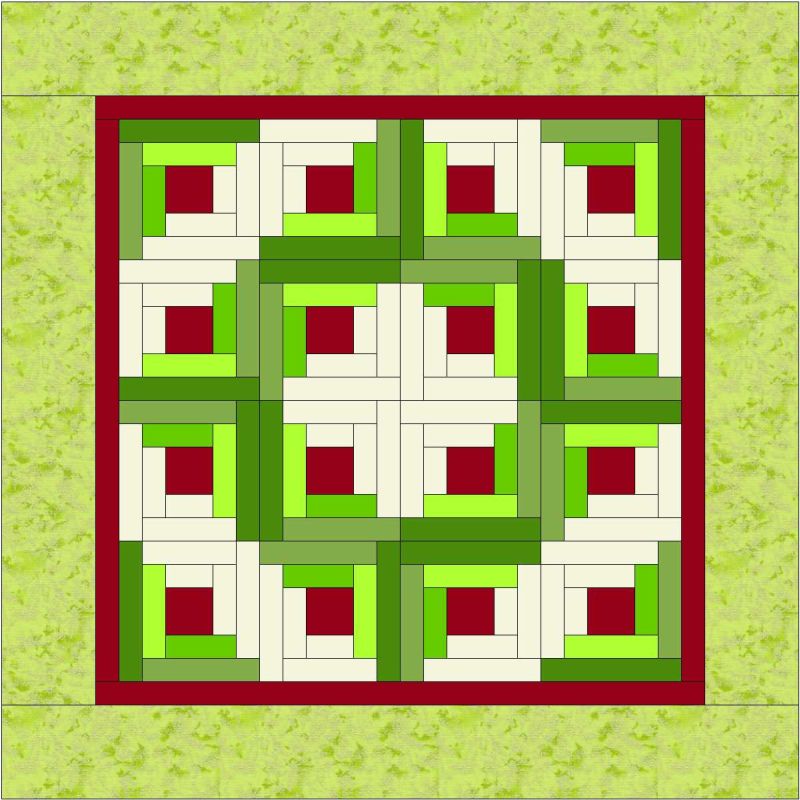
Hi all! I'm Christa from Christa Quilts and I'm excited to share my Log Cabin Wreath mini with you today! I wrote my tutorial so it can be sewn as a Christmas wall-hanging, but you can make it into a pillow, a table topper, or piece more blocks for a larger quilt.
Log Cabin Wreath Log Cabin Wreath, by Christa Watson 18" x 18"[/caption]

The blocks are pretty small, finishing at 3" finished so this is a great exercise in sewing tiny pieces for minis. :-) If you choose to make one for yourself, please share pictures of your progress at Christa's Quilt Along on flickr.

Step 1 - Gather Your Supplies
  • 1/2 yard red for log centers, borders and binding
  • 1/4 yard cream for light half of the logs
  • 1/4 yard total assorted green scraps for dark half of the logs
  • 1/4 yard of green for outer border
  • 20" square of batting
  • 20" square of fabric for quilt backing
  • cotton thread to match fabrics
  • basic sewing supplies and sewing machine
Step 2 - Cutting the Fabric
From the red fabric cut:Red Fabric
  • 16 - 1.5" squares for centers
  • 4 - 1.25 " x 16" strips for inner borders (to trim down later)
  • 4 - 2 .25" x 42" strips for binding


From white fabric, cut 5 - 1" wide Cream Fabricstrips. Cross-cut into:
  • 16 - 1" x 1.5" rectangles
  • 16 - 1" x 2" rectangles
  • 16 - 1" x 2.5" rectangles
  • 16 - 1" x 3" rectangles


From assorted green scraps, cut 6 - 1" wide strips. Cross-cut into: Green Fabric
  • 16 - 1" x 2" rectangles
  • 16 - 1" x 2.5" rectangles
  • 16 - 1" x 3" rectangles
  • 16 - 1" x 3.5" rectangles
From green border fabric, cut 4 - 2.25" x 22" strips (trim later).


Step 3 - Sew 16 Log Cabin Blocks


Starting with the center square, add the smallest white log to one side, right sides together. (It doesn't matter which side.) Chain piece all 16 white units to each of the red squares. Cut them apart, press toward the outside log and add the next largest white log to the right of your unit, forming an "L" shape. Repeat again for all 16 logs.

Add two green logs in the same way on the opposite side of the block. Repeat for a second round of white logs and a second round of green logs. Your 16 completed blocks should look like this:
log_cabin_wreath_block
Step 4 - Join the Blocks into Rows
Lay out your blocks so that they form a wreath shape. I like to think of each block rotation as an "L" or "7" or "backwards L" or "backwards 7". Wreath 1
Sew 4 blocks into a total of 4 rows. Sew the rows together to create the inner quilt top. I like to press my major seams open to help keep things nice and flat.
Wreath 4
Step 5 - Add the Borders
Measure two sides of your quilt top and trim your red border strips to this measurement. Sew them to either side of the quilt and measure again with the added red borders. Trim the top and bottom red borders, sew to the opposite sides to complete the first border.
Log Cabin Wreath TopRepeat this process for the green border to complete your finished quilt top.
Step 5 - Finish It up
Baste your quilt with pins or safety pins and have fun with the quilting! I sewed a series of straight lines in the green areas with matching thread using my walking foot.
Straight Quilting
I added double loops to the outside borders in matching green thread with a darning foot (free-motion foot) and my feed-dogs dropped.
Quilting LoopsI filled in the white background areas with smaller, tighter loopy stipples in white thread to match.
Log Cabin Wreath
EQI have also made this file available for Electric Quilt users.
For more fun quilting tutorials including steps for basting and binding, please visit my Quilt Along page on my blog. :-)
Happy Holidays!