Photobucket Photobucket Photobucket Photobucket Photobucket Photobucket Photobucket Photobucket Photobucket Photobucket Photobucket Photobucket Photobucket

Showing posts with label log cabin. Show all posts

Wednesday, December 11, 2013

Holiday tutorial series from Christa Quilts, Log Cabin Wreath mini...

Christa is an amazing Quilter! Christa Quilts has been a friend and advertiser on our blog for quite some time. She is a rockstar with quilt design, numbers, software, the works! She knows the process from start to finish, including some amazing machine quilting. Christa hosts some amazing quilt a longs, these are great! Check them out, and join in! This lady knows her stuff! She also has an awesome quilt fabric shop, she truly has a great selection. Thank you Christa!!

Hi all! I'm Christa from Christa Quilts and I'm excited to share my Log Cabin Wreath mini with you today! I wrote my tutorial so it can be sewn as a Christmas wall-hanging, but you can make it into a pillow, a table topper, or piece more blocks for a larger quilt.
Log Cabin Wreath Log Cabin Wreath, by Christa Watson 18" x 18"[/caption]

The blocks are pretty small, finishing at 3" finished so this is a great exercise in sewing tiny pieces for minis. :-) If you choose to make one for yourself, please share pictures of your progress at Christa's Quilt Along on flickr.

Step 1 - Gather Your Supplies
  • 1/2 yard red for log centers, borders and binding
  • 1/4 yard cream for light half of the logs
  • 1/4 yard total assorted green scraps for dark half of the logs
  • 1/4 yard of green for outer border
  • 20" square of batting
  • 20" square of fabric for quilt backing
  • cotton thread to match fabrics
  • basic sewing supplies and sewing machine
Step 2 - Cutting the Fabric
From the red fabric cut:Red Fabric
  • 16 - 1.5" squares for centers
  • 4 - 1.25 " x 16" strips for inner borders (to trim down later)
  • 4 - 2 .25" x 42" strips for binding


From white fabric, cut 5 - 1" wide Cream Fabricstrips. Cross-cut into:
  • 16 - 1" x 1.5" rectangles
  • 16 - 1" x 2" rectangles
  • 16 - 1" x 2.5" rectangles
  • 16 - 1" x 3" rectangles


From assorted green scraps, cut 6 - 1" wide strips. Cross-cut into: Green Fabric
  • 16 - 1" x 2" rectangles
  • 16 - 1" x 2.5" rectangles
  • 16 - 1" x 3" rectangles
  • 16 - 1" x 3.5" rectangles
From green border fabric, cut 4 - 2.25" x 22" strips (trim later).


Step 3 - Sew 16 Log Cabin Blocks


Starting with the center square, add the smallest white log to one side, right sides together. (It doesn't matter which side.) Chain piece all 16 white units to each of the red squares. Cut them apart, press toward the outside log and add the next largest white log to the right of your unit, forming an "L" shape. Repeat again for all 16 logs.

Add two green logs in the same way on the opposite side of the block. Repeat for a second round of white logs and a second round of green logs. Your 16 completed blocks should look like this:
log_cabin_wreath_block
Step 4 - Join the Blocks into Rows
Lay out your blocks so that they form a wreath shape. I like to think of each block rotation as an "L" or "7" or "backwards L" or "backwards 7". Wreath 1
Sew 4 blocks into a total of 4 rows. Sew the rows together to create the inner quilt top. I like to press my major seams open to help keep things nice and flat.
Wreath 4
Step 5 - Add the Borders
Measure two sides of your quilt top and trim your red border strips to this measurement. Sew them to either side of the quilt and measure again with the added red borders. Trim the top and bottom red borders, sew to the opposite sides to complete the first border.
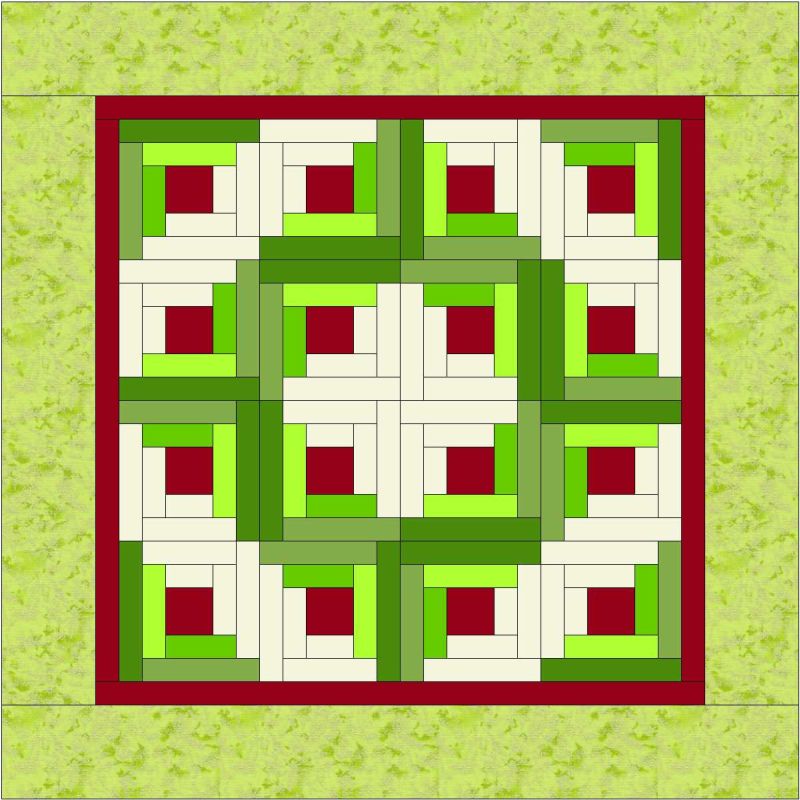
Log Cabin Wreath TopRepeat this process for the green border to complete your finished quilt top.
Step 5 - Finish It up
Baste your quilt with pins or safety pins and have fun with the quilting! I sewed a series of straight lines in the green areas with matching thread using my walking foot.
Straight Quilting
I added double loops to the outside borders in matching green thread with a darning foot (free-motion foot) and my feed-dogs dropped.
Quilting LoopsI filled in the white background areas with smaller, tighter loopy stipples in white thread to match.
Log Cabin Wreath
EQI have also made this file available for Electric Quilt users.
For more fun quilting tutorials including steps for basting and binding, please visit my Quilt Along page on my blog. :-)
Happy Holidays!


Wednesday, October 16, 2013

Beach Cabins Quilt from Chezzetcook

Such a fresh happy feature today from Adrienne of Chezzetcook Modern Quilts. I love it! Modern and oh so pretty.  Great colors, design and pretty photos!!  Chezzetcook Modern Quilts is a sewing/quilting fun blog, she has a great tutorial here on quilting as you go...a method I MUST try, it's been on the list for a while. And for some lovely quilty-eye candy see her finishesTo find our more about Adrienne and her blog name see here.  Thanks for sharing!

The eagle has landed. Beach Cabins reached it's new home in Ottawa and I have heard that her new family loves her :) So now I can share!


This quilt started with a couple of pieces of blue and red gingham that my client gave me. She wanted something "beachy" and then left me to my own devices. After adding some more reds, blues and grays to the Tilted Cabins Pattern (from From The Blue Chair), Beach Cabins was born, and if I do say so myself, I think this quilt fits the "Beachy" bill. So of course I took it to the beach for it's photo shoot. 


This project marked the first time that I used the Quilt As You Go method of quilting, so I talked about it a lot! You can read the previous posts here and here. When this baby came out of the dryer all crinkly and soft I was so happy!  


I am not going to say how long it has been since I had a finish (so embarrassing), but it is all worth it to have one like this!
Adrienne

Previous Posts related to this quilt:
Post 1
Post 2
Post 3
Photobucket

Friday, May 11, 2012

Tanner Reunion modern quilt from a maidenhair fern


Today's feature is from Linda of a madienhair fern.  Linda is a mom to 5 and has been sewing most of her life, but took up quilting in 2007 (same as me!).  She has become quite skilled with her free motion quilting, you can see a lot of her work in pictures here.  Also here are her finished quilts, an impressive list!  I really love the quilt we're featuring today, the Tanner Reunion quilt. I love the fabric line, Sweetwater's Reunion from Moda, her design is great and so is the quilting!!  Thanks Linda, and make sure to say hi at a maidenhair fern!  

Tanner Reunion . . . finished!


stats:
65" x 65"
25 -  11.5" blocks
fabric is Reunion by Sweetwater for Moda, jelly rolls and fat quarters
Warm and Natural
organic/straight line quilting


Picking a quilting design is almost as hard as designing the quilt. There are so many fun options!!


Jacquie from Tallgrass Prairie Studio has a great blog with lots of good information, pictures and tutorials.  I studied her tutorial on Organic Line Quilting before quilting this quilt.  Mine doesn't look quite organic as hers, it probably borders on the line of straight line quilting.


Have you ever quilted words into your quilt?  I've been fascinated with the idea ever since I saw a verse quilted into a quilt by Angela Foster.

It takes a little practice on paper, and even chalking onto your quilt what you're going to write.  It reminded me of typing class in 7th grade, a gazillion years ago, before computers.  Remember figuring out how to center your title on your page?  Count total number of letters, divide by 2 . . .  


I'll stick with names for now.

I love the back almost as much as the front.  For vivid colored pictures, leave your quilt a bit damp.


My next project to finish is the wall hanging that goes with this quilt, see below left.

Photobucket

Wednesday, April 18, 2012

Sue's half moon modern log cabin...

Look at this amazing quilt from Sue daurio! The quiting is awesome! Sue has tons of finishes, 2011 here, 2010 here, 2012 here...WOW. I think love the colors in this quilt, almost rainbow, and then the quilting reminds me of rainbows. Anyhow, LOVE this quilt...

I learned how to do Baptist fans!!  I have a rainbow quilt for a good friend of mines daughter that I wanted to quilt rainbows on, this quilt was practice for that.  This will be one of my Hands 2 Help quilts.  I've also posted the Eq7 project on the projects tab.  But really you don't need E7 for this.  All you need is a jelly row and some other coordinating fabric.  I started with a 2.5 x 10.5 in strip.  Added 1.5 inch strips all the way around.  Then 2.5 inch strips all the way around, then 1.5, then 2.5....until you are happy with the size.  Easy as can be!!

Oops my slipper is in the picture...really I left that in the middle of the floor?  Yikes don't tell my husband :)

This is my first quilt finished for H2H - check out the button on the side bar, it's not too late to join in. 


Photobucket

Monday, January 30, 2012

ROYGBIV Log Cabin Quilt from she can quilt

Love today's feature!  It's no secret I am a fan of color, and I love this modern log cabin quilt from Leanne of she can quilt.  I almost can't decide if I love the backing or the top more! :)  So great.  Also Leanne has a great tutorial on curved piecing, Quilt As You Go blocks and fab tips on basting a quilt.  Check out her flickr for some great inspiration and stop by she can quilt too!
DSC_0513
The ROYGBIV Log Cabin quilt for Claire is all done. It is washed, dried and had a short visit outside.
ROYGBIV Log Cabins
By the time I got out, it was late afternoon. The light was already turning a bit purple. But even still, the colours are more true in the outside pictures.
ROYGBIV Log Cabin - back
Here is the back, I am so pleased with how square this giant log cabin managed to end up.
ROYGBIV Log Cabins
Here it is on my king size bed. The quilt has finished at about 70" x 90" - designed to fit a twin bed with lots to spare on the sides.
ROYGBIV Log Cabin - back
The back makes a nice alternative front.
Before washing, ROYGBIV back
This picture of the back is actually before it was washed.
Before washing, ROYGBIV front
Here is some detail of the quilting on the front before I washed the finished quilt. All the fabrics on this one were pre-washed in warm water and dried in a regular warm dryer.
Before washing, ROYGBIV front
A closer shot of the quilting before I washed the quilt.
ROYGBIV Log Cabins
This is a close up of the quilting after the quilt was washed and dried, again in warm water and in a regular warm dryer. You can see how the washing shrinks the batting and thread a bit, pulling the stitches in just a bit. The entire quilt lost about 3" - 4" in both directions after it was washed.
ROYGBIV Log Cabins
Another close up shot of the quilt after it was washed. You can see how it has become more bumpy and soft. The drape of this quilt really softened up after the wash too. It is very snuggly now.
ROYGBIV Log Cabins
Tomorrow or the next day, I am packing it up and sending it to Claire's dad. It is for her, for Christmas. I hope she likes it - I sure do, and it was just a joy to make.

This quilt was made from a pile of fabrics that Claire chose and then I just cut strips off of most everything bright and colourful that I had. Most of the fabrics are cotton but there are also some flannels, some linen blends, some decor weight. They all play nicely together. The blocks feature red centres (or pink flannel cats) - the red centres in traditional log cabin blocks symbolize the warm hearth of the home.

I am fairly sure there are more ROYGBIV quilts in my future. I highly recommend them, they just make you smile all the time.

As I made this quilt, Rhonda from Quilter in the Gap and Rachel from Contented set up the Duo QAL (see my sidebar for the button) and this quilt became my contribution to the QAL, - where I enjoyed loads of help with free motion quilting and lots of friendship too.

Best,
Leanne

Photobucket

Friday, January 20, 2012

Cheeky Quilt from Diary of a Flutter.Kat

Today's feature is from Kat a very talented Australian quilter who blogs at Diary of a Flutter.Kat.  This feature is very much my style because I love COLOR!  She is very good at knowing how to use it too!  Check out her darling patterns, a scrappy quilted pouch, a zipper pouch pattern and her shop,  so cute!  Also go here for a tutorial on how to make the blocks in her Cheeky Quilt that we're feature today.  Thanks Kat!


**  Health warning to any colour phobes out there - this will not be the post for you... **

{Firstly a brief history about this quilt before I begin... In August last year I got it in my head that I'd like to make myself another Queen/King sized quilt for my bed. Only problem was I was determined, but severely lacking in time. Not just that but I don't have a very good attention span and 49 blocks of the same design is a LOT of repetition for this ADD crafty Mumma!
- I had nearly half the required blocks because I had used the block for my month in 2 rounds of a bee. But that still left 29 to go! So on a cheeky whim, I hesitantly blogged asking if any of my bloggy friends would like to make a block for me. Offering them an exchange of something if they liked.

To be honest I wasn't really expecting any response. But I got one. An amazing response at that! You will find the list of that wonderful group of ladies who helped me make this quilt at the bottom of the post. I will be forever grateful to them for their help.
Anyway; that is why this quilt is now called "The Cheeky Quilt" :) }

***

Oh what a day, what a day...
I can be a stubborn mule when I want to be!
And today's dose of stubbornness led me to finishing my cheeky quilt in time for Christmas...
YEAH BABY!

It was no small task though I have to say. And I really had to push myself to finish it towards about the last 3/4 LOL...
But it was SO worth the final push to get it finished because I could not be more in love with it!
(and I also knew that it was one of those jobs that if I stopped I'd put off starting again and shove it into the corner somewhere...)

***

First I'll show you the last 3 blocks I made which I haven't shown you yet.
 2 were made last night, then the last this morning...

Block 1 (or should that be block 47!?) was made from scraps from my own scrap bin, most of which have come from recent projects of mine and have fond memories attached. The fishies in the middle though I just chose because they were my favourite :) ...


Block 2 was made almost entirely with scraps sent to me by Karen my scrappy swappartner. The scraps which weren't from Karen are scraps that I used to make her a scrappy pouch with...


Block 3 was made using fabric selected by my local friend Megan. Plans were for Megan to make this, but we had to reschedule our sewing date, so I just decided to make it myself so that I could finish. I'm sure Megs won't mind hehehe...


***

Those 3, coupled with the 2 blocks that had arrived last week from Sarah left me 5 blocks left to quilt and trim to size today before I could get started.

I decided to be a bit lazy and I didn't baste them, just taking my chances to see how it went.
What a test for poor Miss Pfaff!
But luckily she coped with the job very well and in no time at all those 5 had joined the other 44 all ready to be laid out...


I decided to quilt the blocks just using straight line quilting of varied distances apart.
- Half of the blocks I quilted with vertical lines & half I quilted using horizontal lines.
Hence the two piles above!

After some fairly major reshuffling of furniture in my lounge room, we eventually discovered enough floor space in order to begin laying them out...


My "helpers" thought that this part was great fun. But I'm pleased to report that I more or less maintained my sense of humour as Abbie periodically nicked off with the blocks, running down the hallway with them in a fit of giggles. Oh what a fun game! ;)

Who me?...

Noooo... surely not me Mum!


Meanwhile Hannah thought they made a great mat for doing ballet on...


Using my two piles I laid them out like a checker board - vertically quilted block, horizontally quilted block, vertically quilted block... and so on and so on.

I more or less just laid them out as they came off the piles. A few times I reshuffled particular blocks to avoid having too many light coloured blocks in a row, or two by the same person in a row for example, but apart from these few exceptions they just got placed as they came off the piles. And it all seemed to work perfectly.

Then it was time to start sewing them together...


Top together check - must be time to baste.

Cue more dancing all over it by my "helpers"...


Basting done (200 pins later!) - check...

Time to stitch the back to the top...


Oh how immensely glad I was at this point that I had quilted as I'd gone and this stitching was minimal. Because at 49 x 15 inch unfinished blocks, boy was this baby big and h.e.a.v.y.

Quilting complete - time to stop for dinner & bathtime.
- Cue me sitting and removing the 200 basting pins while I watched the girls in the bath. No point stopping when the end is so close in sight right?! ;)

Girls in bed - check.
Time to bind...
Make way too much binding because you are too lazy to calculate how much you need - check.
Binding finished - check.

***  
Must be time to try it out on the bed in it's finished state...
eeeeeeeeeekkkkkkkkkkk


To coin a phrase from my daughter....
"I love it, I love it, I LOVE IT!"

And I certainly won't be able to complain that it's not big enough - because it's HUGE!

... When planning to do an extra row than I did on my last quilt, I also didn't take into account that I'd made the blocks an inch bigger in each direction as well.
Ooops.
So it's really really really big!

After it was finished I was a little nervous that it was so large it wouldn't fit into my washer & drier, but I'm pleased to report that it is currently in the tumble drier as we speak. So no problems there...

The Final Stats:
# of blocks:      49 x 14.5 inch (approx) finished squares
Finished size:          approx 101.5 inches square
Number of blocks made by me:        6
Number of other people contributing blocks:       25
Approximate number of different fabrics included:     980

Thank you SO much to: Susan, Shay, Marg, Anne, Linda, Jamie-Lee, Mona, Rachel, Mel, Sarah, Corrie, Lucinda, Juliet, Angie, Bec, Bron, Debbie, Sue, Suz, Allie, Caroline, Tammi, Ellie-Mae, Jill, Bree, (gosh I really hope I haven't missed anyone!)
...for your much cherished and appreciated contributions!!

As well as blocks gifted by these fine people above, I have also used fabric from many swaps I've had with other people. To name a few: Angela, Megan, Karen, Leona, Susan, Bec.

So this really is a very special and sentimental quilt with contributions from so many of my blogging, flickr & "real life" friends!

I am still hoping to name each block with who it was made by, but I'm still pondering the best way to do this and it requires waiting for my main sewing machine to get fixed in order for me to do some trials.

Oh and I have taken photos during my process to do a tutorial of the quilt as you go along process that I do, as promised, but I don't think that will happen until after Christmas now.

So on that note I'll leave you with a few shots of some of my favourite parts...

Love these musical love birds...

I've always wanted that yellow AH bird fabric in the centre but it was always out of stock when I went to make an order. But now I have some - thanks Jamie-Lee

How cute are those Laurie Wishrun donkeys in boots!

"Hey good lookin, what you got cookin" - I can't believe Lucinda fussy cut that saying into her block. It's one of Neil & my little sayings we say to each other regularly...

Gotta love goldfish in bags... And aqua scissors - perfect for a sewing Kat :)

I love every single block though, and it's amazing how well they all go together...


Just too perfect!
I couldn't be happier!!

And now if you'll excuse me I better go clean up my trashed house... It's amazing how much mess 3 people can make when all Mummy does all day is sew ;)

{Edited to add: You may now find my QAYG Process tutorial here...}
Photobucket