Photobucket Photobucket Photobucket Photobucket Photobucket Photobucket Photobucket Photobucket Photobucket Photobucket Photobucket Photobucket Photobucket

Showing posts with label bright. Show all posts

Monday, July 22, 2013

Carnaby Street X Plus Quilt!

I am loving today's quilt by Kelly from My Quilt Infatuation! It's gorgeous!  I love the colors against the gray...bottom line I'm really into COLOR!  I also really enjoyed reading about Kelly here especially how she made her first quilt...awesome!  So take a minute to read it.  Also you can see here Kelly's other quilt finishes.  Enjoy! 

Well, my groovy Carnaby Street X Plus quilt is finished!!  I actually dreamed about it last night and woke up at 7:00am so I could work on it and get it finished today.  We're heading to visit family on Wednesday, so I have a million things I should be doing, but quilting is way more fun than laundry and packing, right?


I chose my good old standby for quilting in a light gray thread, and I'm happy that it helps to disguise my unfortunate mismatched plus seams a little bit.  I used the same teal tonal chevron for the binding that I used as a border in the back, and I like how the chevrons point toward the quilt.  That is totally a happy accident!

I placed my label a little too close to the edge on this one...whoops!


I can't decide which side of this quilt I like better!  The back is so much fun with all of the improv piecing, but I think that the front has almost a 3D effect with the Carnaby Street jumping out against the gray background.


This is my second Carnaby Street quilt and I am not sick of the fabric at all.  You can see my first oneHERE.  The colors in this quilt just make me happy (and kind of makes me want to watch Austin Powers)!  I love the fun, groovy vibe.  Which side do you like best?
Photobucket

Monday, April 29, 2013

Rainbow Wave Quilt from Busy Hands Quilts


I love color, bright colors, and thus I do love rainbow! Our feature today of Mrs. Hearts from Busy Hands Quilts is so happy and bright!! A darling quilt for her daughters joyful room! :)  I think I even have enough solids to make my own...hmmm.  Make sure to check out Busy Hands Quilts...she truly is busy!! Almost every post is a finish!
Rainbow Bunkbeds
My daughter's newly decorated room.  Don't you love the walls?!?  The other two walls are blue, which I may show you on another day.  That half of the room is ... not ... clean!!!  I had originally planned to make a Rainbow Plus Quilt on the top bunk {remember the 60 solids I purchased?}, but when Millie and I found this set at Kohl's for uber cheap, we couldn't pass it up.  It matches perfectly!
The bottom quilt is a full-size Wave quilt with 18 different solids, made by yours truly.

Rainbow Wave in Full Size
It is LOVE ... or what!?!

Rainbow Wave in Full Size
It turned out truly AMAZING!
Rainbow Wave in Full Size
The backing is a Riley Blake chevron in apple green and white, and oh, my, this fabric was a charm to work with!  WAY nicer than lesser quality flannels from other sources.  I washed and dried it once before assembling the quilt since flannel shrinks more than regular cotton fabrics and will shrink again when washed a second time.  The quilt top and binding were not preshrunk.

Rainbow Wave in Full Size
Here is a close-up of the candy binding.  YUM! 
I quilted across the quilt twice in the colored areas, varying the height of the "swoops" as the wave progressed; and the white has tiny up/down swoops in it which you can't see.

Rainbow Wave in Full Size
Can you see where the two chevron fabric pieces were joined?  It's pretty hard to find it!  This high-quality flannel from Riley Blake was printed so perfectly on excellent fabric that the points met amazingly well.  I pinned the two pieces together at every zig zag and had no problems whatsoever.

Rainbow Wave in Full Size
Quilt Stats:
  • Pattern:  New Wave by Oh, Fransson!, free
  • Size:  75" x 85", full bed size
  • Quilt Top Fabric:  18 Kona solids with white
  • Batting:  100% cotton, thin
  • Backing:  Riley Blake Chevron in flannel
  • Binding:  Sweet Treats, double fold with 45-degree mitered corners, attached by machine
  • Quilting:  Varying sized "swoops" within the colored waves and small swoops in the white
  • Value:  Truly uplifting!
I am taking custom orders for Rainbow Wave Quilts in any size in my Etsy shop!
Busy Hands Quilts

Photobucket

Friday, January 11, 2013

Kitchen Windows Quilt from Let's Begin Sewing...

Beautiful quilt feature today of Rachel from Let's Begin Sewing... It is called Kitchen Windows a pattern from Elizabeth Hartman. She made this beauty for her mum!  Love the bright colors, so pretty!  Stop by Let's Begin Sewing... to see lots of fun quilt finishes, clothing and other fun projects!  Thanks Rachel for sharing :)

Completed one more quilt. This one is special as I made it for my mum. I really do hope she likes it. This is the biggest quilt I have made so far, completed it measures 85" x 85". I quilted it diagonally and it was difficult to maintain straight lines on a small sewing machine but somehow it worked out. This quilt has definitely made me a fan of linen fabric and I think you will see me use it a lot more often in my quilts. I used stripped binding for my quilt. This is the first time I have used stripes and it does frame the quilt quite nicely. The backing is Folksy Flannel from Anna Maria Horner. It's very good quality and gives a real snug feel to the quilt. I prewashed all my fabric for this quilt so it's got a nice fresh smell about it. Any way without further adieu..


Had to add a little hand stitched note!

Photobucket

Wednesday, May 23, 2012

Twister Quilt from A Quilting Jewel


One of the fabulous things about doing features weekly not only is inspiration...but it reminds me of projects I want to do! :)  I had a Twister Quilt on my list for a while and I forgot about it until I saw this quilt by Jen from A Quilting Jewel!!  I love the design, love the bright colors (It's A Hoot is such a great line!) just love it all!  Jen is a modern quilter with a great list of completed quilts and some awesome free patterns and tutes.  Check out A Quilting Jewel!

This weekend I finished putting the binding on my twister quilt.

I love the way it came out.  I used two It's a Hoot charm packs for the twister portion.  I then used coordinating fabric for the binding and backing.  The white around the outside of the quilt is a Kona white.

I quilted this little quilt on either side of the horizontal and vertical seams.  I was trying to think of some way to play off the twisting pinwheels, and realized that with this type of quilting, the quilting would go through the long point of every pinwheel.

 I love this mini quilt.  I think it would be a perfect baby quilt.  I know so many people having babies this year, so who knows, it could wind up being for one of them.

I can see myself making more of these twister quilts in the future.  They come together so quickly and look great.


Photobucket

Friday, April 13, 2012

Granny Squares Quilt from s.o.t.a.k handmade

Today's feature is from Svetlana of s.o.t.a.k handmade and I am convinced!  I've seen these Granny Squares quilts everywhere and been tempted, but she may have pushed me over the edge!  I love how bright and cheery her finish is.  Love all the colors she uses too.  She's already busted out a 2nd Granny Squares Quilt!  Check out her great quilt finishes , other projects and tutorials for some inspiration.  Thanks for sharing Svetlana!


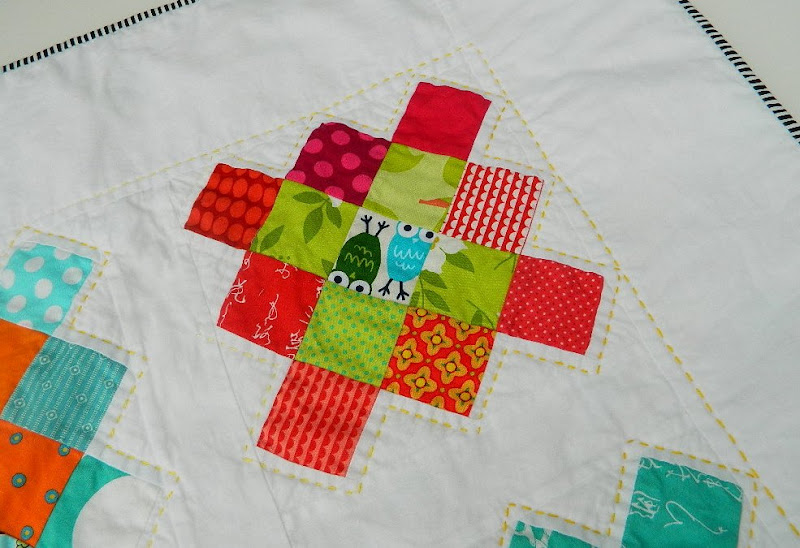
I am so excited to be able to show you my finished Granny Square quilt. Isn't she a beauty? Just the way I like my quilts, bright, colorful, and cheery.


It was, of course, inspired by Jolene's fantastic Granny Square quilt. I was able to use up lots of my scraps, I only had one rule for the fabric to get into this quilt - I had to love it. This was the first block I made and it still is my favorite. Adore those little owls. 

I decided to use Anna Maria Horner's voile for the back of the quilt. I've heard so many great things about  voile, it was time to give it a try.

What I did not know, however, was that voile did not stick to the batting when I tried to spray baste my quilt. Noooooooooo!!!! Seriously, that was a major setback. The thing is, I am horrible at pin basting. I thought about using some other fabric for the backing, but at the end I went with the original plan and pin basted just the back of the quilt (the top was spray basted). I know, does not make much sense, right? I ended up with pins on the back side of the quilt. I wanted to hand quilt around the squares anyway, so I just took out the pins as I went. I was pleasantly surprised to find out that I actually enjoyed hand quilting.

I used my trusty black and white stripe fabric to bind the quilt. I think it frames all those happy squares rather nicely. 

So, there you have it. My Granny Square, all finished , washed, and dried, ready to be snuggled under. 


You can read more about the process of making this quilt here and here. How about you, did you get on the granny bandwagon, also?

Hope you have a wonderful and relaxing weekend, Svetlana.

Photobucket

Friday, January 20, 2012

Cheeky Quilt from Diary of a Flutter.Kat

Today's feature is from Kat a very talented Australian quilter who blogs at Diary of a Flutter.Kat.  This feature is very much my style because I love COLOR!  She is very good at knowing how to use it too!  Check out her darling patterns, a scrappy quilted pouch, a zipper pouch pattern and her shop,  so cute!  Also go here for a tutorial on how to make the blocks in her Cheeky Quilt that we're feature today.  Thanks Kat!


**  Health warning to any colour phobes out there - this will not be the post for you... **

{Firstly a brief history about this quilt before I begin... In August last year I got it in my head that I'd like to make myself another Queen/King sized quilt for my bed. Only problem was I was determined, but severely lacking in time. Not just that but I don't have a very good attention span and 49 blocks of the same design is a LOT of repetition for this ADD crafty Mumma!
- I had nearly half the required blocks because I had used the block for my month in 2 rounds of a bee. But that still left 29 to go! So on a cheeky whim, I hesitantly blogged asking if any of my bloggy friends would like to make a block for me. Offering them an exchange of something if they liked.

To be honest I wasn't really expecting any response. But I got one. An amazing response at that! You will find the list of that wonderful group of ladies who helped me make this quilt at the bottom of the post. I will be forever grateful to them for their help.
Anyway; that is why this quilt is now called "The Cheeky Quilt" :) }

***

Oh what a day, what a day...
I can be a stubborn mule when I want to be!
And today's dose of stubbornness led me to finishing my cheeky quilt in time for Christmas...
YEAH BABY!

It was no small task though I have to say. And I really had to push myself to finish it towards about the last 3/4 LOL...
But it was SO worth the final push to get it finished because I could not be more in love with it!
(and I also knew that it was one of those jobs that if I stopped I'd put off starting again and shove it into the corner somewhere...)

***

First I'll show you the last 3 blocks I made which I haven't shown you yet.
 2 were made last night, then the last this morning...

Block 1 (or should that be block 47!?) was made from scraps from my own scrap bin, most of which have come from recent projects of mine and have fond memories attached. The fishies in the middle though I just chose because they were my favourite :) ...


Block 2 was made almost entirely with scraps sent to me by Karen my scrappy swappartner. The scraps which weren't from Karen are scraps that I used to make her a scrappy pouch with...


Block 3 was made using fabric selected by my local friend Megan. Plans were for Megan to make this, but we had to reschedule our sewing date, so I just decided to make it myself so that I could finish. I'm sure Megs won't mind hehehe...


***

Those 3, coupled with the 2 blocks that had arrived last week from Sarah left me 5 blocks left to quilt and trim to size today before I could get started.

I decided to be a bit lazy and I didn't baste them, just taking my chances to see how it went.
What a test for poor Miss Pfaff!
But luckily she coped with the job very well and in no time at all those 5 had joined the other 44 all ready to be laid out...


I decided to quilt the blocks just using straight line quilting of varied distances apart.
- Half of the blocks I quilted with vertical lines & half I quilted using horizontal lines.
Hence the two piles above!

After some fairly major reshuffling of furniture in my lounge room, we eventually discovered enough floor space in order to begin laying them out...


My "helpers" thought that this part was great fun. But I'm pleased to report that I more or less maintained my sense of humour as Abbie periodically nicked off with the blocks, running down the hallway with them in a fit of giggles. Oh what a fun game! ;)

Who me?...

Noooo... surely not me Mum!


Meanwhile Hannah thought they made a great mat for doing ballet on...


Using my two piles I laid them out like a checker board - vertically quilted block, horizontally quilted block, vertically quilted block... and so on and so on.

I more or less just laid them out as they came off the piles. A few times I reshuffled particular blocks to avoid having too many light coloured blocks in a row, or two by the same person in a row for example, but apart from these few exceptions they just got placed as they came off the piles. And it all seemed to work perfectly.

Then it was time to start sewing them together...


Top together check - must be time to baste.

Cue more dancing all over it by my "helpers"...


Basting done (200 pins later!) - check...

Time to stitch the back to the top...


Oh how immensely glad I was at this point that I had quilted as I'd gone and this stitching was minimal. Because at 49 x 15 inch unfinished blocks, boy was this baby big and h.e.a.v.y.

Quilting complete - time to stop for dinner & bathtime.
- Cue me sitting and removing the 200 basting pins while I watched the girls in the bath. No point stopping when the end is so close in sight right?! ;)

Girls in bed - check.
Time to bind...
Make way too much binding because you are too lazy to calculate how much you need - check.
Binding finished - check.

***  
Must be time to try it out on the bed in it's finished state...
eeeeeeeeeekkkkkkkkkkk


To coin a phrase from my daughter....
"I love it, I love it, I LOVE IT!"

And I certainly won't be able to complain that it's not big enough - because it's HUGE!

... When planning to do an extra row than I did on my last quilt, I also didn't take into account that I'd made the blocks an inch bigger in each direction as well.
Ooops.
So it's really really really big!

After it was finished I was a little nervous that it was so large it wouldn't fit into my washer & drier, but I'm pleased to report that it is currently in the tumble drier as we speak. So no problems there...

The Final Stats:
# of blocks:      49 x 14.5 inch (approx) finished squares
Finished size:          approx 101.5 inches square
Number of blocks made by me:        6
Number of other people contributing blocks:       25
Approximate number of different fabrics included:     980

Thank you SO much to: Susan, Shay, Marg, Anne, Linda, Jamie-Lee, Mona, Rachel, Mel, Sarah, Corrie, Lucinda, Juliet, Angie, Bec, Bron, Debbie, Sue, Suz, Allie, Caroline, Tammi, Ellie-Mae, Jill, Bree, (gosh I really hope I haven't missed anyone!)
...for your much cherished and appreciated contributions!!

As well as blocks gifted by these fine people above, I have also used fabric from many swaps I've had with other people. To name a few: Angela, Megan, Karen, Leona, Susan, Bec.

So this really is a very special and sentimental quilt with contributions from so many of my blogging, flickr & "real life" friends!

I am still hoping to name each block with who it was made by, but I'm still pondering the best way to do this and it requires waiting for my main sewing machine to get fixed in order for me to do some trials.

Oh and I have taken photos during my process to do a tutorial of the quilt as you go along process that I do, as promised, but I don't think that will happen until after Christmas now.

So on that note I'll leave you with a few shots of some of my favourite parts...

Love these musical love birds...

I've always wanted that yellow AH bird fabric in the centre but it was always out of stock when I went to make an order. But now I have some - thanks Jamie-Lee

How cute are those Laurie Wishrun donkeys in boots!

"Hey good lookin, what you got cookin" - I can't believe Lucinda fussy cut that saying into her block. It's one of Neil & my little sayings we say to each other regularly...

Gotta love goldfish in bags... And aqua scissors - perfect for a sewing Kat :)

I love every single block though, and it's amazing how well they all go together...


Just too perfect!
I couldn't be happier!!

And now if you'll excuse me I better go clean up my trashed house... It's amazing how much mess 3 people can make when all Mummy does all day is sew ;)

{Edited to add: You may now find my QAYG Process tutorial here...}
Photobucket