Photobucket Photobucket Photobucket Photobucket Photobucket Photobucket Photobucket Photobucket Photobucket Photobucket Photobucket Photobucket Photobucket

Showing posts with label hand stitching. Show all posts

Wednesday, April 25, 2012

Star Crossed Quilt from Don't Call Me Betsy

Elizabeth from Don't Call Me Betsy is no stranger to us...and probably not to you either...her work is fabulous! We're constantly checking out her cute stuff for inspiration! :)  One of my favorite things Elizabeth has done is her Kaleidoscope QAL...so cute!!!  Make sure to stop by Don't Call Me Betsy and her pattern shop, love this one!!

I am so excited to share the finished quilt with you!  This is definitely one of my favorite finishes in a while, thanks to the fun I had quilting this one and the great texture the quilting created.  I love densely quilted quilts like this one, so I'm quite sure it's going to be one of my favorites for a while to come.

Star Crossed Stitch quilt - unwashed full shot
before washing

Star Crossed Stitch quilt - washed full shot
after washing
A while back, I fell in love with a block I saw in a copy of Jinny Beyer's The Quilter's Album of Patchwork Patterns, on loan from the library, and sketched it out in my sketchbook.  Many months later, back in January, when the fabulously talented Betz White sent me some of her fantastic organic line of fabric for Robert Kaufman, I revisited the sketch and decided to finally make the block.  I called it a Star Crossed block, as it felt like a fab combination of a star and cross block, and I slowly started working on this quilt bit by bit, in between what feels like a zillion other obligations that I can't share yet.

I was super excited to finish this quilt...until I realized that I didn't have a clue how I wanted to quilt it.  Usually, I don't make that decision until after I see the finished quilt top.  When I looked at this quilt top, I just couldn't seem to decide.  I wanted to do something other than my usual smooth stipple, and I thought a pointy stipple would be fun, but rather than mocking it up to see how it would look, I just went for it.  Whoops.  I hated it.  Intensely.  So much so that I ripped it all out.  Note to self: always mock up the quilting.  Always.  (ETA: All I do to mock up my quilts is print out a photo and draw out my FMQ design on it with a highlighter.  It's uber-low-tech and fast.)

IMG_8059
before washing

Somehow or another, I got baptist fans on the brain, and just couldn't let go.  So I did them.  And they were really fun to do!  The way I stitched these fans is indeed in a continuous line, with one start at the beginning of each row of fans and one stop at the end.  I'm putting the finishing touches on a tutorial of how I did this quilting to share with you all tomorrow, so stay tuned for that. 

IMG_8056
before washing
I'm so happy I went with my gut and ripped out the pointy stipple quilting stitches I started with.  I'm also really glad I tried a new style of quilting, even though I really thought it was going to be either too difficult or too tedious.  Trying something new can be so much fun!

Star Crossed Stitch quilt - washed detail #1
after washing
Thanks again, Betz, for sharing some of your lovely fabrics for this project!

Quilt Stats
Name: Star Crossed Stitch quilt
Block PatternStar Crossed block
Size: 34" x 44"
Fabrics: Betz White's Stitch Organic collection for Robert Kaufman along with some coordinating fabrics from Just Dandy, Katie Jump Rope, and So Sophie
Backing: Remants from Betz White's Stitch Organic collection
Quilting: All-over baptist fan free motion quilting (tutorial coming tomrrow!) by yours truly
Binding: Scrappy binding, using remants from Betz White's Stitch Organic collection, hand finished
Photobucket

Sunday, March 18, 2012

Kar's down home bliss disappearing 9 patch quilt...

Kar's down home bliss submitted this pretty pretty quilt. She made a quilt from our disappearing 9 patch tutorial :) That always makes us happy! Funny thing is, I still haven't finished my disappearing 9 patch quilt, come to think of it, I am not even sure where the quilt top is? Anyhow, am in love with the colors of this pretty quilt. The hand stitching is amazing! Be sure to check out Kar's down home bliss for some great inspiration!


Pictures were finally taken of the quilts that I made the girls for Christmas.  I know.  Nearly two months after!  I do have my moments were I'm just not on the ball with things.  Yesterday things just kind of all fell into place for the photo shoot.  

Kind of like this;  I was walking through the house in the afternoon and noticed all the sunshine pouring in through the windows.  A thought ran through my mind about how awesome that was and Glenn being home and being the quilt holder.  But it was very breezy, chilly out.  And I was not about to go and stand outside myself.  So within a 2 minute span I had people running up and down stairs, ripping quilts of beds, placing a chair in just the right spot for Glenn and started snapping pics.  Poor Connor was over and didn't even have a clue about what the heck was going on.  I'm surprised he didn't get run over.

This is how it all turned out.  Forgive the bright bit of sunshine glaring on the quilts.  You get what you get when I start ordering people around here.

Each quilt was made using the Disappearing 9 Patchtutorial over at Quilt Story.  Love this pattern!  Very scrappy with minimal piecing.  Love that.

This one is Little B's made with the "It's a Hoot" from Moda.
Gotta love Glenn's little helper there in the corner.  :)

This one is Little B's made with the "It's a Hoot" from Moda. Gotta love Glenn's little helper there in the corner.  :)


The second is Em's made with the "Just Wing It" from Moda.

Both quilts were made bigger than needed for now with the intention that they can be used for a full or queen size bed later.

 Hand stitching was done in all of the big blocks in a petal sort of pattern that I quickly drew up and cut a 'stencil' out of poster board.


I still keep going back and forth about doing more hand stitching on both quilts.  In between the blocks and around the edges.  After taking another look this weekend, I'm leaning towards the more idea.


And solid colored sheets were used for the backing.  And scrappy strip pieced binding was put all around the edges.


(I linked the quilts to Quilt Story)
I finally got to the 1/3 mark with Glenn's blanket.  It seems that it's taking forever to get it done.  It's to the point now that it has to lay on the floor as I work on it to make sure that I don't make identical squares for it.  So with it not being such a great thing to work on at the desk while the girls are doing school work I have to find something else that can be worked on while school is being accomplished.

That is were this pile of fleece and flannel come in.  It has sat around for a month at least just waiting for me to make them into pj/lounging pants.  Hopefully I can get them done quickly.


Friday, April 29, 2011

Quilt for a princess from Stitched in Color

Did anyone watch the much anticipated wedding??  I recorded it.  Heather is probably dragging her feet somewhere right now...silly girl spent the night at my parents, ate Shepherd's Pie (what "commoners" would eat to celebrate) and got up early to watch the wedding with my dad.  Really I'm jealous and wished I lived near them so I could join too!!  Our daddy is from England so it's fun to get to do these things from time to time.


Rachel from Stitched in Color needs no introduction to must of us!  Her blog is inspiring and a really fun read.  Just check out this latest post where I spent probably AN HOUR reading others comments!!! I can hardly see my computer screen my eyes are fried.  I can't wait to feel free again (ie when Market is over) and can try out her Bottled Rainbow quilt-a-long.  In keeping with a royal theme, here is a quilt she made for her princess:


This picture (finally) brought to you by the inspiration of Quiltstory!


Fairytale Patchwork Quilt


I can't believe I never got my act together and took a finished picture of this quilt!  When Heather and Megan of Quiltstory asked to feature Fairytale Patchwork, it was the push I needed to get it done.  So, welcome to Aria's room!

Do any of you remember this quilt?  I made it last summer for my daughter, inspired by my wildflower curtains (there in the background) and Heather Ross' simply stunning Far Far Away collection (FFA1 on double cotton gauze).  The Far Far Away unicorns had my heart on first glance, and Aria was starry eyed over the Princess and the Pea!

Far, Far Away - Purple Unicorn

Combined with Anna Maria Horner Little Folks Voile and a few Good Folks, this stack of fabrics was sooo invitingly plush and silky.  Fabric heaven!  Still, I was a little nervous to cut into them, being so pricey and all, which is why I did a mock up of my quilt layout like this: 

12" blocks, 2.5" sashing

The quilt design was inspired by Lauren's quilt for her daughter, Mira.  I added the occasional pieced block, to accommodate the tall pattern repeat of those picky princesses.  

Princess Block layout

And sashed the whole thing in natural linen (rather than white or pink), in hopes that the linen would temper the uber-girlishness of these fabrics.  Because, ya know, I'm hoping Aria will love this look for years to come!

Fairytale Quilt Over a branch


Piecing this quilt top was a breeze, even with a near-shocking interruption, thanks to the large cuts and simple design.  And, I'm still such a fan of that approach!  Large cuts really allow my eyes to appreciate the fabrics. Simple is beautiful.  Simple is fast. Simple is fun.  Yeah for simple!!!

Fairytale Quilt Top from the grass
Fairytale Snapshots from atop my Dogwood Tree!

And then this new quilter was faced with the problem of quilting and binding this pretty young thing.  Gulp.  First off, I decided to skip binding.  This quilt already had a linen edge border and I wasn't keen on hand-sewing so much binding.  I did right sides together, sew, turn right side out and close up edge.  Quick and painless.  I'd do it again!

For quilting, I tried machine quilting straight diagonal lines.  Marked them with ruler-drawn lines, marked them with masking tape - nothing worked!  It may have been my lack of experience or it may have been the slippery fabrics, but I couldn't stitch straight lines on this for the life of me.  Frustrating and sad.

Though in retrospect, it was just not meant to be. Hand-quilting was the absolutely delicious alternative!

Hand quilting - Diamond Mine

Hand quilting - Dobby Dots


Hand quilting - Princess Strips

I started work with needle and pearl cotton thread. And, oh my, how I enjoyed hand quilting Aria's Fairytale Patchwork quilt!  The entire process was so relaxing and satisfying, especially experimenting with different quilting patterns.  Here are a few more.

Quilted Diamonds

This pattern, quilted diamonds, ended up being my favorite style for quilting on the Princess and the Pea blocks.  It looks especially nice on this Diamond Mine (from Anna Maria Horner's Little Folks collection) block, which actually inspired the quilting pattern.

Quilted Star

Here's another fun one.  I only used this star pattern on a few unicorn blocks, as I came to the idea a bit late in the game.  I like how it works with the layout of the print!

Quilted Frame

And, a simple pattern.  It creates a clean-lined, understated effect that works on almost any block.

I've been asked how long the hand quilting takes.  Let me start by saying that 95% of the time, I was stitching while watching a show with my husband.  So, given frequent breaks to watch the screen and an overall level of comfortable distraction, each block took me about 45 minutes to complete.  I would begin a block by marking my stitch lines with a chaco pen, and then carefully centering the block in my quilting frame.   On the few occasions that I stitched sans TV, the work came along much faster.

All too soon, I had completed all 26 blocks.   The overall effect is fairly random, since I varied the quilting patterns enough so that no 2 touching blocks share the same pattern.  I reasoned that this sparse quilting pattern was "enough" since I had used a repurposed blanket for batting, which wasn't going to fall apart or bunch up within the quilt.  


But I'm not perfect, and it wasn't enough.  If you were reading Stitched in Color in December, you may remember my confession post, Sew Imperfect.   Here's what happened...

Week Seams

Weak Seams.  I had to wash Aria's Fairytale Patchwork Quilt recently for the 3rd or so time.  One of the children found a hole in the quilt top along the seam soon thereafter.  When I went to repair it, I noticed that several (and one was too many) of the seams were coming open.  Only the Far Far Away gauze and Little Folks voile were effected.  The sturdier quilting cotton seams showed no wear.  It's not as if the stitches actually came undone.  Instead the fabric frayed away.  What did I do wrong?  I wonder if a 1/4" seam allowance was not generous enough or if the fact that I only sparingly hand-quilted it just didn't give it enough strength to withstand normal pulling.  Ugh.  So, my solution was to zigzag quilt around most of the gauze and voile squares to close up opening seams and reinforce the others.  I'll confess, that was not a happy sewing morning.

Your kind comments on that post included so many suggestions for working with delicate fabrics like voile, including using interfacing and a wider seam allowance.  If I were to do it again, I might go that route, but I'm more likely to just avoid quilting with voile in the future.  Not that I think it's unwise or impossible, just that I'd rather save voile for projects that capitalize on it's lovely, drapey, silky properties such as clothes-making or a simple flannel-backed baby blanket a la Anna Maria Horner.  

Since the December incident, Fairytale Patchwork has held up beautifully and it's been enjoyed everyday.  I made Aria a matching pillowcase too!  It's such a privilege to be able to make these beautiful things for my daughter and so rewarding to express my love and creativity in this kind of tangible, practical way. 

I bet you know exactly what I mean!

Fairytale Patchwork for Quilt Story

Thank-you, Quiltstory, for prompting me to share my journey with this project! 
Photobucket

Wednesday, December 1, 2010

Amylouwho's cute quilt...years in the making...

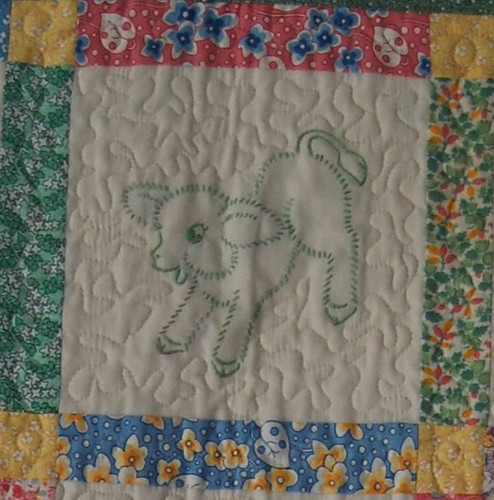
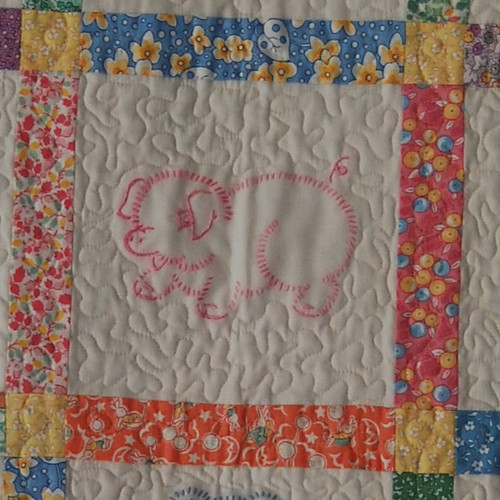
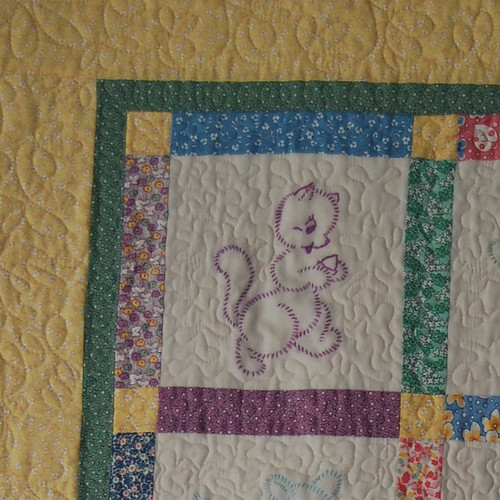
Amy from the fun Amylouwho blog sent me this darling quilt. I love the story. So sweet, she did it for the fall online quilters festival. She has cute little animals she embroidered when she was a young girl. It will be a cherished quilt for sure!  Be sure to check out her site, and her linky parties on Friday's are always full of inspirational projects.

Not only is it cute, this little quilt has a great story!
When I was about 12, I embroidered these blocks for a church project. I don't remember how long it took me, but I'm sure it was a while. The idea is that they would be made into a baby quilt for when I grew up and had my own kids. Well, you know what happened. They sat in my sewing box for about 20 years (that long? really?).


Well, when I got pregnant with my first, my mom and I decided to resurrect the old project and breathe some new life into it. So we went through her stash of 40s reproduction prints and decided to use a lot of different fabrics so it would be more gender-neutral. So we cut out the sashings, and I managed to sew that main part together.


Then my mom took over again and she put on the borders.

My Aunt Mary quilted it on her long-arm machine, my mom sewed the binding on, and I handstitched it down.


I finally finished it a few months before my SECOND was born. (Remember that procrastinating problem?) Even when we got it all put together it still took me forever to sit down and do the handsewing. I really didn't think I would enjoy that part very much - it's grown on me since.

Thanks so much to my mom who helped not just with the sewing and cutting but with the overall look of the quilt and to Mary for doing such a great job on the quilting. I'm really pleased with how it turned out, and it's so cute I'm not sure I really want anyone spitting up all over it. So for now it's hanging on the wall in the playroom.

What's funny (or sad, you decide) is that it took over 20 years, 3 people and many locales to get this thing done. Here's a list of the places it's been worked on:
embroidery - Annandale, VA
Sashing cut - Draper, UT
Sashings sewn - Oceanside, CA (thanks Allyn for letting me use your machine back then!)
Borders sewn - Draper, UT
Machine Quilting - Tooele, UT
Initial binding sewn - Draper, UT
Final handstiching - Stafford, VA

At least it started and ended in Virginia - but sheesh, what a trek. I am kind of glad we didn't put it together way back then - I think the fabrics we had available to us recently make it really cute - who knows what 80's influence would have been at work had we completed it back then! But I love that I have something that my mom, aunt and I worked on together.


Photobucket