Photobucket Photobucket Photobucket Photobucket Photobucket Photobucket Photobucket Photobucket Photobucket Photobucket Photobucket Photobucket Photobucket

Thursday, November 29, 2012

The Quilted Castle

Today we're taking a break from Holiday Tutorials and having a giveaway!

Our newest sponsor, The Quilted Castle


The Quilted Castle comes from Allyson, and I love how she got started, let me share her little story:

I learned to quilt from some friends that I used to work with.  When I became a stay at home mom, I made custom rag quilts which I sold on Ebay and Etsy.  When that business picked up, I started buying extra fabric, and selling the extra fabric that I didn't need.  One thing led to another and I ended up opening The Quilted Castle in 2008 and went to selling fabric full time.  We still run our business from our home, with only the help of one part time employee, Katelynn.  So when you order from us, you get our personal attention!  Our loyal customers have enabled us to broaden our product lines, and we now are able to offer thousands of different fabrics, kits, precuts and patterns.

I love the lines The Quilted Castle carries, modern and new.  I just got some Perfectly Perched, love!  And more lovely Chevrons, love these in my stash.  Both of these are available now.  

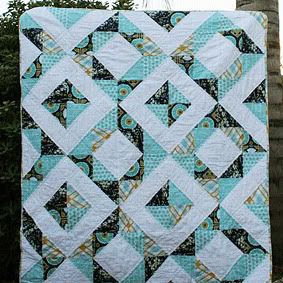
Today they're giving away a Bella Kit in Schooner Blue OR Poppy!!!


Ahhh!!  Love this line.

How to enter:
LIKE The Quilted Castle on Facebook and comment which kit you'd prefer, blue or poppy!

THIS GIVEAWAY IS NOW CLOSED


Photobucket

Tuesday, November 27, 2012

Fabric Tuesday #113

Fabric Tuesday #113!

I (Megan) am in Utah finally getting to see Heather and the rest of my family.  We had a great Thanksgiving, lots of food and so many pies :)  Everyone also got to meet Lucia.  My sweet baby girl has certainly brought an amazing feeling around our family that we all need right now.

Did you enjoy Thanksgiving?  Any of you sewing?  Heather and I have been doing a little crocheting, so nice to chill on the couch and watch a show!

Here's some darling projects from last week:


Sandy quilts from Knotted Thread

Lunch box from Crafting...

Little House in the Woods from Krista Stitched

Weekender bag WIP
Weekender Travel Bag from Quilt it out

Ya'll are so inspiring!  What have you done this week?


Photobucket

Wednesday, November 21, 2012

Imagine Fabric Winner

Winner winner for the Fat Quarter bundle from Imagine Fabric is:

MoeWest said...
I shared this giveaway on FB.

CONGRATULATIONS!!!

Thanks so much for the generous giveaway from Imagine Fabric!
Photobucket

Tuesday, November 20, 2012

FABRIC TUESDAY (sorry I am late)


My craft project...finishing our basement!!!  Holy Moly, my fingers are numb, I think I have nerve damage. We have been painting several days straight for the carpet men to come lay tomorrow.  We started this basement refinishing about 2 months ago. I have a niece temporarily living with us, and we had already grew out of the upstairs...


Of course we have had some fabulous helpers...


Dozens of volunteers we will never be able to repay...


My niece and daughter will be moving into this room....

Hopefully a reveal next week...

What have you been up to?
Photobucket


Monday, November 19, 2012

Fly a kite quilt from Gold Show Girl...


How darling is this quilt? And the kite pillow is just killing me! Gold Shoe Girl is a fun blog of Alissa. A quilting/crafting/decorating kind of girl (my kind of girl!). Here are some of her sewn projects, some great wall art ideas, be sure to visit her blog for more fun....

Well, the name for this quilt was kinda obvious to me.  I made it using October Afternoon for Riley Blake's Fly a Kite line.  I have to say that I think this is my favorite quilt finish so far.  It is my own design and I really like how the borders turned out especially since I had not done any until now.


I fussy cut the main fabric with the kids so that the pieces would highlight them flying kites and swinging.  I also fussy cut the border pieces to try to get the kite and the dog too.


The binding is machine stitched using one of the coordinating fabrics that I also used in the patchwork.  The quilting is very simple and sparse straight line around the seams.  Again I used the Kona white for the backing.  I really like how soft it is and how the white allows the fabrics to really stand out and keeps everything from getting too busy.  It is 45 x 60" which is just perfect for a toddler or crib quilt.  Now if I just had a toddler...


I always seem to make a little pillow too.  I hate to waste any scraps or extra pieces and it's just so easy to make a matching pillow to go with the quilt.  Plus I can usually get the pillows done in an afternoon so it is a nice instant gratification project.  


The kite in the pillow was made by sewing 1 inch strips together lengthwise and then I cut a kite shape out of the white and sewed the stripped piece in behind it.  I didn't turn the white under - I just stitched around the edge.  I am actually hoping for a little fraying to add some texture to it.  Then I embroidered the string for the tails and the wording in coordinating floss I already had on hand.  


The tails are pieces of scrap cut with pointed ends, topstitched around the edges and then tied into a little knot.  Then I just sewed them onto the embroidered tail string.


Honestly, I am going to have to start finding recipients for these little projects or open an etsy or something because I am running out of space to keep all these quilts.  I have another quilt done that I haven't even shown you yet and I am in the middle of another something special for fall.  Plus I went crazy at fatquarter.com the other day so there's likely to be a storm of sewing soon.

Photobucket

Thursday, November 15, 2012

Holiday Tutorail: Flip Pouch from a2w

Today's Holiday Tutorial is by Ali from a squared w.  Ali's blog is a fun read, she's a darling red head who loves to travel, take pictures, sew (of course!) and the color yellow!  She's got a lot of great tutorials, patterns and finished work!  Thanks so much to Ali for her awesome Flip Pouch tutorial!!

When I received my copy of Melody' book, Ruby Star Wrapping, I was inspired to cut down on the wrapping waste this year. Ideas floated around but none of them seemed to stick. I needed something easy that I could do with what I already have (lots of fabric!).


Flip Bag Tutorial by asquaredw
Like magic, this came to me. I spent a good amount of time figuring out how to make this with all seams hidden. A few prototypes later and some hard thinking and I have it.

I've scaled mine to fit my hairdryer and brush for travel. They would also make great shoe bags (these are perfect for size 7 Converse!), snack bags (if you line them with PUL instead) and travel laundry bags for delicates. Toss a plain rice sack in it for a heating pad, or make a tiny one for headphones. I trust you can come up with many uses!

Let's get to it!

* All seam allowances are 1/4" *

Materials
- 9.5" x 26" exterior fabric
- 9.5" x 9.5" lining fabric
- 9.5" x 19" lining fabric
- 6" of 3/4" velcro (optional)

Make It!
* Optional: Velcro
Center one piece on the velcro on the exterior fabric: 3/4" down from the top, 2.25" from each side.

Center the other piece of velcro on the 19" piece of lining fabric: 1.75" down from the top, 2.25" from each side. 

1) Sew the two lining pieces together along one 9.5" side, leaving a 3" gap in the middle. This is where we will turn the bag at the end. (seam 1) (The velcro should not be near this seam)

2) Sew the exterior fabric to the 17.5" lining fabric. Press the seam open. Top stitch with decorative stitch of your choice over the seam line. (seam 2) (The side of the lining fabric that has the velcro and the side of the exterior fabric that does not have velcro)

3) Sew the other ends of the lining and exterior fabric together, creating a tube. Turn right side out and press. Top stitch 1/8" from the edge. (seam 3)(The side of the lining fabric that does not have the velcro and the side of the exterior fabric that does have velcro)

Flip Pouch Tutuorial Seams

4) Turn back inside out. This is the tricky step.


Flip-Pouch-folding-diagram 

- Lay the tube on your cutting mat with Seam 1 lined up in a grid line and the wrong side of 9.5" lining square facing to the left.

- Fold it back at Seam 2 so that you create a pocket. The next fold should line up with Seam 1 on the grid line.


-  Measure 12" from Seam 1 and mark the layer on the cutting mat (Mark 1). Measure an additional 5.5" from this point and make another mark on the bottom layer (Mark 2).


-We are going to be making a second pocket on the left side of our tube. Fold the fabric toward the right at Mark 1, then back to the left at Mark 2, making sure that this is on top of the first pocket. Pin!


- The last fold should align with the fold at Mark 1. Pin. Pin. Pin.

Flip Bag Tutorial-5
This is the pocket created on the left side of the diagram. You can see that both the top and bottom layer are folded. 


5) Sew along the 2 pinned sides. Trim corners. Do not cut any folds!

Flip Bag Tutorial-4

6) Turn right side out. There will be a lot of turning and flipping involved, but you should be able to get it to the right place if you folded it correctly. Top stitch the opening closed, making sure not to catch any other layers. 

Flip Bag Tutorial-8
Here is the pouch with the top flipped open. You can see that there aren't any exposed seams and that the top and bottom have a couple inches of overlap.

Ta-Dah! Now go put things in it. :)
Flip Bag Tutorial-9Flip Bag Tutorial-10
These two bags are the same size. On the left are a pair of size 7 sparkly black Converse. On the right is a lumpy package. Can you guess what's in there?
Photobucket

Wednesday, November 14, 2012

Fat Quarter Bundle Giveaway from Imagine Fabric!

We've got a great new sponsor, Imagine Fabric:


I was looking for a certain print a couple months ago that I couldn't find anywhere...and found it here!  I love that.  Easy to shop, great and fast shipping.  I'll let Hien tell you a little more about Imagine Fabric:

Here at Imagine Fabric, we always want to establish a relationship that doesn’t end as soon as you place your order online and ship your products. We want to develop an intimate rapport with passionately inspired customers like you by providing highest standard customer service as well as customer-oriented activities.
Imagine Fabric started 5 years ago with my own search for fabrics I loved and inspired me to create. Unique and beautiful designer fabrics were and still are difficult to find locally.  To get my hands on the fabrics I liked, I started to call the manufacturers directly and that is how Imagine Fabric started.  I figure if I have difficulties finding “boutique-like” designer fabrics, other end consumers probably have the same problem so I wanted to fill that need.  We want to continue to offer the most on-trend manufacturers, designers and fabric designs. 

They're offering a great giveaway for a lucky reader today!  
Fat Quarter Bundle of Valori Well's Nest Collection
$43 value


Yummy!  Think of the homemade gifts you could make!

Want to win?
Two ways to enter, leave a separate comment for each please


Imagine Fabric SHOP
Imagine Fabric FACEBOOK
Imagine Fabric TWITTER

Giveaway through next Monday, winner announced Tuesday.

Photobucket

Tuesday, November 13, 2012

Fabric Tuesday #111

Happy Tuesday ya'll!  Now that my sweet little Lucy is here you'll still get baby girl clothing projects...but at least there will be a cute baby in them now! :)

My awesome friend Sara from Sew Sara sent me the sweetest little onesie for Miss Lucia.  I looove it, I've already decided this will be her "debut" outfit, hehe :)


Is that not crazy cute?!  Sara is sooo good at applique, I need to practice much more to have her skills.  She was super nice to do an applique letter tutorial a while back for you to practice too!


Lucy was a little over photo shoots for the day, I've been snapping pictures nonstop.  They are only tiny for so little time. I already feel like she's grown so much, smiling, trying to hold her head up, sigh.

Don't you love her "tights"? Hehe.


I made the little skirt to match.  It went perfect with Apple of My Eye from The Quilted Fish.  Glad I had it in my stash!

Sara does custom orders, she does a lot of these sweet minky blankets.  But I checked with her tonight since I knew people would be asking, and she would do the onesies custom too :)  Just contact her through her shop.  Thanks Sara for the sweet and thoughtful gift!!

Edited to add:  I forgot to link to SEWSARA's FACEBOOK page!  She posts a lot of custom orders so you can see all those cute things!!

Fabric Tuesday #111

Have you been sewing your heart out?  Let's see it!


Photobucket

Monday, November 12, 2012

Keep Calm and Graduate On from The Blueberry Moon


Keithena from The Blueberry Moon has a fabulous quilt and story to share today.  Absolutely LOVE this quilt, such a great idea!!  The British side of me is very inspired!!  The Blueberry Moon has some fun places to look around, her quilts, recipes, tutorials...so stop on by after her feature :)

Remember When I said London was calling?
Well look....It did. And it was for Brontë.
Quilt and pillow ..... Jolly good I'd say.   


    WARNING!!
        Here comes the quilt story....It's a bit long winded.

     When I was 19 I read "Wuthering Heights". Oh, I loved that book! I read it over the summer of 1986. It was a challenge for me. I love to be challenged. It remains as my all time favorite reads. The author of that great tale, Emily Brontë, I found fascinating also. I remember telling myself at the time. If I ever have a daughter. I will name her Brontë. 

     Eight years and two sons later, I did. And she, like the book, has been challenging. In the very best way possible. I have learned so much about who I am by raising her. She is fascinating, complicated, silly, kind, smart, thoughtful, creative, strong-willed and beautiful.

     On tuesday she begins her senior year of high school. She has plans to attend college. She is thinking photo journalism. I am thinking..... I never want her to leave !!!

      Senior years are so tough these days. The stress can be overwhelming for these kids. I have watched some of my son's friends get crushed under the pressure. And some achieve amazing things. I know what lies ahead for her. And it is a lot. The best and most challenging of times. As a mom I can only comfort her. The work and results are all up to her.

      So comfort her I will...
 With this pillow.
                               
 And this quilt.


    This idea came to me a while back.I was going to wait until graduation. 
But for all the reasons I will give. The time was now....

        I know in the days ahead, 
She will come home mad at something some dumb girl said....
"The Boy" will bruise her heart....
The testing will melt her brain....
The teacher just won't understand....

There are sure to be,
Rejection letters......
Failed awards....
Grades that didn't come out as planned......
Plans that seem like they will never succeed.....

But then again there will be,
Great test scores....
Amazing teachers....
Homecoming ........
The Prom .....
The acceptance letter...
Graduation celebrations....
The acceptance letter....
Saying goodbye to friends.....

For each of these moments in time. She can run home  cuddle up with these gifts of love. She can cry tears of anger, happiness or fear. Scream into the pillow. Hide under the quilt.
But she will know she has a Mom that loves here......
And the goal is to just......
Keep Calm and Graduate on !!!!

More pics....


 If any of you out there have a Senior in your life...... I think this makes a great gift idea. 

In the next few weeks, I will have the PDF template for the the letters and cap. Also included will be cutting and finishing instructions.  So keep a look out.......

Photobucket