Photobucket Photobucket Photobucket Photobucket Photobucket Photobucket Photobucket Photobucket Photobucket Photobucket Photobucket Photobucket Photobucket

Showing posts with label holiday guest tutorial. Show all posts

Wednesday, October 24, 2012

Holiday tutorial, Handmade by Kirsty...

Check out this lovely little lady Kirsty. Lovely projects all over her blog that I browsed and browsed when I first came across it. Just swoon over these lovely little finished projects of the year. And she has only been sewing since May! (should we warn her???). I really hope to make some of these little scented pillows, I wish I had one now to throw in the micro and warm my freezing toes! (guess it will be my poor husband's legs again) Be sure to visit Kirsty's blog and give her a welcome...

If you missed our other Holiday tutorial projects, see 12 pocket bag, Holly Berry Pillow Cover, and Hexagon Handle Holder. Be sure to visit Thursday's through the rest of the year for some more gift ideas. 

Hello, my name is Kirsty and you can find me blogging at allhandmadebykirsty.  This is my first guest blog and tutorial so thank you to Heather and Megan! I am a little excited!  I have only been sewing since May 2012 but have found a real love for it and spend a lot of time reading other blogs for inspiration.

My tutorial is for scented pillows which are very easy and a quick stocking filler.  These are great for putting in drawers or if you scent it with lavender they can assist with sleep and relaxation.


Materials:

Fabric Scraps

Ribbon (if you want to make a ribbon pillow)

Coordinating Thread

Water Soluble Pen (optional)

1 lb or 450g Rice (uncooked)

Essential Oils


For the pillow:

Cut 2 pieces of fabric 51/2"x31/2"

For patchwork:  Cut 4 pieces 11/4"x11/2"  (or if you are making a few pillows, cut strips of 11/4" wide)

For stripes:  Cut 2 pieces 11/2"x31/2"

For ribbon:  Cut 2 lengths at 31/2"

Step 1:  Mix uncooked rice with 15 drops of essential oils in a zip lock bag.  Allow the rice to sit for a couple of hours to dry.


Step 2. Sew patchwork or stripes together.  For patchwork sew the 11/2" edges together and press seams.  For stripes sew 31/2" edges together and press seams. (seam allowance is 1/4" throughout)


Step 3.  With your pen mark each long side 1/4" in from edge and press along that line.


Step 4.  With one piece of pillow fabric, right side up, pin patchwork 21/4" in from the left side and top stitch along each side. Or for the stripes, pin 2" in from the left side and top stitch along each side.


For the ribbon I placed the first strip 11/2" in from the left edge and allowed 1/4" gap in between.


Step 5.  Pin pillow fabric, good sides together, and mark 3/4" in from each edge on one short end.  This will be your guide on where to start and end stitching.  Sew from top right corner around to your other pin.


Step 6.  Trim corners off and turn out the right way.  You can use a stuffing tool or a chopstick as I do to push your corners out.


Step 7.  Press pillow, making sure the opening is pressed inwards.


Step 8.  Add scented rice to the pillow.  I used approx 1/4 cup.


Step 9.  Lastly, top stitch around the outside of the bag, ensure
that the opening is caught in the top stitch to seal the pillow.  When you
reach each corner give the pillow a shake and move the rice to the opposite corner.


Then all that's left to do is wrap your pillows.


Photobucket

Monday, December 19, 2011

Tutorial: Mini Christmas Quilt

First, winner of our $40 giveaway from Five Monkey Fabric, #198:


Mimi said...
Oooooh I love the Black and White bundle, 4 Fat Quarters - sweet!!! Thanks!

Congrats!!  Get shopping!!  Thanks to Five Monkey Fabrics for such a great giveaway to our readers :)

Get ready to die. of. cuteness.  I have to admit that today's Holiday Gift Tutorial is 100% selfish of Heather and I.  We both went nuts when we discovered Erin from Why Not Sew? and her mini quilts.  So unbelievably cute.  And she does not disappoint today!  Make sure to see Why Not Sew? , her darling gallery of birdie quilts and her shop.
 First of all I'd like to say a big "Thank You" to Heather & Megan for asking me to be apart of all of these great Christmas tutorials. I hope I can deliver. All of the projects have been fantastic! For my Christmas Tutorial I am going to show you how I make, and how you can make, a mini Christmas quilt that can be used for a wall hanging or topple topper.
You will need: Heat'n Bond or a fusible web of your choice (you won't need much of this, 4 x 10 inches should be enough) Fabric of your choosing  for applique pieces (large scraps are perfect!) 12 inch square of background fabric (I used linen) 1 3/4 inch square for the present. 13 inch square piece of batting 13 inch square piece of backing fabric Black thread Darning foot for free-motion sewing (alternative-hand embroidery) binding fabric and method of choice Birds, holly leaf, holly berry template here.  
 Draw or trace your pieces onto the paper side of your fusible web. Cut out your pieces leaving at least 1/8 of an inch around your drawn lines. This will insure that the fusible web has covered all of the fabric and there will be less chance of fraying. You may use the birds, holly and berries that I drew for you or by all means draw your own. The ones for the file are not what I used here. I tried to draw nicer ones for you to use that are in the file.  Birds, holly leaf and holly berry file here.
Fuse your pieces to the WRONG side of your fabric.
Cut out your pieces ON the drawn line.
Take the paper off of your pieces and place them like this on your background fabric. When you have them in place iron them down.
Use black thread and set your machine up for free motion sewing (darning foot, drop feed dogs).
I start by outlining the Holly leaves and berries on each side.
Next I draw a branch between each set of Holly for the birds and present to rest on.
Then I outline the present and make little loops for the bow.
The birds are outlined next. I like to go around them a few times. Then make eyes, a beak and little bird legs. For all of these outlines I like my stitches to fall on the fabric pieces and the background fabric. I like a really drawn / sketchy look. Now this is where you can decide if you are finished with your block or if you want to add some embroidered words.
 I wanted to embroider a Bible scripture on mine. I just grab a Sharpie and write right on the background fabric.
Here it is embroidered. I know that it isn't perfect. But it has that handmade feel that my mother loves and this is for her so I know it's okay. You can use a ruler and write very neatly on the lines or use a really pretty font, whatever you like. I prefer this method. Press and square up your block now. There is some shrinkage and distortion from the free-motion stitching and the embroidery. Now you can add a patchwork border or a plain border or leave your block as is. It's really up to you and I have made these using all of the above and they are all great options. Next layer your block (top), batting and backing fabric to make a quilt sandwich. Baste.
For this quilt I am quilting some horizontal uneven lines with big stitches. 
Next thing you do is bind your quilt! I chose a bright cream colored fabric with pretty green polka dots for the binding.
 That's it! Enjoy your new Christmas quilt! I hope my instructions are clear. If you have any questions please don't hesitate to ask. I hope you all have a wonderful holiday with the people you love! Thanks again Heather & Megan!

Thank you to everyone who participated on our Holiday Gift Tutorials series, we are so appreciative!


November 7th: Amber from A Little Bit Biased Tutorial: Holiday Table Topper
November 14th: Quilt Story :) Tutorial: Winter Tree Table Runner
November 21st: Bev from Flamingo Toes Tutorial: Linen Jewelry Travel Bag
November 28th: Corey from Little Miss Shabby Tutorial: Hope Canvases
December 5th: Jeni from In Color Order Tutorial: Fabric Embellished Dish Towels
December 12th: Melissa from Happy Quilting Melissa Tutorial: Holiday Oven Mitt
December 14th: Gentri from Little Lulu's Nest Tutorial: Hoop Art Ornament
December 19th: Erin from Why Not Sew?

Photobucket

Tuesday, December 13, 2011

Hoop-art Ornament tutorial from Little LuLu's nest....


The winner of the POPPY SEED FABRICS giveaway is:


Blogger Emily said...
My best birthday was when my husband threw a party for me with all of our friends.
 It was the first time I'd had a real birthday party since I was a little girl!
December 9, 2011 8:46 AM

Congratulations!

Today we have Gentri from Little LuLu's Nest. Gentri and Megan are good friends, she should probably be writing this intro :) They met while their husbands were in medical school together. Gentri and her sister Brayli have a darling blog, and etsy shop. Their blog is full of fun tutorials, recipes and general crafting. They are super duper cute fun sisters!

Here are the Holiday Gift Tutorials past and upcoming:

November 7th: Amber from A Little Bit Biased Tutorial: Holiday Table Topper
November 14th: Quilt Story :) Tutorial: Winter Tree Table Runner
November 21st: Bev from Flamingo Toes Tutorial: Linen Jewelry Travel Bag
November 28th: Corey from Little Miss Shabby Tutorial: Hope Canvases
December 12th: Melissa from Happy Quilting Tutorial: Holiday Oven Mitt
December 14th: Gentri from Little Lulu's Nest
December 19th: Erin from Why Not Sew?


hello, I'm Gentri from Little LuLu's Nest
and I'm excited to be here
at Quiltstory
Megan and I met while our
husbands were busy studying 12+ hours a day...
and I am happy to say I've met Heather as well
at this year's quilt market
and they are both beautiful, fun, talented ladies!
I've come up with a fun, last-minute neighbor gift
that is so versatile, and can be
personalized any way you'd like
and best of all it's {cheap} and {easy}
hoop-art ornament
1. start with your embroidery hoop,
the smallest hoop you'll find is 3 in and that's perfect
for a little personalized ornament.
2.  cut out your background fabric and leave
some extra fabric around the edges for later on.
{i used a linen blend for 2 and a cotton pattern for 1)
3. next i "google imaged" the shapes i wanted to work with
and simply traced those onto paper
(or if you're awesome and can free-hand any drawing, that's easy too)
4. cut out your desired shape and pin to felt
and cut out your felt piece
5. simply glue the center of the shape onto
the fabric in the hoop
(fabric glue works wonderfully)
I chose to do 3 different ornaments
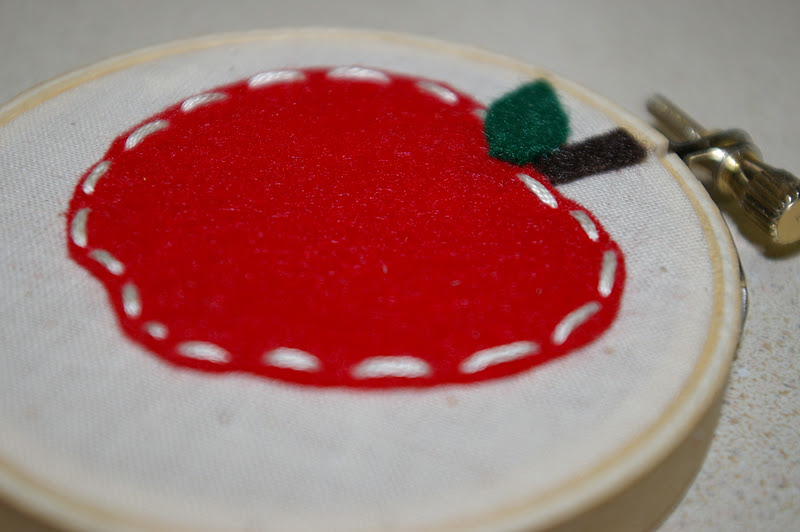
an apple for my son's teacher
a "T" for a family friend
and a star for a neighbor
this is the fun part,
the possibilities are endless
a "1" for a couple's first Christmas
or a baby's first Christmas
a date
2011
an initial
a snowflake
the word "JOY"
etc
etc
6. with cooridinating thread
hand-stitch the outside of the shape
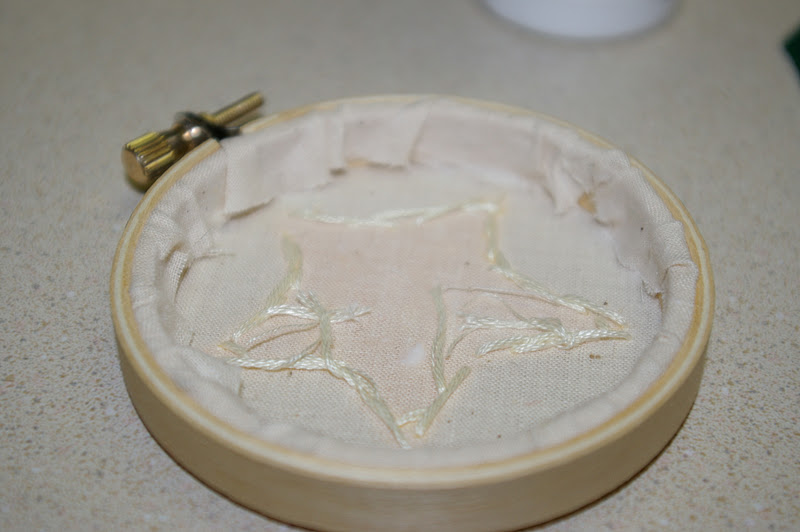
7. lightly glue your leftover threads
out of the way of the edges, like the above picture
8. next, glue around the inside of the hoop
around the back and tuck in your fabric
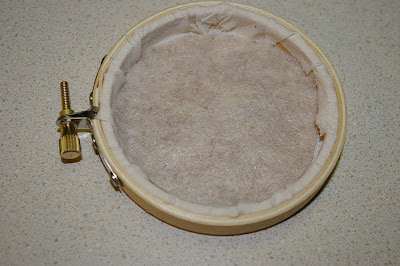
9. cut out a small felt circle and glue to the back of your hoop
this way the thread's stay in place and it gives it a nice finishing touch
10. that's it.
you have a cute, personalized ornament
to gift to someone
...last, but not least
tie some twine, ribbon, thread or yarn
to the clasp at the top.
that way it can actually hang
like an ornament
I'm attaching my hoop ornaments
to little jolly treat bags
and spreading the joy of Christmas
thanks for hanging out today
and come stop by and say hello or check out my etsy shop
i'll be posting a gingerbread cookie recipe later this week
if you need a little treat for those bags :)
Happy Holidays,      
Gentri

Monday, December 12, 2011

Tutorial: Holiday Oven Mitt

Don't you love these Holiday Gift Tutorials each Monday? What great gift ideas, now all I need is the time to make them! Melissa from Happy Quilting brings us today's tutorial, fun oven mitts! Melissa's blog is fabulous! Check out her amazing quilt archive.  And some awesome quilt tutorials, you can make 13 great quilts without every buying a single pattern! And for even more tutorials click here.  Her blog is a great source of inspiration and fun, she is a super duper darling girl!

Here are the Holiday Gift Tutorials past and upcoming:

November 7th: Amber from A Little Bit Biased Tutorial: Holiday Table Topper
November 14th: Quilt Story :) Tutorial: Winter Tree Table Runner
November 21st: Bev from Flamingo Toes Tutorial: Linen Jewelry Travel Bag
November 28th: Corey from Little Miss Shabby Tutorial: Hope Canvases
December 12th: Melissa from Happy Quilting
December 14th: Gentri from Little Lulu's Nest
December 19th: Erin from Why Not Sew?


Hi Everyone!!!  This is Melissa from Happy Quilting :)  When Heather and Megan asked me to participate in their Holiday Gift Tutorials hop I was so excited.  One of my favorite parts of the Holiday season is Baking!!  So I figured it would be super fun to whip up some Holiday Oven Mitt's for all of the baking I will be doing :)  These Oven Mitt's go together super fast and are so much fun to make.  
To make this oven mitt you will need :
   2 Pieces of Christmas fabric each  measuring 10" x 16" for the outer oven mitt
   2 Pieces of Christmas fabric each measuring 10" x 16" for the inner lining
   1 piece of Christmas fabric measuring 2 1/2" x 16" for the binding
   2 pieces of Insul-Bright batting each measuring 11" x 17"
   2 pieces of Warm and Natural batting each measuring 11" x 17"
   
You start by making 2 mini quilt sandwiches.  Layer each sandwich starting with the lining print faced right side down, then the Insul-Bright, followed by the Warm and Natural batting and then the outer print fabric with right side up.  Baste your two mini quilt sandwiches.
Print out a copy of the Oven Mitt template.  Trace the template onto each of your quilt sandwich making sure to flip it over for the second tracing.  (So the thumbs should be on opposite sides of the sandwiches.)  The template is for a standard size oven mitt but if you want yours longer (I like mine that way) you can add 2" to 3" at the bottom of the template.
This is my favorite part.  Quilt inside the tracings of each quilt sandwich.  (I like to stay inside the drawn line so that I don't end up cutting any of my quilting lines.)  You can quilt a basic cross-hatch design or you can spice it up and do some fun free motion quilting.  I did swirls to match with the candies :)  Once you are done quilting your two sandwiches go ahead and cut out on the trace lines of each sandwich.
To make things a little easier when binding we will stitch up the bottom of the oven mitt.  If you have a serger just go ahead and surge along the bottom (and only the bottom) of each side of the oven mitt.  If you don't have a serger (like me) stitch a straight line 3/8" in from the edge and then go back and do a tight zig-zag stitch right along the edge.
Place your two oven mitt sides with right sides together so the linings are both on the outside.  Pin along the outer edge but not along the bottom of the oven mitt.
Now once again, if you have a serger, go ahead and serge around your pinned edge.  If you don't go ahead and stitch your straight stitch 3/8" in from the edge and then go back and do a tight zig-zag along the edge.  This is a lot of layers so if you have a heavy duty needle and a walking foot it will help :)
Turn your oven mitt right side out.  This takes a little work along the seams.  Use a sharp tool if necessary to push out some of the curves.
All that is left is binding the bottom.  So take your binding strip and iron it in half.
Measure the amount of lining you will need to go around the inside of your oven mitt and overlap 1/2".  Trim the excess.
Take your newly trimmed binding strip and open it up and place it with right sides together.  Stitch a 1/4" seam along the raw edge.  Now fold your lining in half again with wrong sides together and right sides out.
Place the lining inside the edge of your oven mitt with the raw edge of the lining along the edge of the oven mitt.  Pin in place.
Now stitch a 3/8" seam along the edge of the binding on the inside of the oven mitt.  This is a little tedious but a walking foot and heavy duty needle will help.
Lastly, flip your folded edge of the binding over the oven mitt and pin. You can hand sew the binding down or use your machine.  Whatever your preference :)
And you are done!!  Wasn't that easy.   Now just fill it with some fun Holiday baking goodies and it is ready to give to your friends and family :)  Enjoy!!!  And if you make some of these fun Holiday Oven Mitt's I would love for your to post a picture of them in my Happy Quilting Flickr Group :) Thank you to Heather and Megan for having me here at Quilt Story and Happy Holidays!!!

 Photobucket