


We've got another tutorial today from our Holiday Gift Tutorials series and it's Bev from Flamingo Toes. Anytime Bev agrees to help us on a project I get all giddy because she's amazing. It is very hard for me to pick a favorite of her projects, but here are a couple of my recent favorites, her Retro Christmas Dish Towels, Stitched Furniture Silhouettes and Anthro Weights and Measures Bracelet. I strongly encourage you to stop by Flamingo Toes after you check out her fabulous Jewelry Bag Tutorial!!
Here's the schedule:
November 7th: Amber from A Little Bit Biased Tutorial: Holiday Table Topper
November 14th: Quilt Story :) Tutorial: Winter Tree Table Runner
November 21st: Bev from Flamingo Toes Tutorial: Linen Jewelry Travel Bag
November 28th: Corey from Little Miss Shabby
December 5th: Jeni from In Color Order
December 12th: Melissa from Happy Quilting Melissa
December 14th: Gentri from Little Lulu's Nest
December 19th: Erin from Why Not Sew?
Hello Quilt Story Readers!
I am so excited to be here sharing a Handmade Gift Idea!
My name is Bev and I blog over at Flamingo Toes.

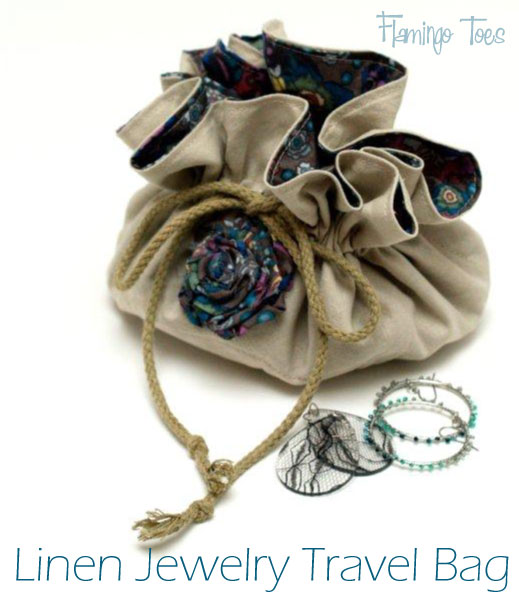
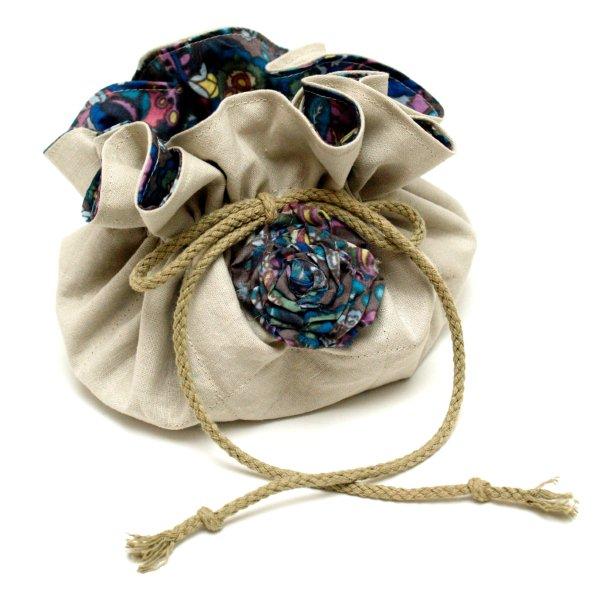
I'm here today with a gift idea for the gals in your life! It's a pretty Linen Jewelry Travel Bag!
This is a pretty quick tutorial! It's really fun to put together too!
Here's what you'll need to make one:
1/2 yard for outside fabric
1/2 yard for inside fabric
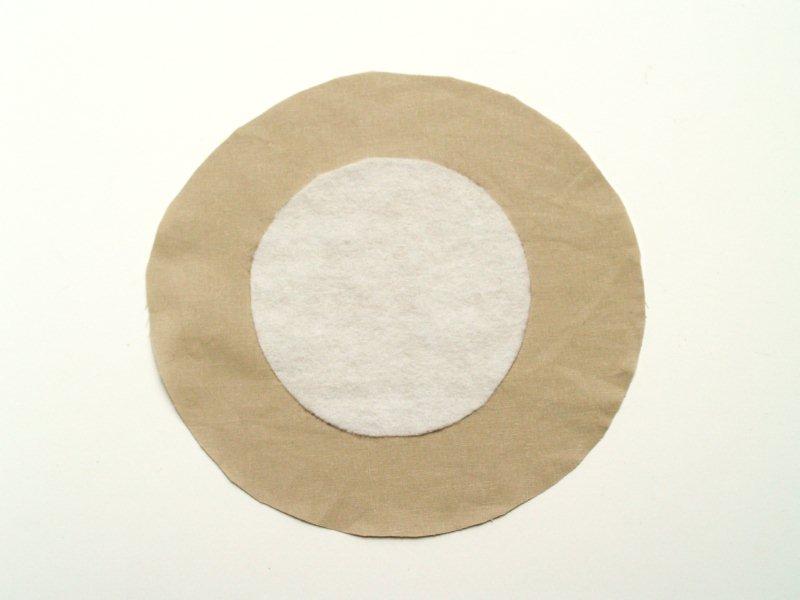
7" circle of fusible interfacing
Cording or Ribbon for Tie
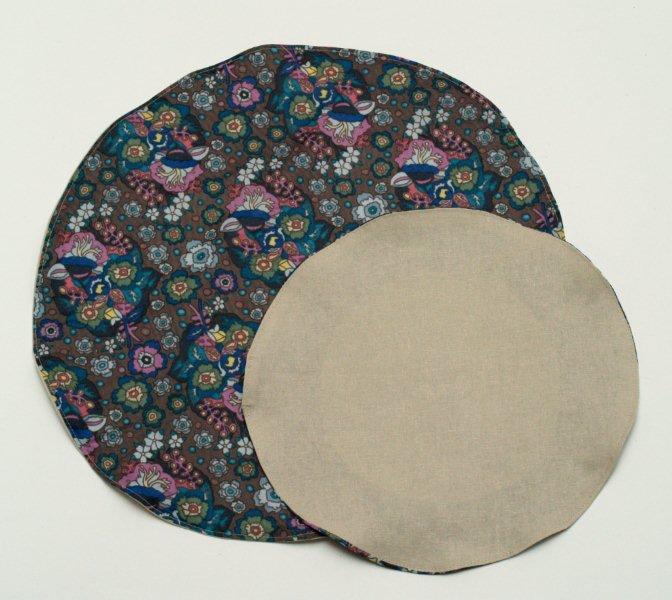
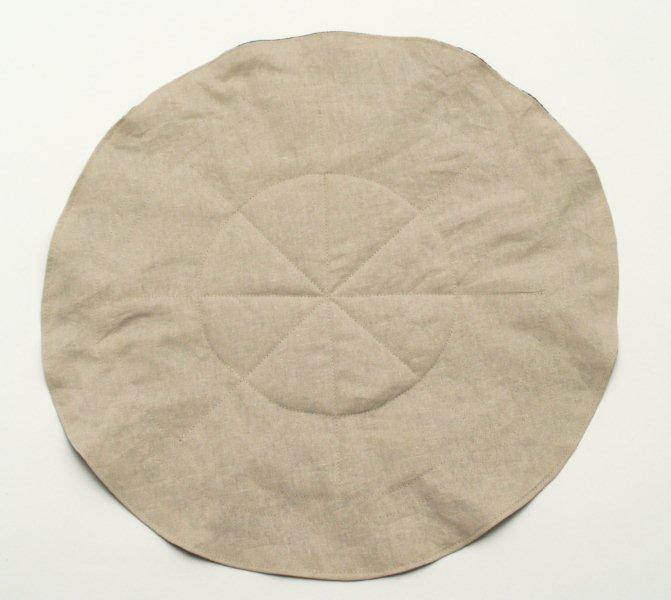
Begin by cutting out your circles. Out of each fabric cut 1 - 18" circle and 1 - 15" circle.
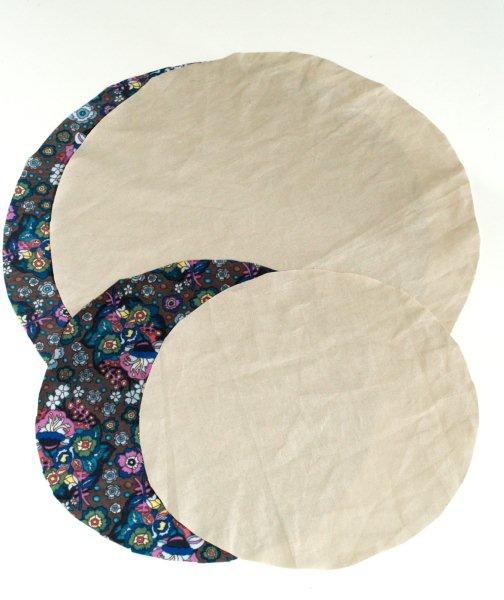
On the wrong side of fabric of the small outer fabric circle, iron the circle of fusible interfacing in the center.
Place the small circles right side together and sew around the edge with a 1/2" seam allowance. Leave an opening for turning, clip the seam allowance all the way around and turn right side out.
Press. Repeat for the large circle.
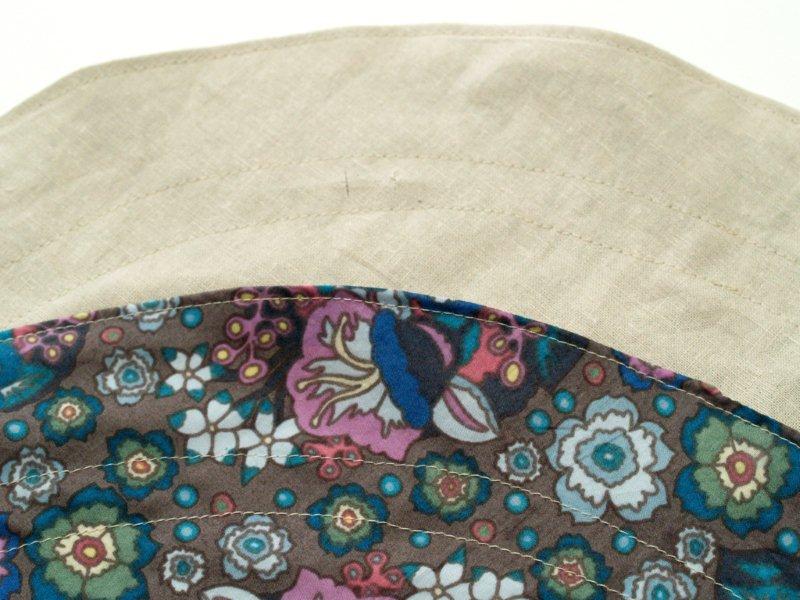
 Topstitch around the outside just inside the seam, making sure the openings are sewn closed.
On your large circle, sew a circle 1 3/4" from the edge, then a second circle 2 1/4" from the edge. This will be your casing.
(If you are using wide or really thin ribbon, you can adjust this.
Topstitch around the outside just inside the seam, making sure the openings are sewn closed.
On your large circle, sew a circle 1 3/4" from the edge, then a second circle 2 1/4" from the edge. This will be your casing.
(If you are using wide or really thin ribbon, you can adjust this.
Topstitch around the outside just inside the seam, making sure the openings are sewn closed.
On your large circle, sew a circle 1 3/4" from the edge, then a second circle 2 1/4" from the edge. This will be your casing.
(If you are using wide or really thin ribbon, you can adjust this.
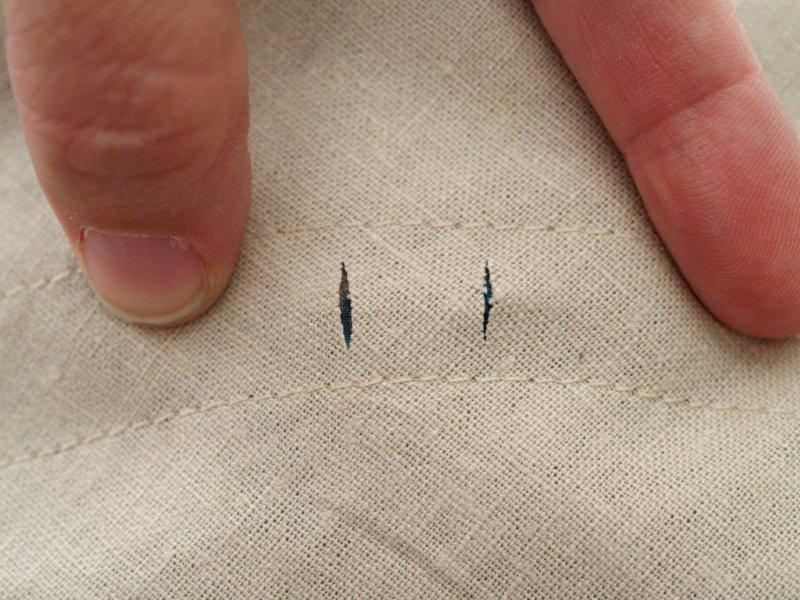
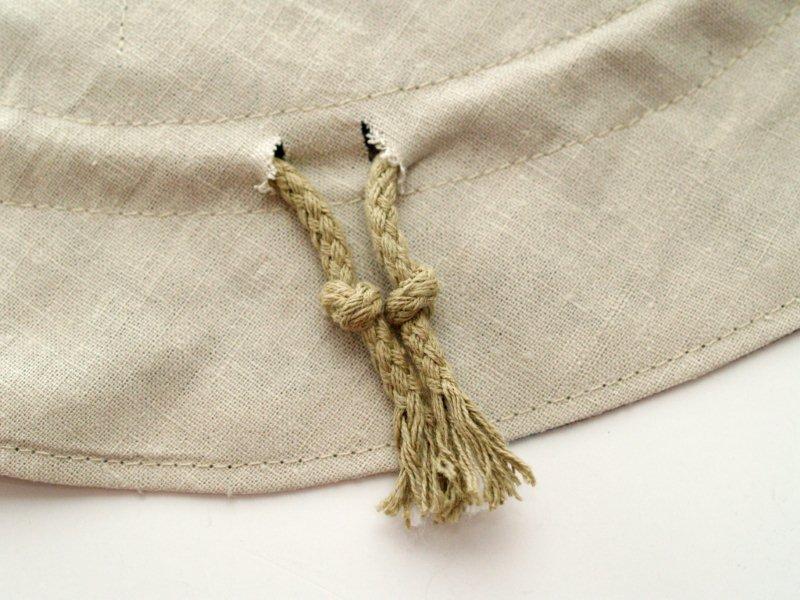
Pull the outer fabric away from the lining inside the casing. Make two small slits in the outer fabric only.
Treat these with Fray Check.
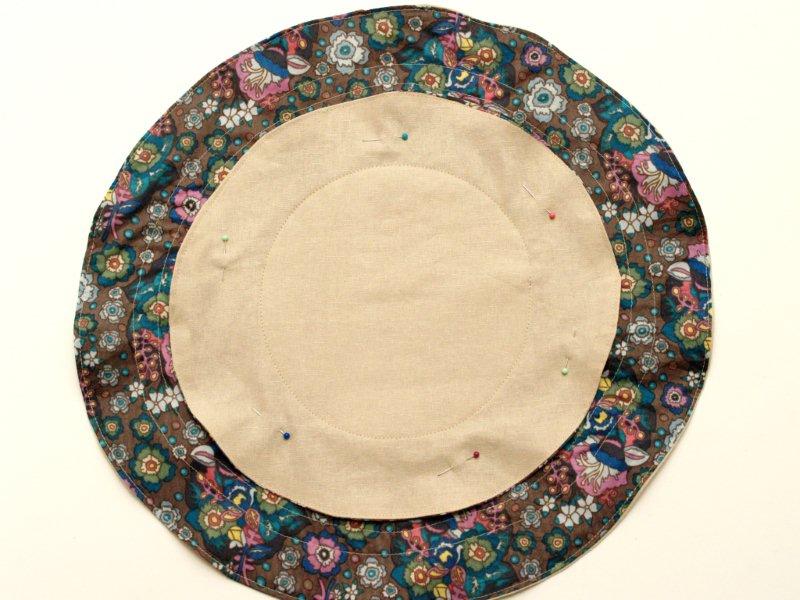
Place your small circle, outer fabric up, on top of the inside fabric of the large circle.
On your small fabric circle, sew a circle just over the edge of the fabric batting in the center, sewing through both circles.
Draw 4 lines through the inside circle, like a pie. Sew down these lines. This will create the little pockets along the sides.
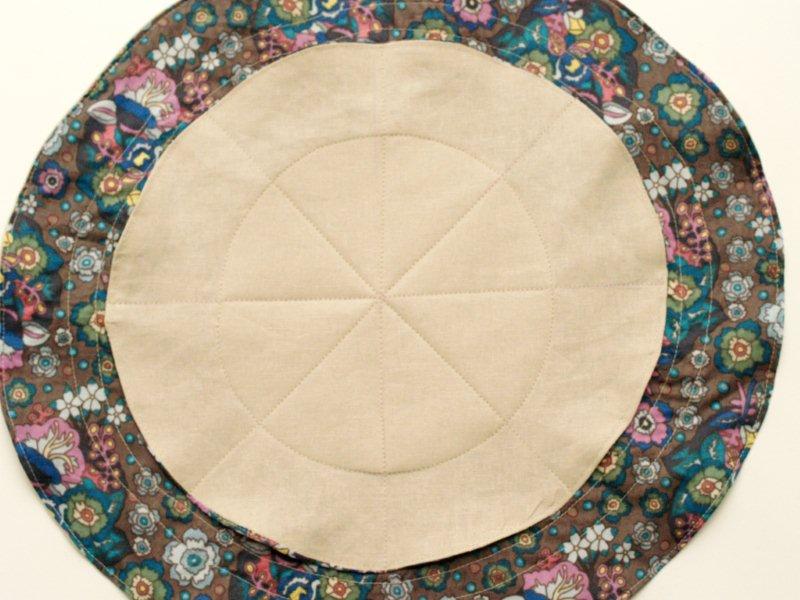
Here's what the back looks like.
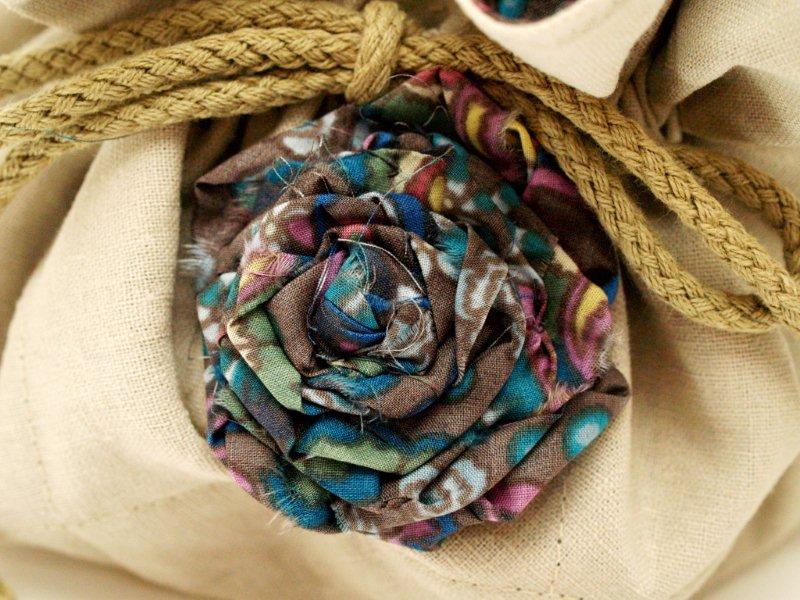
Feed your cording or ribbon through the casing, leaving just a little bit through each hole. Knot the ends.
Make a little fabric rosette out of your inside fabric. Sew it to the outside just below the casing opening.
That finishes off your little bag!

Inside there are 8 little pockets that you can stash earrings in, you can put bracelets or other larger things in the center section.
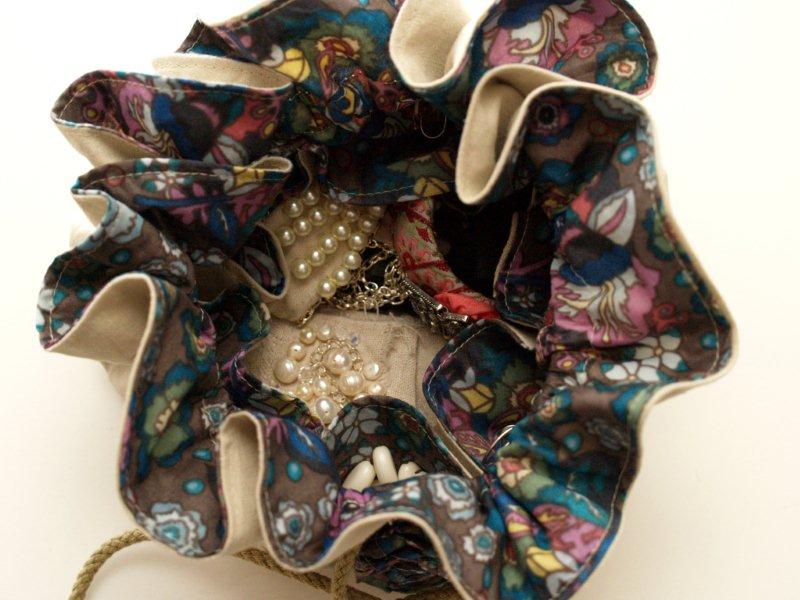
This little bag would be great for makeup too!
I hope you like it!
I'd love for you to come check out Flamingo Toes sometime - you can see my other Tutorials here!
You can find other sewing projects, plus lots of jewelry knockoffs to go along with your new little Travel bag! :)
And on Black Friday I am having a HUGE Giveaway Day with 20 giveaways totalling almost $800!
I'd love for you to come by!

Thanks so much Heather & Megan for having me over!! :)


11 comments:
This is really lovely! Thanks for the tutorial.
Thanks so much for inviting me over girls!! I LOVE Quilt Story - and I sooo appreciate your sweet intro! Made my day!! :)
Love this tute! Making a few for Chrsitmas presents :o)) Thank you, Amie in Tn.
very cute! Love the lining fabric :)
This bag is awesome, what a clever idea!
such a great tutorial!
Very cute and useful! a win win :)
If you make this in all black it's not very pretty, but it hides very nicely in the recesses of your purse when you are on travel. I can even go through my own purse and think I've lost it so it's a nice safety feature.
A splendid job! best trollery luggage
Nice Article...Celebrity photographer in mumbai
GREAT POST!
THANK YOU FOR SHARING....
Post a Comment