Photobucket Photobucket Photobucket Photobucket Photobucket Photobucket Photobucket Photobucket Photobucket Photobucket Photobucket Photobucket Photobucket

Showing posts with label holiday. Show all posts

Wednesday, November 23, 2011

Awesome Holiday Tutorials Feature!


With our fun Holiday Guest Tutorials it was too hard to resist asking Jenelle from Echinops and Aster to share about her holiday how-to series.  She's going to give you the short version on her awesome series so make sure to check out the whole thing for yourself!  Thanks so much Jenelle, we love your tutorials...I especially love that garland!

I am so excited to be joining in the fun today at Quilt Story and to have the chance to share my tutorials from the Holiday How-to Series with you! Thanks so much to Heather and Megan for inviting me over and for organizing their own great holiday series. With so many amazing ideas, I am quickly adding to my holiday sewing "must make" list.

Echinops and AsterI organized the Holiday How-to Series to be a month-long crafty celebration of the upcoming holiday season. During this November, I have been posting an original holiday-inspired tutorial each Friday that shares some of my favorite handmade ideas and techniques for the season. This week is the final week of the series and we'll be sending it off in style with a great gift-related tutorial (in case you'd rather skip the crowds this Black Friday). Plus, there will be an awesome giveaway from Sew Lux Fabrics! I hope you'll have the chance to swing by to check it out, but in the meantime, I thought I would share some pics and a little bit about the other tutorials in the series.

Merry Mushroom Felt Ornament Merry Mushroom Felt Ornament

I always find that when I make holiday decorations and gifts, it helps me to get into more of a festive spirit as I look forward to getting together with family and friends to open gifts, feast, and have fun! Each week I have tried to bring a little of that spirit into the tutorials, focusing on different ways to deck the halls or make a truly unique gift. During week one, I introduced the Merry Mushroom Felt Ornament pattern. This easy to sew ornament has a lot of personality and is really fun to customize using simple embroidery. As I have been making my mushrooms this year to give as gifts, I have been thoroughly enjoying adding little flourishes and choosing specific colors for each of the people on my list.

Detail of the Embroidered Snowflake Table Runner

During week two, I shared my tutorial to make the Embroidered Snowflake Table Runner. This is a really great project for anyone wanting to jump into quilting or embroidery for the first time or for those wanting to make a festive project that isn't a huge time commitment. I had so much choosing the fabrics for this project and really wanted to make mine more winter-themed so that I could continue to use it well past Christmas (although I am dying to see this made up using some of the great Christmas fabric that has come out this year!).

Mosaic

Finally, during week three, I introduced a project that would be amazing to make collaboratively with your favorite people this holiday season. The Homespun Holiday Garlands are designed to introduce some new craft skills into the mix (needle felting anyone?) while also making it possible for crafting pros and beginners alike to work together to make a beautiful finished product. This is also great scrap busting project that can be made using stray yarn and left-over strips of fabric, which means more money for your gift-giving or crafting budget, which we all like. :)

I hope that you have enjoyed seeing some of the projects I have been working on and posting tutorials for this November. Please feel free to stop by to check out the last tutorial in the Holiday How-to Series this Friday and to get all the details on each project shown here. Have a wonderful (and crafty) Holiday Season!

Photobucket

Monday, November 7, 2011

Tutorial: A Christmas Runner

Welcome to our first Guest Holiday Gift Tutorial!
Every Monday through December

At market in May Heather and I got to meet Amber from A Little Bit Biased.  As it turns out she lives very close to Heather and in the town that I grew up in :)  Anyway she is super nice, super talented and was one of the first people to come to our mind when we thought of doing a Guest Holiday Gift Tutorial series.  She designs really great patterns, Gigi's Thimble Quilt Patterns and makes darling projects, like this Candy Hearts quilt that I looooove.  Have fun with this tutorial!  Thank you Amber!!


I'm thrilled that Megan and Heather asked me to participate in their Holiday Gift Tutorials series.  In my opinion, there is nothing better than a handmade gift for the holidays.  So today, I thought I would share this festive table topper tutorial.  It's the perfect little project for using up scraps and it's sure to dress up any home during the holidays!
Finished size: 20" x 26"
Here's what you'll need: (20) 2-1/2" x 4" scraps of assorted green fabrics (15) 1-1/2" squares of assorted red fabrics for berries 1/3 yd. beige fabric for background 1/4 yd. red fabric for sashing 6 yds. green 5/8" wide ric rac 3/8 yd. red fabric for bias binding 2/3 yd. backing 3/8 yd. light weight fusible web (17" wide) such as Heat n Bond batting, 24" x 30" Let's get started! First you will need to trace THIS leaf template (20 times) and a U.S. nickle (15 times) onto the paper side of fusible web.  Roughly cut out each shape.  Iron (paper side up) to the wrong side of the appropriate colored fabric scraps.  Cut out each shape on the traced line (leaving the paper on at this point).
Next, from your beige colored fabric, cut three 3-1/2" x width of fabric strips.  Sub cut these strips into five 3-1/2" x 20" strips.  Fold one strip in half and press with a warm iron to mark the center.  Then fold in each end to the center point and press again.  Peel of the paper back of three berries.  Center one berry on each fold mark (the edge of each berry should be 1-1/4" away from the edge of the beige strip).  Press with a warm iron to adhere.
Peel off the paper back of four leaves and center on either side of each berry (edge of leaf should be 3/4" away from the edge of beige strip).  Press with a warm iron to adhere.
Repeat this process for the other four strips of leaves and berries. Once all of the leaves and berries are adhered, machine applique around each one using a small zig zag stitch and coordinating thread.
* I marked each of my strips with a number so I could keep them in order :) 
Set leaf/berry strips aside.  From your red fabric, cut three 2-1/2" x width of fabric strips.  Sub cut these into six 2-1/2" x 20" strips.  You will also need to cut ten 21" strips of ric rac.
Sew one piece of ric rac to either side of each red strip of fabric (using an 1/8" seam allowance).  The ric rac tends to fray so don't trim it until right before quilting.
Sew the strips together using a 1/4" seam allowance.  Alternate colors, beginning and ending with the red.  **Don't mind this picture, it was taken before all the leaves and berries were adhered and before the ric rac was sewn on - but it shows you the layout of the strips :)
Quilt as desired and bind with 2-1/4" bias strips.  You can check out my "Sweet Bias Binding Tutorial" on my blog for some tips!
I hope you enjoyed this project and tutorial but if you're still itchin' for some more red and green quilty goodness, check out my new Pretty Peppermints quilt pattern HERE. 
Happy Holidays to everyone
(and may there be lots of handmade goodies coming your way! :)
~ Amber
Photobucket

Friday, September 17, 2010

Hot Cross from Madame Samm

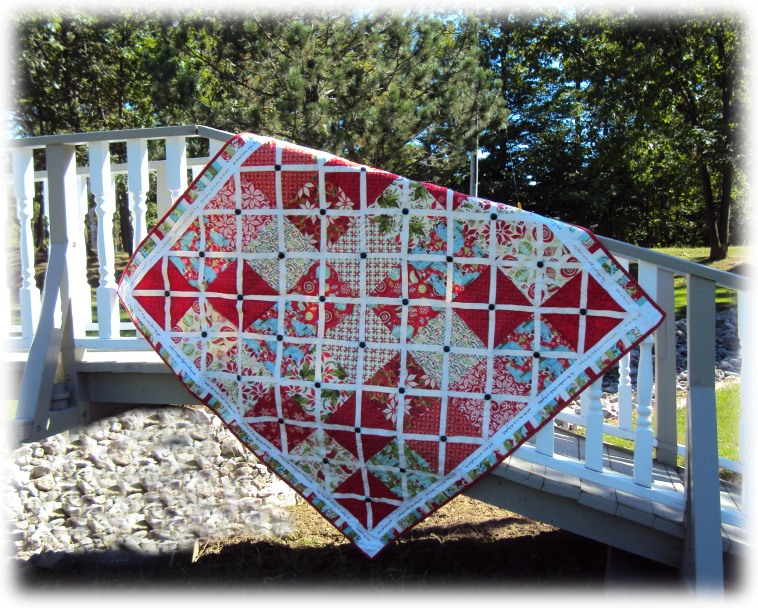
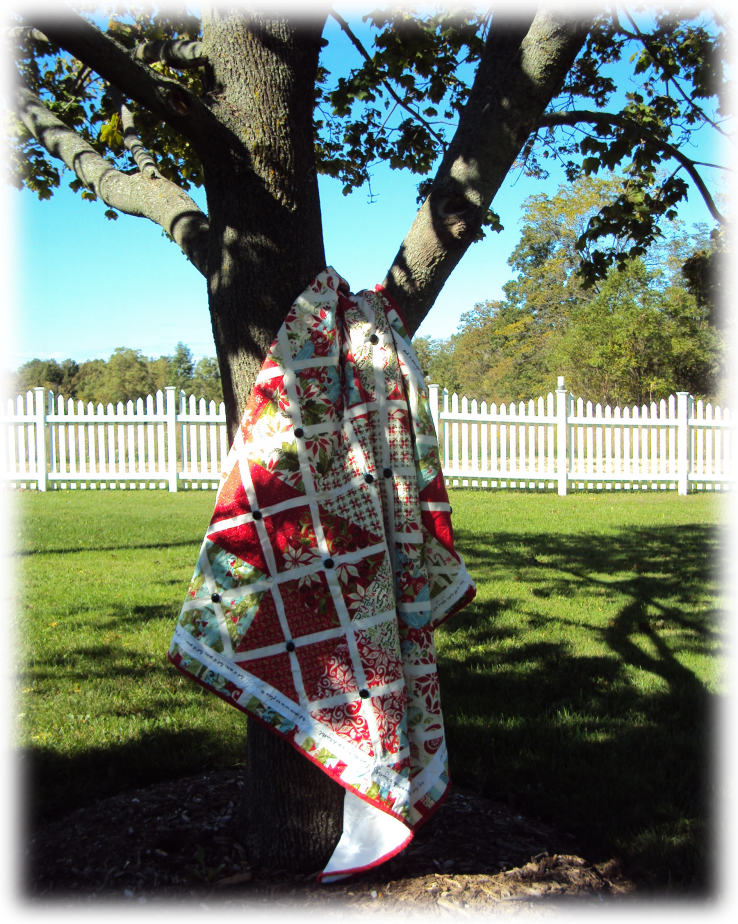
First, congrats to Madame Samm of Sew I Quilt for her 2nd place quilt win through Moda/Schnibbles Martingale Contest!!  It is an amazing quilt, she definitely deserves to be one of the winners.  And lucky us, today we get to see and read more about this oh so pretty quilt.  Also, make sure you stop by Sew I Quilt, and check out some of her great projects on flickr.

I just won today (Wednesday) the Moda/Schnibbles contest, came in 2nd overall~! This was my very first quilt, and my very first win. I chose Carrie Nelson's Hot Cross for a variety of reasons. I love them, they symbolize for me Christmas and they would go very well with 12 days of Christmas Fabric by Kate Spain. I added the lyrics of Let it Snow all around the quilt which I called the same. I added black patent leather buttons to represent raisins on the buns and to me it screams HOLIDAYS.
    I have already been approached for patterns and a book...I think some are possibly over the top excited, but really no match to the excitement of feeling like I sew belong to the Quilt World. My passion has been decades of sewing creatively in vintage design, home decor and a home wear line...'cause home is where you where them... I began as a doll maker and soon was sew inspired each time I placed orders for quilting fabric that I thought why not venture in the unknown , I am a quick learn...   
Sew here I am, now on my 3rd design, I hand quilt each of my quilts and even have time to make
halloween towels, runners and purses..
blessings madame samm
http://sewdollswhosnext.blogspot.com