Photobucket Photobucket Photobucket Photobucket Photobucket Photobucket Photobucket Photobucket Photobucket Photobucket Photobucket Photobucket Photobucket

Showing posts with label joel dewberry. Show all posts

Thursday, April 12, 2012

Pretty Pillowcase Tutorial


Welcome!  Today is my stop on the Festival of Half Square Triangles from Canoe Ridge Creations.  All month Megan (of CRC) has had tons of inspiring guest tutorials all using HST's.  Then starting next week you can link-up your projects that use HST's and are entered in to win awesome prizes.  Click here to find out more!

Ever wanted to know how to make a pillowcase?  Maybe a pillowcase with some pretty details or piecing?  Well look no further!

Pretty Pillowcase Tutorial
  • I will give instructions for two different pillows, a chevron pillowcase and a pinwheel pillowcase.  All fabric/cutting requirements are for a single pillowcase.  If you would like to make both you will need to double accordingly.
  • All seam allowances are 1/4".

Fabric Requirements
1/2 yard of a solid
*1/8 yard of print for band for pinwheel pillowcase
*Two 1/8 yard of print for band for chevron pillowcase
3/4 yard of print for main pillowcase

Cutting Requirements
Pinwheel Pillowcase
  1. Solid: 5.5" x 39" and 5.5" x 20.5" and 2" x 5.5" and two 1.5" x 5.5" and six 3.5" x 3.5" 
  2. Print for Band: six 3.5" x 3.5"
  3. Main Print: 25" x 39"

Chevron Pillowcase
  1. Solid: 5.5" x 39" and 5.5" x 19" and eight 3.5" x 3.5" 
  2. Print for Band: from each print four 3.5" x 3.5" squares, eight total
  3. Main Print: 25" x 39"

Create HST's using all the 3.5" x 3.5" solids and prints.  For pinwheels a total of 12 HST's.  For chevron a total of 16 HST's.  If you need help making Half Square Triangles I have a tutorial for the method I use HERE. Square each HST to 3" x 3".

Tip:  If you are new to HST's or still can't get it perfect I recommend cutting your squares a little larger than required, by 1/4".  In the end you can cut it down to size with a little trimming.  


Create pinwheels and chevrons pieces like below:


Piece together band.  Piece together first side to side and then top to bottom.

Note: Numbers shown below are the cut fabric requirements, not the finished sizes. I wanted you to know which pieces to use.

 click to enlarge

From here on out the instructions are the same for the pinwheel pillowcase and chevron pillowcase.  I will use whichever picture describes the instructions best regardless of design.

Now we put it all together.  This is what is known to me as the "burrito method".  What is great about this is it allows the band to be lined, but all of your seams end up on the inside.  There are 5 steps and photos below of each step.

Step 1: With the design on the top (important!) place the main pillowcase and band right sides together.
Step 2: Match the unfinished top edges of the band and main piece exactly together.
Step 3: Take the bottom of the main piece and carefully roll it up until you see about half of the band      underneath.
Step 4: Bring the band back over the rolled main piece.
Step 5: Pin the three edges together, taking care to keep all the unfinished edges matched.


Phew! We're almost there!  

If you have a serger I would serge along the pinned edge.  If not do as I did, sew a straight line and zig-zag over top.

Next pull out the main pillowcase piece.  You'll see how nice it looks!  Press entire piece.


the extra gray hanging out the bottom is the other pillowcase :)

Fold pillowcase together and sew along the bottom and side.  Again if you have a serger I would use it here or sew a straight line and zig-zag overtop.


Turn pillowcase right side out and press.  I top stitched along both the bottom of the band and top of the pillowcase.  It helps everything lay nicer plus adds a more professional look!


Done!!  I am so happy with how these turned out and am wondering what took me so long!! I can't wait to bust out a few more!

Please let me know if there are any issues with this tutorials. I will respond in the comment section.
Please give credit and link back to us if you use this tutorial!


Fabrics used: Denyse Schmidt's Aunt Edna print for main pillow, Joel Dewberry's Heirloom for chevrons and pinwheels, Kona bone for solid.

Linking to these parties: Finish it up Friday's at crazy mom quilts; Sew and Tell at amylouwho; Pity Party at Thirty Handmade Days; weekend wrap up at Tatertots and Jello.
Photobucket

Wednesday, September 7, 2011

She was angry that day my friends...

Feisty little girl, darling little dress!

This is my little Bo Bo, that is what we call her. She gets called a lot of things, but one thing you will not hear her called is sweet. She is feisty, stubborn, angry, funny, firecracker, aggressive. I had 3 daughters prior, and they are all the things little girls are normally called, but not this one...


We are not sure where we went wrong, but we clearly did something wrong!
Anyhow, we love her, adore her, and wouldn't change her. She makes us all laugh. We are encouraging her poor behavior. 

This was her first day of school, boy was she angry this morning!


Anyhow, my mother and I worked for hours and hours on this Izzy and Ivy Stella dress. How cute is it! Izzy and Ivy patterns I have said before are really easy to follow. It did take us (my Mom and her free labor) forever, but we were never lost or confused on what to do next. Fabric is Joel Dewberry's latest heirloom. Pretty!


I take it back, when she is not around family, people say she is sweet and kind and nice.  It always baffles me!  

We also have these fun "sprinkles" from Izzy and Ivy. Fun tags for your creations!


Are they not the cutest???


Won't it make gift giving that much sweeter?  Here some more information from the Izzy and Ivy gals:

"One package has 11 size labels, you get 2 of each size for a total of 22.  The  sizes are 6mo, 9mo, 12mo, 18mo, 2, 3, 4, 5, 6, 7, and 8.  There are 4 different “handmade” labels, in different sizes, you get 8 of those and last but certainly not least you get 1 Izzy label! That’s 31 damask woven labels! The fact that their labels are woven means they won’t fade, shrink or bleed.  They come packaged in a super sweet cupcake container, perfect for giving or if you are like us, just looking really cute in your studio."


And they come in these little cupcake containers! 

We have 2 cupcakes full of tags to give away to two our our readers.

Just tell me if you have a feisty child like mine, or just let me know of you really want a "Sprinkles" cupcake. I think we will choose who makes us laugh the most!

Thanks!
Photobucket

Tuesday, September 6, 2011

The Girl Who Quilts cute gift quilt...

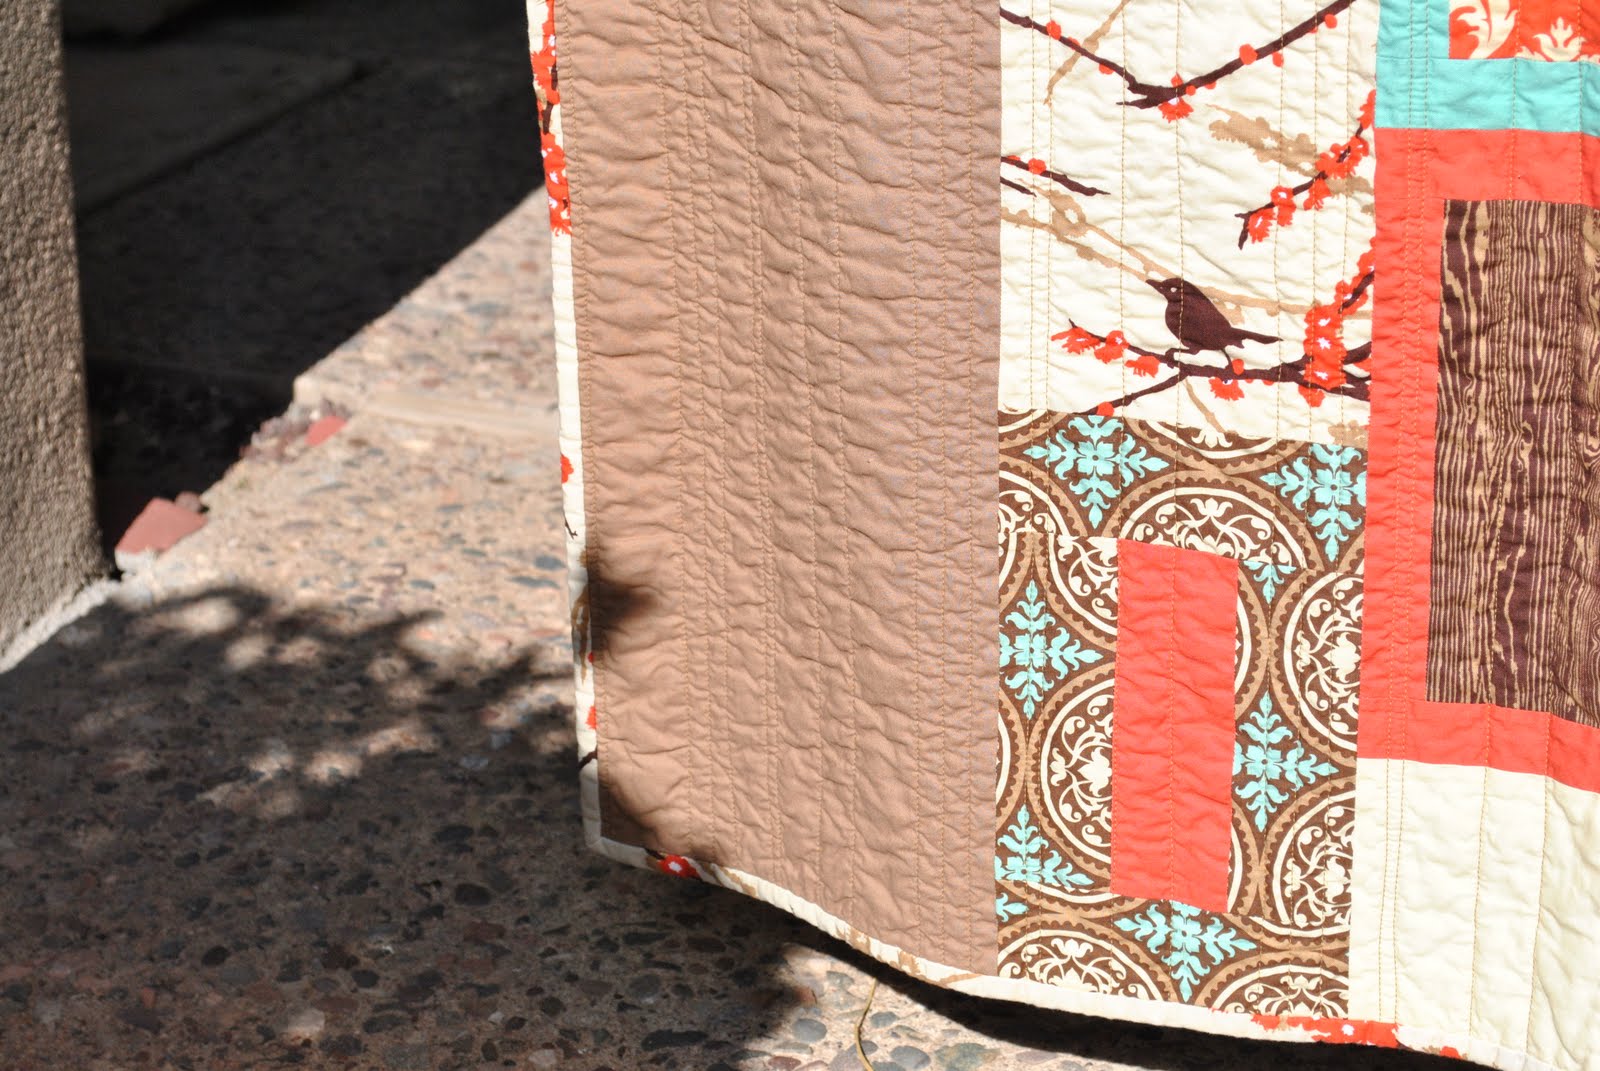
QuiltyGirl from "The Girl Who Quilts" made this darling quilt for her step brother. Be sure to see her blog, she has some great tutorials, I like her straight line quilting on a short arm tutorial. These are her Scrap projects, love these! Make sure to check her out and say "Hi!"

This is a new finish, and one that I'm especially proud of. My step brother recently got married in Phoenix, AZ. As soon as I found out that he was engaged, I starting thinking about quilt designs. I initially thought of using some cute camper fabric to make him and his (now) wife a quilt to keep in their vintage Streamline  camper. But it seemed too kitschy for them, so at the last minute I decided on a color stack of Aviary 2 by Joel Dewberry.
I had less than a month to make the quilt, plus pack up our house for a cross-country move! So I quickly got started on the design, even before the fabric arrived.
My first thought was to make a square-in-a-square quilt, as the set of solids and prints work well for that design. But then my mind drifted to a brick layout. Soon I had combined the two ideas, only to realize that 10 fat quarters were not going to stretch very far. That's when I started to envision a brick path, with solid on either side. What better style for a wedding quilt, than a path?!?
And that is how "What Lies Ahead" was born!
(The quilt is wrinkled and wonky in the photos because it was packed in my luggage for nearly a week before I shot these pics.)
 The solids are Free Spirit solids. Having only worked with Kona solids in the past, I was excited to give these a try. I really liked working with them! I love the almost dusty appearance in the coloring, and they are very soft.
 I intended to use the cream solid for the background, but I couldn't find enough yardage online. I ended up using the Camel color, and I'm really glad that I did.
 For quilting, I went with simple straight lines using a thread that matched the Camel solid almost perfectly. (Total coincidence, that's what I had on hand!)
 Gifting a quilt always makes me nervous, and this was no exception. I had never been to Phoenix before the wedding, nor did I know what my step brother's town home was like. Had I known much about the culture or his home, I don't think I would have considered gifting a quilt! The Phoenix area doesn't seem to have embraced handmade goodness like other parts of the country, and my step brother's house is very modern.
I'm happy to say that they loved the quilt, though! They even commented that it looked like something straight out of Anthropologie. That I will take as a compliment. ;)

Photobucket

Thursday, December 16, 2010

HST Quilt Finish!!


I finished my HST quilt!  (That's the best name I have)
Happy day.

Click here for HST Quilt Tutorial Part 1
Click here for HST Quilt Tutorial Part 2


The quilt is made entirely of Half Square Triangles.  I am very pleased with how it turned out!  It is a Christmas gift, I can't wait to tie a bow around it :)


I straight-line quilted it.  It created a cool pattern that I wasn't expecting, see those four squares? I love it!  I stitched about 1/2" on each side of each of the large outer squares.


I don't particularly love the backing (especially seeing it held up like this), but it is cool how you can see the design on the white.


I went with the picnic plaid for the binding.  At first I thought because the background was white that it wouldn't stand out enough for me, but I think it compliments the style of the quilt.  It definitely is contrasting, but it doesn't pop, which I think is great for this colorway.


I put this on my baby almost 2 year old {major sigh} and he seriously said "cheese!".  Seriously Ollie!!  So stinking cute.


Finished Quilt Size: 50" x 60"

Fabric line: Modern Meadow 2 by Joel Dewberry and 100% white cotton
I got all of this gorgeous fabric from Treasure Bay Fabrics

Materials needed: Refer to Part 1 of the tutorial for a complete list

Quilting: Straight-line

*Please let me know if you have any questions or if anything is unclear.
*Please send us pictures of your finished quilt!  We'd love to see!  We're working on a flickr account where we can all share, but for now send us an email myquiltstory{at}gmail{dot}com


Wishing you the best this holiday season from sunny Arizona!


Photobucket