Photobucket Photobucket Photobucket Photobucket Photobucket Photobucket Photobucket Photobucket Photobucket Photobucket Photobucket Photobucket Photobucket

Showing posts with label hst. Show all posts

Wednesday, May 7, 2014

Tube piecing. Fun technique...

Have you guys tried the "tube" technique? It is a simple technique with jelly roll strips.  Pretty simple and fun, with a lot of options. 

I found this tutorial, from Missouri Star Company on the technique. Watch it, it's cool. 


What you are left with is a bunch of blocks like these. They you basically have "cooler" half square triangles, with all the layout possibilities. 


I did this zig zag chevron pattern. I really like it. Problem is, I didn't make many blocks. I was just planning a few decor items for my living room, but I changed my mind on colors. So now I am not sure what to make with them. Too small for a quilt. Not the right colors for a pillow or mini...hmmm.. I guess it will just go into the pile of UFO's and one day, hopefully, I will come back to it. 

Try it!
Photobucket

Wednesday, January 16, 2013

Seaside Stitches zig zag quilt...


Tina from sea side stitches created this bright colorful zig zag quilt. I have been wanting to make one of these zig zag quilts forever! I love the rows being the same print. This quilt just really makes me happy! Check out all these finishes! That is one busy lady! Be sure to visit her blog!

I finished three small quilts this week, and this is my favorite!


For my lecture on Modern Quilting, I wanted to show how nicely all the designers play together.

Lots of girls: Valori Wells, Pamela Mostek, Martha Negley, Pat Bravo and Amy Butler.
And some boys, too: Kaffe Fassett, Joel Dewberry and Philip Jacobs.

I'm really happy with the way the color progression worked out, and I think it would make an awesome Blooming Nine Patch, too. Although, HST Zig Zags are a lot easier to make than BNP.

I had a big piece of this orange solid for the back, but I was wishing it was a little paler. The soft stripe worked pretty well for the binding.

For the quilting, I first quilted in the ditch along the zig zag, then went back and quilted both sides of thatline, riding along the edge of the walking foot. The best part of edge to edge quilting is not having to bury any thread tails!

Photobucket

Monday, June 18, 2012

Charm Pack Quilt from Katie Mae Quilts


Last week was busy for Heather and I.  Heather was on vacation with her family and I was hosting our mom, dad, a niece and nephew!  Phew!  Sorry for not getting the winner of the Skye Reve Fabrics $25 giveaway as promised.  Drumroll....


Kirsten N said...
I like the Secret Garden bundles - the blues are so lovely.
Congrats Kirsten!!  It's always fun to see familiar readers win. Send us an email and we'll get you your prize!!  Now for the feature...

Sweet and simple quilt today from Kate of Katie Mae Quilts, a quilt that she made from a QAL.  I love the colors, so sweet, perfect for a girly :)  Kate is a mom, wife to a military man and has two cats, as she describes one annoying and one fat! :)  She's got a great list of her finishes and soon to be finishes...see her Tops Waiting to be Quilted, Finishes 2008-10, Finishes 2011 and Finishes 2012 for some great eye candy!

I don't have a song title name for it yet, but I'm taking suggestions.
It was started over the summer (with the actual quilt along) but obviously wasn't a priority until I made it one.
I wanted to avoid the bulky seams, so I quilted straight lines in the white. It's bound with rick rack (so fast and easy!)
 It's 70x70", made with Deb Strain's Love U and white Kona.
The wind didn't think I should take a flat picture of the back. It's lemon Kona and that random yard of Love U.
And now it's off to my niece, who instantly declared anything pink and butterflies as hers.


Photobucket

Monday, May 21, 2012

HST Doll Quilt from Plum and June


Happy Monday! :)  Sometimes the simplest quilts are the most interesting!  I love this doll quilt by Beth from Plum and June.  And it's her first go at HST...I would not have guessed! Stop by Plum and June, I was just going through her last few posts and saw some really sweet baby quilts!  I love this quilt she entered into the blogger's quilt festival and this simple patchwork quilt...cute stuff.  Thanks again Beth! 

I finally tried making Half Square Triangles and now I know what all the fuss is about!  They really are fun and easy to put together.  Whoever came up with the right sides together, draw a line down the middle, sew two lines, and cut was genuis! 

I used this charm pack from the "big order" from months ago that I had regrettably prewashed.


Made one and squared it:


Made many more and squared them:


Then I just started arranging and rearranging and mixed in some of the now completely gone solid yardage that I had in my stash (actually, I had to cut some off one of my WIPs - Yikes!) 

And, the Sun and Water Blocks doll quilt was born (have I mentioned that my kids name the quilts???)

I'm again not sure this is exactly my aesthetic but I guess my aesthetic is growing.  And I really enjoyed the HST method so I think when my new fabric order comes, I'll make another one. 

This was another doll-sized, stroller-size quilt.  I like making this size because it can be done in a few nap times, allows me to experiment with new techniques, and it is actually the most practical size for me right now - great for the stroller and floor for the baby AND great for my older girls for their dolls and for gifts for other little girls who love getting things for their dolls.


Photobucket

Friday, April 27, 2012

Fabulous I*Spy from Kelsey Sews

Today is a great quilt and sweet story from Kelsey of Kelsey Sews.  I really love I*Spy Quilts and being a mommy of little ones I really should take the time to make one! Especially with so many darling novelty prints out there...I've got to do it.  Kelsey uses great prints and I think she found a great balance in making it a fun kid's quilt but it's still very pretty and not too "childish".  Visit Kelsey Sews for regular inspiration on quilt blocks, WIP's Wednesday and other fun sewing things...like this Bookshelf Modern Mini!


I've posted a bit about it before, but my husband's cousins have two adorable little girls and we spend time together every Friday night.  They were over at our house one day (which they find boring since we don't have cable or kid stuff haha) and I was trying to think of something for us to do.  We were down in my sewing space and I decided that I'd pull out the charms I got through the I-Spy Charm Swap and we could lay them out and play a little game.  That was when E informed me that it was almost her birthday and sweetly requested that I use these "pretty fabrics" to sew her a quilt as a present.  Melted my heart!! So the only logical thing to do was start planning and cutting.  

I have a tutorial *almost* done so hopefully I can get it up later this week - but I just couldn't wait to share the quilt until then.

Without further ado - The I*Spy Quilt!

I*Spy Top
Top & Back
Quilting

Top

I used 96 different charms and combined them with Kona White for the background.  I had the different colors of polka dots in my stash (they're from Connecting Threads) and backed it in purple gingham by Michael Miller and bound it in a Bella purple (not sure the name).

This was also the first big project I free-motion quilted on my home machine!  I won't deny that I need some more practice but once it's all washed and crinkly everything fades together.  I will definitely be doing some more FMQ at home soon.

The gift was a huge hit, she loved it and snuggled up with it that night!! Her older sister also informed me that if E didn't like it that she'd take it :) - Guess I better get working on a quilt for her too!

TUTORIAL FOUND HERE.
Photobucket

Wednesday, April 25, 2012

Star Crossed Quilt from Don't Call Me Betsy

Elizabeth from Don't Call Me Betsy is no stranger to us...and probably not to you either...her work is fabulous! We're constantly checking out her cute stuff for inspiration! :)  One of my favorite things Elizabeth has done is her Kaleidoscope QAL...so cute!!!  Make sure to stop by Don't Call Me Betsy and her pattern shop, love this one!!

I am so excited to share the finished quilt with you!  This is definitely one of my favorite finishes in a while, thanks to the fun I had quilting this one and the great texture the quilting created.  I love densely quilted quilts like this one, so I'm quite sure it's going to be one of my favorites for a while to come.

Star Crossed Stitch quilt - unwashed full shot
before washing

Star Crossed Stitch quilt - washed full shot
after washing
A while back, I fell in love with a block I saw in a copy of Jinny Beyer's The Quilter's Album of Patchwork Patterns, on loan from the library, and sketched it out in my sketchbook.  Many months later, back in January, when the fabulously talented Betz White sent me some of her fantastic organic line of fabric for Robert Kaufman, I revisited the sketch and decided to finally make the block.  I called it a Star Crossed block, as it felt like a fab combination of a star and cross block, and I slowly started working on this quilt bit by bit, in between what feels like a zillion other obligations that I can't share yet.

I was super excited to finish this quilt...until I realized that I didn't have a clue how I wanted to quilt it.  Usually, I don't make that decision until after I see the finished quilt top.  When I looked at this quilt top, I just couldn't seem to decide.  I wanted to do something other than my usual smooth stipple, and I thought a pointy stipple would be fun, but rather than mocking it up to see how it would look, I just went for it.  Whoops.  I hated it.  Intensely.  So much so that I ripped it all out.  Note to self: always mock up the quilting.  Always.  (ETA: All I do to mock up my quilts is print out a photo and draw out my FMQ design on it with a highlighter.  It's uber-low-tech and fast.)

IMG_8059
before washing

Somehow or another, I got baptist fans on the brain, and just couldn't let go.  So I did them.  And they were really fun to do!  The way I stitched these fans is indeed in a continuous line, with one start at the beginning of each row of fans and one stop at the end.  I'm putting the finishing touches on a tutorial of how I did this quilting to share with you all tomorrow, so stay tuned for that. 

IMG_8056
before washing
I'm so happy I went with my gut and ripped out the pointy stipple quilting stitches I started with.  I'm also really glad I tried a new style of quilting, even though I really thought it was going to be either too difficult or too tedious.  Trying something new can be so much fun!

Star Crossed Stitch quilt - washed detail #1
after washing
Thanks again, Betz, for sharing some of your lovely fabrics for this project!

Quilt Stats
Name: Star Crossed Stitch quilt
Block PatternStar Crossed block
Size: 34" x 44"
Fabrics: Betz White's Stitch Organic collection for Robert Kaufman along with some coordinating fabrics from Just Dandy, Katie Jump Rope, and So Sophie
Backing: Remants from Betz White's Stitch Organic collection
Quilting: All-over baptist fan free motion quilting (tutorial coming tomrrow!) by yours truly
Binding: Scrappy binding, using remants from Betz White's Stitch Organic collection, hand finished
Photobucket

Saturday, January 28, 2012

Tutorial: Friendship Star Block

Hope you're enjoying your weekend!  We've got a simple tutorial to share with you today, the Friendship Star.  We shared this tutorial several months ago on Chasing Cottons and hadn't put it onto our blog yet! :)  This is a simple and fun block to make for a sampler, swap or repeated in a quilt.  What makes this star a little unique is I fussy-cut the center square...you can't go wrong with Heather Ross!

Cutting requirements
see image below
Solid background: two 4.25" x 4.25" squares for HST and four 3.5" x 3.5"
Contrasting pinwheel: two 4.25" x 4.25" squares for HST
Center: one 3.5" x 3.5"


HST (half-square triangle)
Draw a line from corner to corner on both solid background pieces.


Sew 1/4 inch on each side of the pencil line, then cut down the pencil line.


Square the HST's to 3.5"


Piece together in rows first, always using 1/4" seams


Then rows together!
Voila!  One 9.5" x 9.5" finished block

Do you have a quilt block tutorial??
Make sure to link it up to our Block Tutorial Link-Up!

Photobucket

Thursday, January 19, 2012

A Quilt for Baby Belle

Warning: Picture Overload

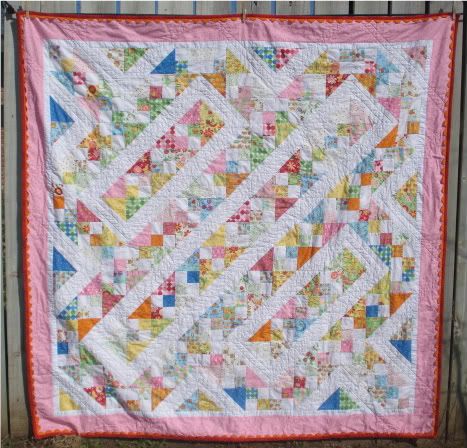
I've got another quilt finish (Megan), so I had to sneak in my own feature :)  My sister-in-law just had her first baby, a sweet baby girl Annabelle.  I called my SIL a few months into her pregnancy and asked her what colors she liked.  She said she was really into yellow, pink and brown.  Well just prior to that Heather and I got the whole line of Just Dandy.  Perfect right?  Except that I had the blue/green colorway and Heather took the pink/yellow colorway.  AND I had already used mine on these messenger bags.  Sigh.  After a lot of pouting and bribery (and more pouting) Heather gave me some.  I don't think there could have been a more perfect line!


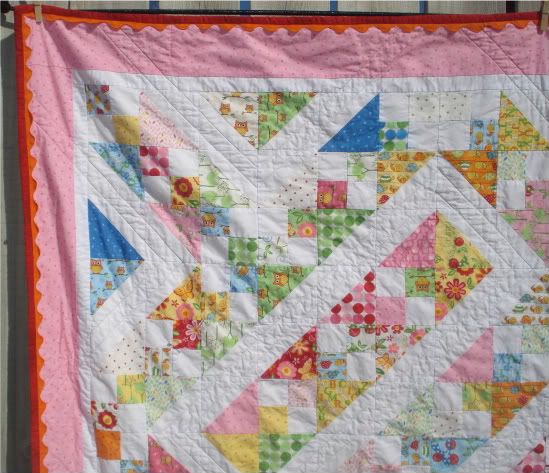
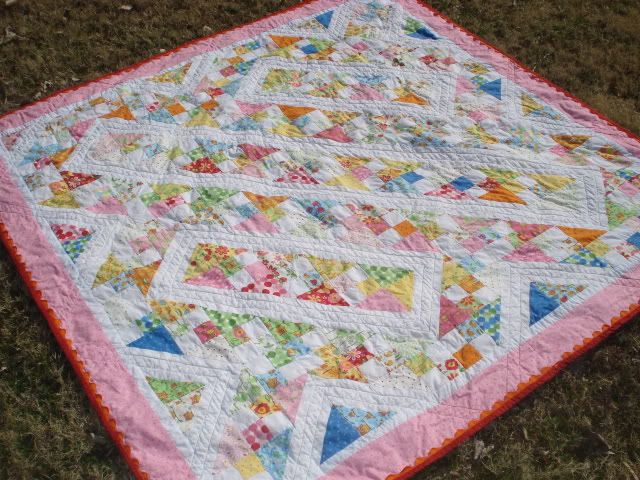
I went through several designs with this, all of them were HST though :)  At one point it was a zig-zag quilt.  Ultimately I settled on this design and I liked having the pink/cream double hourglass to offset the yellow.


I used some leftover Peacock Lane for binding. I need more of those fabrics, amazing for the stash, seriously.


I also gave baby Belle Lola's Quilt :)  I figure if I ever have a girl I will want to do all pink/red/purple for her.  Already having two boys I literally have blue and green in every room.


I used Joel Dewberry's Heirloom for backing.  I straight stitched about 1/4" on the sides of the seams.  It made a neat pattern and I love the six-pointed stars in the middle.


Next I had to make her one of my Carseat Canopy's from Oh Baby!.  I used felt for the flowers and added a pearl in the middle.  I loved working with so much pink!  Here's the supplies you need for the flowers:


Two colors of felt, scissors (these teflon Havel's are my fave...they're really really good!), glue gun and disappearing ink pen.  I used the cup opening for the lighter pink and large circles, cut 4.  From the bottom of the cup cut the darker pink, cut 4.  Fold in half twice using the glue gun to keep in place. Arrange like below and add a pearl or two to the top!  Ta-da! How's that for a mini tutorial??


I also made her a nursing cover with Midnight Garden from Michael Miller.  Those come together fast...some boning and D-rigs and you're good to go!  Got to have one of those right?


I made an extra flower with a hair clip on the back.


Seriously it was so much fun to make girl stuff!  And it felt nice to go "overboard" since it was for a niece...now to get to meet that sweet baby girl!  They're in Florida and we're in Arizona, so it may take some time but it'll happen. Until then Skype will suffice.

Thanks for stopping by!

Photobucket