Today I am going to do my best at giving you a tutorial on paper piecing. There are a ton out there, but I remember when I was first looking, I couldn't find a tutorial that made it crystal clear to me. Hopefully at least I can answer those questions that I had, for you here today.
We have had a our block of the month series, and for September we are doing paper piecing. So here goes...
First, you will need a template. There are a million online. I chose The Lone Starburst from Six White Horses. You will need to download the template and print it. For this block, I had to print 4 copies.
Start with segment A, each segment will be numbered through 7. (or different for what you choose to make)
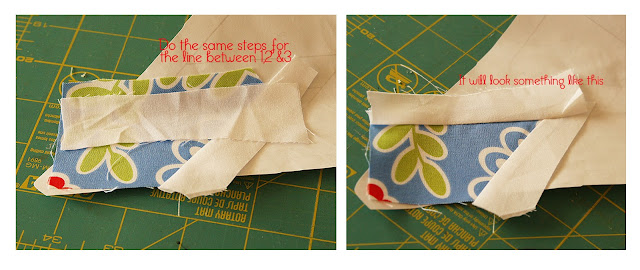
The basic idea here, is that you are sewing the finished block to the back of the template. One numbered space at a time.You need a scrap of fabric that is at least 1/4" bigger than space 1, on each side of all the black lines. (including the left bottom that isn't covered in the photo.) Place wrong side of fabric to the back of the template covering space 1. Now you need a scrap of fabric for space 2. (that will cover space 3 and 4 by at least 1/4" too) . You place fabric for space 2 right sides together with space 1 fabric, stitch, then fold space 2 fabric over space 2. See below.
(if that seemed wordy and confusing, hopefully the photos will clear it up)
By putting your scraps up to a window, you will be able to see that both the scraps of fabric go into space 2 by at least 1/4". After you stitch the line, you will fold and space 2 fabric (white) over space 2. See below.
Here is the back of the template now (finished side of quilt block). Now trim 1/4" from stitch line, fold over and iron into the next space. You will do this for all numbered template spaces.
If you are doing this at night, or don't like holding it up to the window, you can fold along the line you will be stitching. This lets you see where you need to place your next fabric scrap. (be sure place scrap at least 1/4" over the fold)

Continue for all numbered spaces. You are ready for the last step.
When you are done, it will look like this. Trim 1/4" from template edge. This pattern has the 1/4" seam allowance grayed out. Not all patterns to this, so make sure you leave that allowance for when you sew the whole block together.
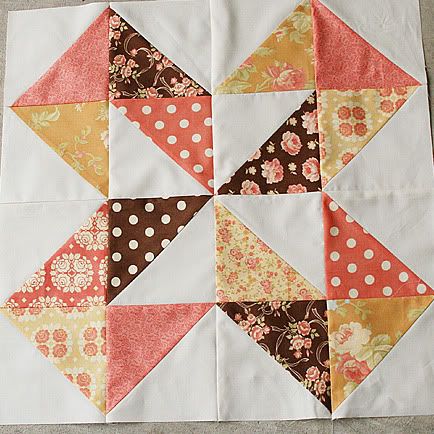
Looking nice and sharp. Do this for all segments of your block. This one has 8 segments.
Getting pretty? Now arrange them, and sew together with 1/4" seam.
This is what your back looks like. Now you get to tear off all your papers. Be careful, you don't want to stretch your block, or tear out stitches. I never have too hard of a time doing this, the lines are already torn a bit by your stitches.
You are finished! Let me know if you have any questions.



















20 comments:
That's so pretty
I love paper-piecing and your tutorial is great! I really like the block you used because it is simple, but when all 4 pieces are together it makes a stunning star block!
Looks very clear and easy! Thanks! Beautiful block! x Teje
Great tutorial... I like to use Carol Doak paper and a Add a 1/4 ruler when I do mine.
What a beautiful block. I see so many paper pieced blocks out here in blogland = especially Jackie of Canton VIllage. Anyway I'm so afraid of trying them, BUT, I've bookmarked your tutorial for the day that I get the courage (and time) to try it. Thanks for an easy to follow tutorial =D
And you make it look so easy as well as gorgeous! I'm including your tutorial among my zallion links to free patterns and tutorials! I'm sure there are a lot of quilters that have been afraid to try..and this might just give them enough hints to get them going. Thanks, ladies!
Thanks for the tutorial. I'm really new to quilting (still working on my first), and paper piecing has had me pretty puzzled as a concept. This definitely clarified it for me. Now it actually looks like something I might want to try!
Wonderful tutorial! I love it :)
You sure make that look easy!
Gosh I am months behind on this!! I think I may start again with other fabrics. Some of my blocks have come out at different sizes! =D
thanx! you've got a great tute here ... i don't remember anyone mentioning using a light box. that one thing should make my fp much, much better!
Great tutorial! It was very clear and I love that you put it up to the window to show everything that was going on!
Thanks for the tutorial! I'm also so inspired by paper piecing, but haven't tried it yet. This is my very favorite paper pieced pattern, so I'm for sure bookmarking this. It looks like such a great way to use up all those little scraps I just couldn't part with!
Great tutorial! I am going to add it to my paper piecing links page, I hope that is OK. I think many beginners will find this really helpful
Great tutorial... I like the pictures that you made - there are almost no more words needed...
You might want to try a slightly thicker needle (No. 12 instead of No. 10) and a smaller stitch length than the usual setting... you will find out that ripping away the foundation is a piece of cake afterwards!
Oh cool! I've never done paper piecing but have always wanted to, maybe now I actually will! Thanks for the tutorial :).
I love your tute. I am learning paper piecing and love it.
Thanks,
Stephanie
Thanks for the clear and easy instructions. I think I might actually have to try paper piecing for my next project, now :)
Pretentious and not at all welcoming. Show us something truly livable. Something for the real world. Decor that is serviceable.
Love this paper piecing block!
Post a Comment