Sara from Sew Sweetness created this super duper darling Heather Ross quilt I am SO jealous of! I love it. She has so many of Heather Ross prints that are super hard to find, and if you do, you will have to sell an arm and a leg to get them. Make sure to check out Sara's blog, really cute stuff!
I just finished my Heather Ross quilt and I couldn't be more excited! A small group of us banded together for a Heather Ross Quilt Along. Some people used other fabrics than Heather Ross, which was just fine! Everyone in the group was so supportive of each other...it was amazing! The tutorial used was the Boxed In quilt pattern by Freckled Whimsy. I also used this McKinley quilt tutorial from OCD: Obsessive Crafting Disorder for the sashing and the lovely band near the bottom of the quilt.
So, first of all, I could not have made this quilt without my friend, Kim, who sent me pieces of her entire Heather Ross collection, including bits of Munki Munki pajama pants. Kim is so generous and selfless, it's unbelievable. She sent me both of the goldfish prints and some dots for Christmas, and the rest later when we decided we were going to make this quilt. As a matter of fact, her grandson is due any day now, and look at the cute little Heather Ross outfits she just made for him!
 |
| Outfits that Kim made for her new grandson! |
And as a matter of fact, Kim's daughter-in-law joined the quilt along, too, and she started on a Heather Ross play mat for the new baby! Isn't it the cutest?!
 |
| Heather, the mother-to-be, is working on this quilt top! Isn't she amazing?! |
Oh man, I've got the warm and fuzzies now. :-) Anyway, so my quilt, I just finished it. I used Heather Ross fabrics for the inside of the squares (no print used more than once), for a total of 42 blocks. For the outside of the squares, I used a variety of Kona solids in really bright colors. Along the way, I hemmed and hawed about the use of these solids, but seeing the finished quilt, I think I made the right choice.
 |
| Spray basting the quilt in my grandmother's living room, because she has the space for this, lol! |
For the back of the quilt, I used a polka dot cotton shower curtain that I got at Target on clearance for only $7! The shower curtain was 72" x 72", so I made it a little bit bigger by cutting it and adding strips of Heather Ross Mendocino prints in pinks and orange.
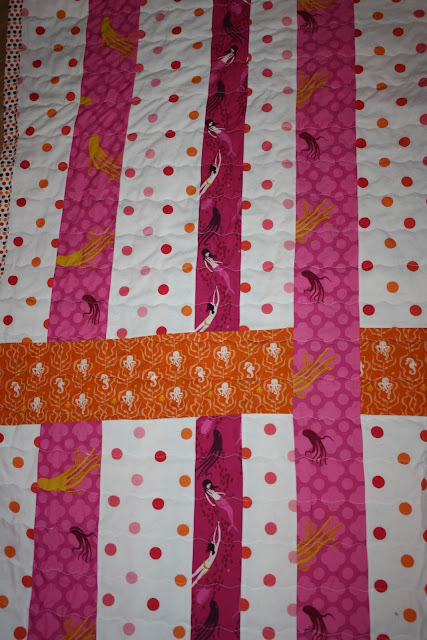 |
| The back of the quilt: mermaids and octopi and seahorses, oh my! |
This was a very easy quilt pattern to assemble. Easy, but beautiful, and the added tutorial from OCD: Obsessive Compulsive Disorder has a great impact, I think. If you're new to quilting, this would be a great quilt to start out with. I like that the blocks are wonky, but if you are more of a symmetrical girl, you could also make one like Heather did for her baby's play mat. I quilted it using wavy lines, 2 inches apart, thanks to Megan at Canoe Ridge Creations, who helped me out and answered all my questions after I saw her Sliced Coin Quilt. Wow, thank goodness for those wavy lines, I only had to quilt in one direction. The one part I hate about making quilts was accomplished much faster! Yay!
I bound the quilt using four different colorways of Heather Ross dots from the 'Lightning Bugs and Other Mysteries' line. I didn't have enough to do the binding in one single color, but I think it's sort of cool with the alternating dots.
 |
| My daughter, Violet, and I enjoying the quilt. |
The best part about this quilt is that I used so many different tutorials to make it...it just goes to show what an inspiration all the blogs out there in blogland are! Everyone is so creative and individual!
I'm so happy that this is finished...now on to the next quilt!!




















5 comments:
I love that quilt Sara!!!!!! Heather's will be finished now that the baby is here and I need to finish mine :o) Really beautiful!!!!
Really a great looking quilt...lots of happy colors!
Fabulous job, Sara! Your masterpiece's layout reminds me of a wall in an art gallery featuring each little print showcased in a colorful frame. Great choice in binding, and the creative backing is so fun! The wavy quilting adds the perfect touch. Well done!
Wonderful!
I love it! Great work!!! :)
Post a Comment